Grand Willys Project - Page 181 - AUSJEEPOFFROAD.COM Jeep News Australia and New Zealand

Go Back   AUSJEEPOFFROAD.COM Jeep News Australia and New Zealand > JEEP GARAGE > Jeep build up
Register Forums Trading Your Jeep My Garage Mark All Read

Post New Thread  Reply
 
Thread Tools Search this Thread
  #1261  
Old 15-11-2016
CJ6np435's Avatar
CJ6np435  CJ6np435 is offline
Lowranger Shocker
 
Join Date: Oct 2003
Location: Hobart TAS
Age: 62
Posts: 1,679
What Jeep do I drive?: CJ
Likes: 41
Liked 133 Times in 100 Posts
Default

was talking to a Willys owner at the 75th, he was using the cable system, and said it worked reasonably well, I'm looking at upgrading the CJ linkage to a YJ setup, just because it's easy to do, but the mid mounted motor and TJ setup would be the go, the wipers work real nice have a good arc and park at the bottom of the windscreen, but with the Willys 2 piece? windscreen, might be a challenge to get the linkage to work.
__________________
Not another V8!
Likes: (1)
  #1262  
Old 26-11-2016
Gojeep's Avatar
Gojeep  Gojeep is offline
LokRinger
 
Join Date: Jul 2002
Location: Victoria
Posts: 6,878
Likes: 792
Liked 1,769 Times in 560 Posts
Default

Quote:
Originally Posted by CJ6np435 View Post
was talking to a Willys owner at the 75th, he was using the cable system, and said it worked reasonably well, I'm looking at upgrading the CJ linkage to a YJ setup, just because it's easy to do, but the mid mounted motor and TJ setup would be the go, the wipers work real nice have a good arc and park at the bottom of the windscreen, but with the Willys 2 piece? windscreen, might be a challenge to get the linkage to work.
Thanks for the info.
__________________
Cheers, Marcus.

My web site:
http://willyshotrod.com Over 5'000 Club
  #1263  
Old 26-11-2016
Gojeep's Avatar
Gojeep  Gojeep is offline
LokRinger
 
Join Date: Jul 2002
Location: Victoria
Posts: 6,878
Likes: 792
Liked 1,769 Times in 560 Posts
Default


Time to finish off the top half of the extra B pillar.


I could just fit it over the top much like the factory did it, but it would be an overlap.


Decided to sit it in under the existing pillar. Hides the factory join on the bottom which was rather ugly. Will clean up the look of those deep spot welds though and the brazing you can still see in the original join.


You will only see the last part of the curve at the top. Filled the old spot welds and join with weld after grinding out the overflowed brazing.


The rest of the outer panel was fully welded in first before the pillar was welded in behind it. That was so I could fully planish the weld and panel as no access after the pillar gets welded in.


Pillar blends into the top of the upper frame well enough.


This side all done.


I was levering off the original pillar behind the weld so I could stretch the metal back flat again by hammer on dolly from the outside. A quick mark can make it easy to know that you are in exactly the right spot on the inside.


Other dollies or spoons were at the wrong angle to get in between the pillar and body work on the inside, so quickly made up this to get into the exact position that I needed. Was made the right thickness at the end to fit between the pillar and outer panel so I could hammer against it to planish the weld seam


Other side done.


The two B pillars have been fully spot welded to each other to form one strong pillar. Will reduce flexing and give a solid mount for the seat belts too. Both will still need to have a panel made to cover them and have the adjustable upper seat belt mount integrated. Bottom seat belt mount has already been made for the inertia reel to be mounted flush into it, same as the donor.
__________________
Cheers, Marcus.

My web site:
http://willyshotrod.com Over 5'000 Club
Likes: (7)

Last edited by Gojeep; 14-08-2017 at 05:54 AM.
  #1264  
Old 10-12-2016
Gojeep's Avatar
Gojeep  Gojeep is offline
LokRinger
 
Join Date: Jul 2002
Location: Victoria
Posts: 6,878
Likes: 792
Liked 1,769 Times in 560 Posts
Default


Time to fit the upper seat belt mounts. I had already cut the bottom mount out from the donor B pillar when I built the Willys one. Can see how the inertia reel sits recessed into the pillar. This also tells me the height the top mount needs to be from the floor as I am using the donor floor, seat mounts and seat in the same position.


Cut the mounts from the donor and will weld them to some thicker plate. Regulations here require a minimum of 75x50x3mm, (3"x2"x1/8"), backer behind the panel for the seat belt mounts. I have made mine a bit bigger to suit where I am welding it in.


Bevelled the front face to get full weld penetration into the B pillar.


Will sit exactly inline with the bottom mount.


Fully welded in and filled the bevel with weld and still left the front face flush.


Other side done. Good to have a record of anything important like this, that will be covered later, so the engineer can see how it was done.


Can see how it will sit once completed. This B pillar passes right through the floor and is part of the body mount that will attach to the chassis. I need to be able to get to the top of the body mount for fitting and removing the body later on, so a recess was always needed anyway.


Mocking up the final part of the B pillar. Will use the original Willys one for the door side on the pillar.


Still use my little vice folder as is handy for little spots like this where my big one wont fit.


Widened it to cover the new double width it now is. Got to use my spot welder again to make this a quicker job. You can see also the channel that the tack strip sits in for the windlace in the original part and why I wanted to keep it.


This is how it will sit. All the holes are where I will plug weld it to the flange on the B pillar. The door side I will be filling the holes where I had drilled out the original factory spot welds.


Plugs welds done. Might also notice extra ones around the upper seat belt mount. This is where I added extra thickness on the back so it won't crush due to the thickness of the lap joint each side of it.


Sits nicely out of the way.
__________________
Cheers, Marcus.

My web site:
http://willyshotrod.com Over 5'000 Club
Likes: (9)

Last edited by Gojeep; 14-08-2017 at 05:59 AM.
  #1265  
Old 17-12-2016
Gojeep's Avatar
Gojeep  Gojeep is offline
LokRinger
 
Join Date: Jul 2002
Location: Victoria
Posts: 6,878
Likes: 792
Liked 1,769 Times in 560 Posts
Default


Decided to make new bracing for the rear wall as wanted extra ones for the bigger cab. Folded up some galvanised sheet I had picked up off the street many years ago. For the ends I will fold the vertical tabs outwards just using pliers and turn the centre part down.


A bit neater and stronger with the ends done this way. The outer tabs are where I plug welded them to the underside of the main brace.


Even though it wasn't done this way factory, I have plug welded the braces to the rear wall for extra stiffness and to stop any vibration. I have 4 across the back now instead of the original three to help even more. The wall was zinc coated before adding the braces on top.


For the upper braces I need to clear the flange of the main brace. Just taped one gauge thicker pieces of scrap above and below where the step needs to go.


Clamped it hard in the vice and it created the step. I gave a quick extra hit with a bolster on the scrap piece to define the step a little more.


One little step formed. The other side will be done as well.


As any plug or spot welds would be visible in the upper section of the cab, because temperature changes would pull on them, I built the brace so it can be welded to the inside window flange instead. The extra bracing on the underside is to stop any flex as the radius around the window pressing stops me getting right up close.


The brace is plug welded on the inside of the window frame and will be sanded smooth. It is also plug welded the the main brace and the top roof frame. A automotive adhesive and sealer was also added under the brace flanges.


I can tell you this is one stiff rear wall now. Originally these were never upholstered and just painted body colour. I will be fully covering it with a heat and sound barrier and then fully lining it in matching upholstery to the rest of the cab. The inside will not be the utilitarian theme of the outside, but of the 2008 Jeep Grand Cherokee donor instead.
__________________
Cheers, Marcus.

My web site:
http://willyshotrod.com Over 5'000 Club
Likes: (10)

Last edited by Gojeep; 14-08-2017 at 06:05 AM.
  #1266  
Old 09-01-2017
Gojeep's Avatar
Gojeep  Gojeep is offline
LokRinger
 
Join Date: Jul 2002
Location: Victoria
Posts: 6,878
Likes: 792
Liked 1,769 Times in 560 Posts
Default

Back from holidays after seeing Christmas and the rest of the year out while camping by a river in the bush. Nice way to spend the hot summers days away from the hustle and bustle.
Been hard in the workshop since back though with it being 38*C/100*F inside!
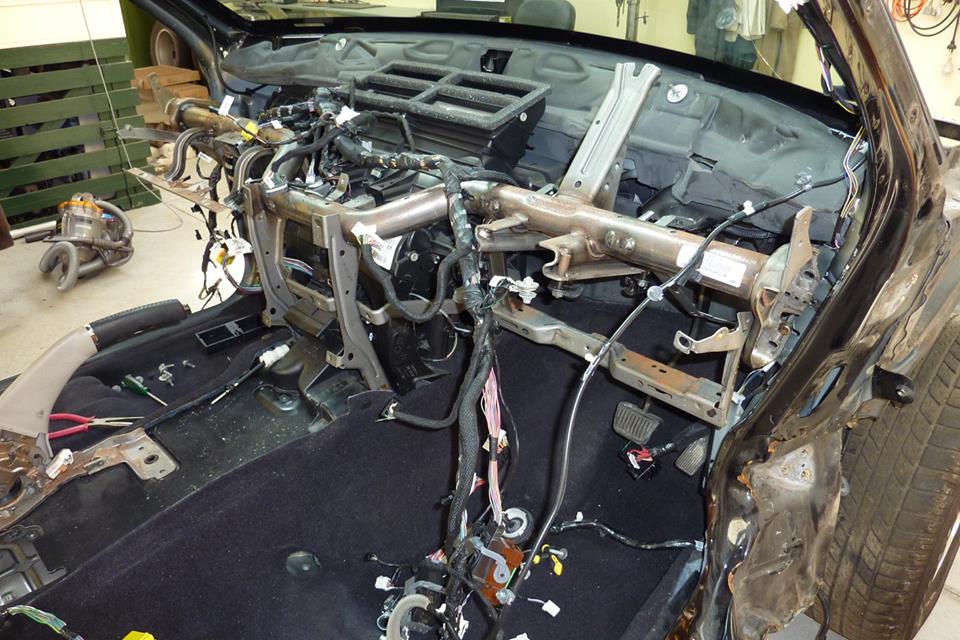

As I will be using as much from the interior as possible from the donor, I will be adding this support frame that goes from A pillar to A pillar. It took some of the impact from the Harley hitting it side on at 100mph, so needed some straightening first on the end bracket and lower frame.
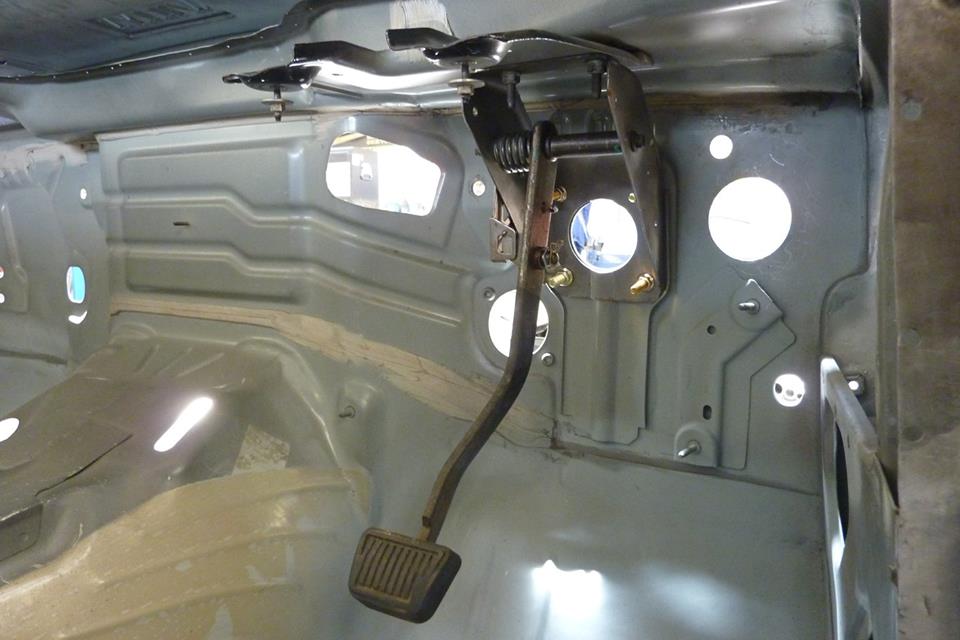

I fitted the brake pedal as it bolts between the firewall and the lower cowl as I wanted that to be at the correct height. Can also see the two studs that the support frame I am adding next bolts to.
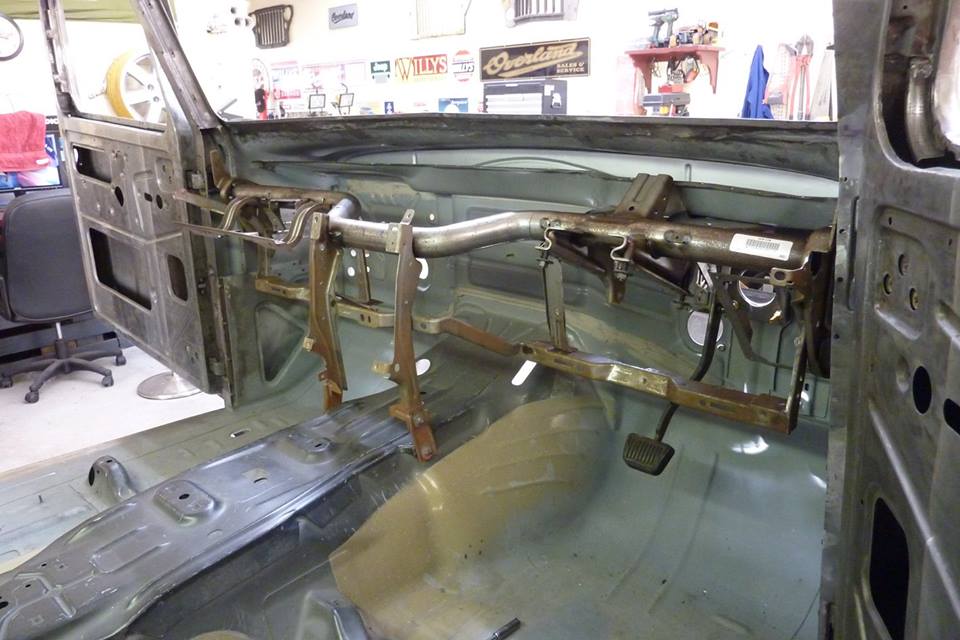

After straightening the frame I could bolt it into the lower cowl and also the studs on the transmission hump. The tube is very strong and did not bend in the impact. It is 52x5mm-2"x5/16" mandrel bent tubing. The frame holds the steering column, satnav, climate controlled air-conditioning, glove and fuse box etc.
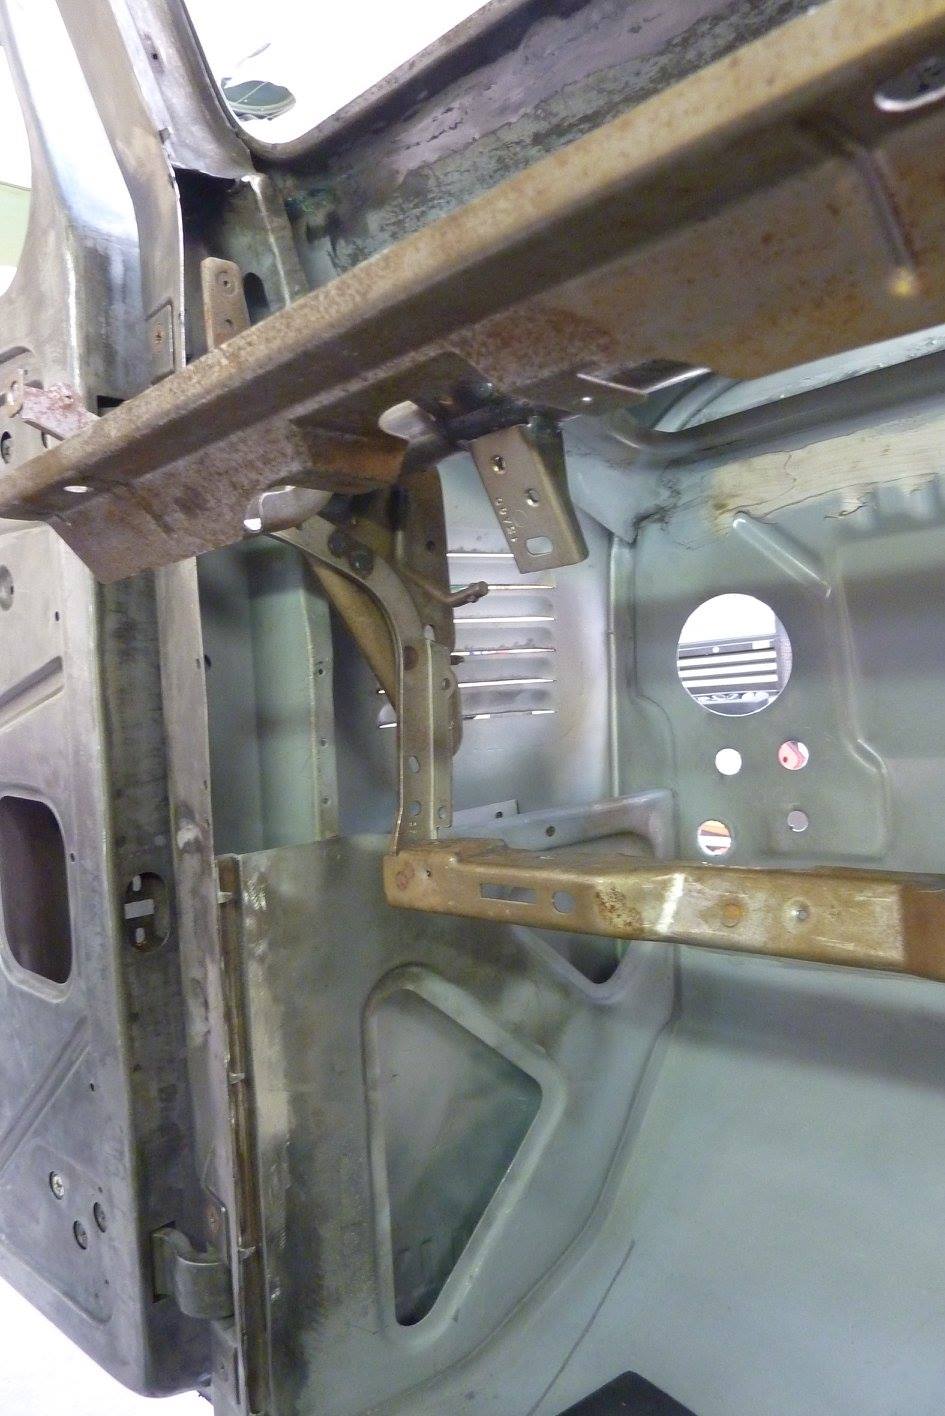

Can just make out the vertical face of the main mount for the frame over by the louvers. I will have to add something to stretch from the A pillar right to the firewall. Going to utilise the tag that is in the middle of the A pillar as well for an extra mount.
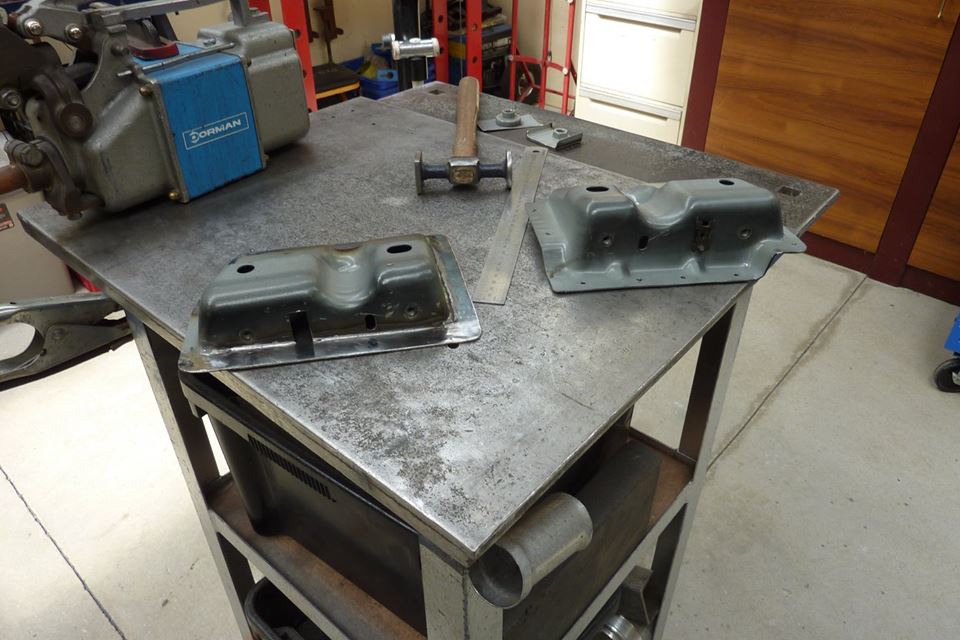

I had kept the original donor mounts for this purpose but have to modify them to suit my setup. Can see the stock one on the right and how I have altered the other one.
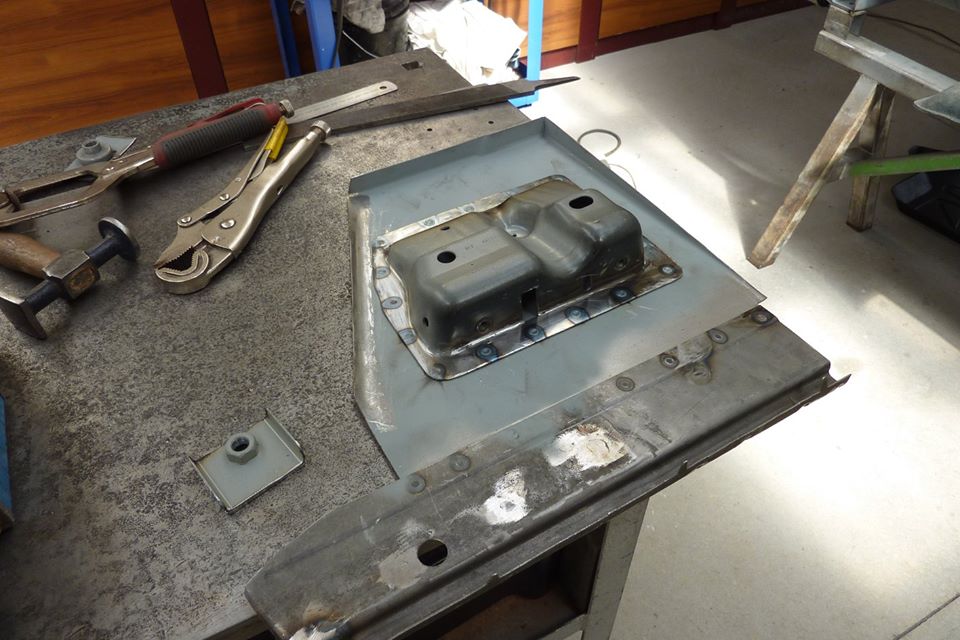

I have bent up a new upper panel out of 1.2mm-18g sheet to take the mount. Spot welded it to the original A pillar piece from the Willys. Decided to add an extra mount also for the frame and the captive nut will get welded behind the hole which will be inside the A pillar itself.
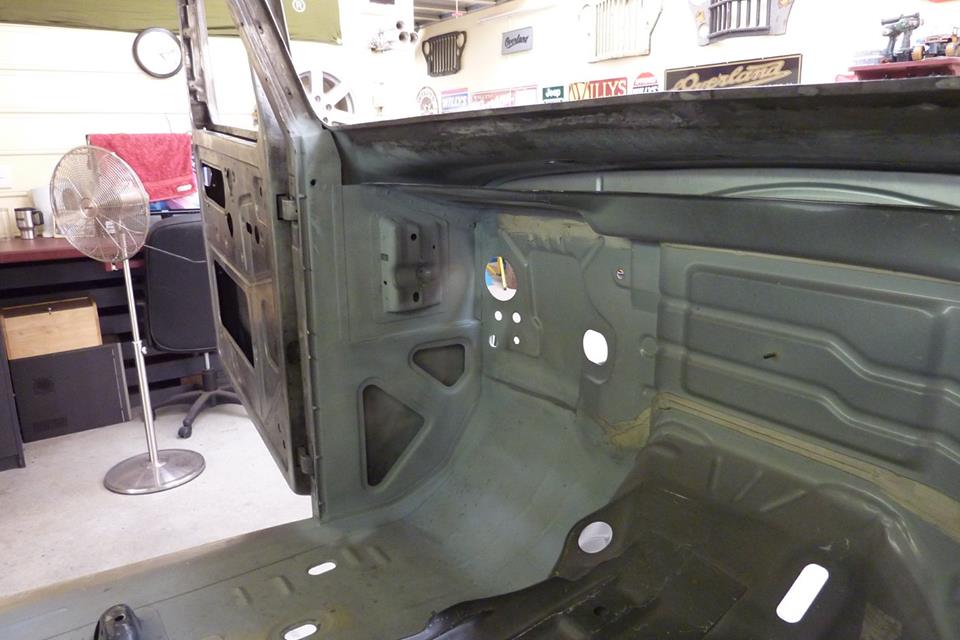

This adds a lot of strength to the A pillar to take the weight of the longer doors I have. The panel is plug welded to both sides of the A pillar and also to the firewall and lower cowl and kick panel.
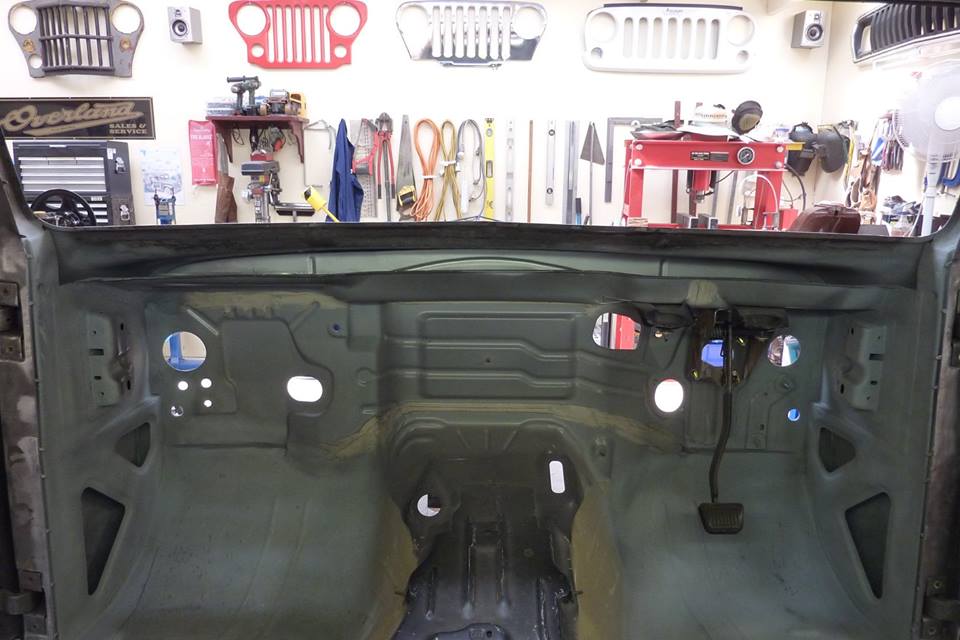

Both sides now done. Next will be to make a filler panel between the lower cowl and the upper one as all has to be sealed off for my fresh air intake which draws fresh air in from the louvers I cut into both cowl sides.
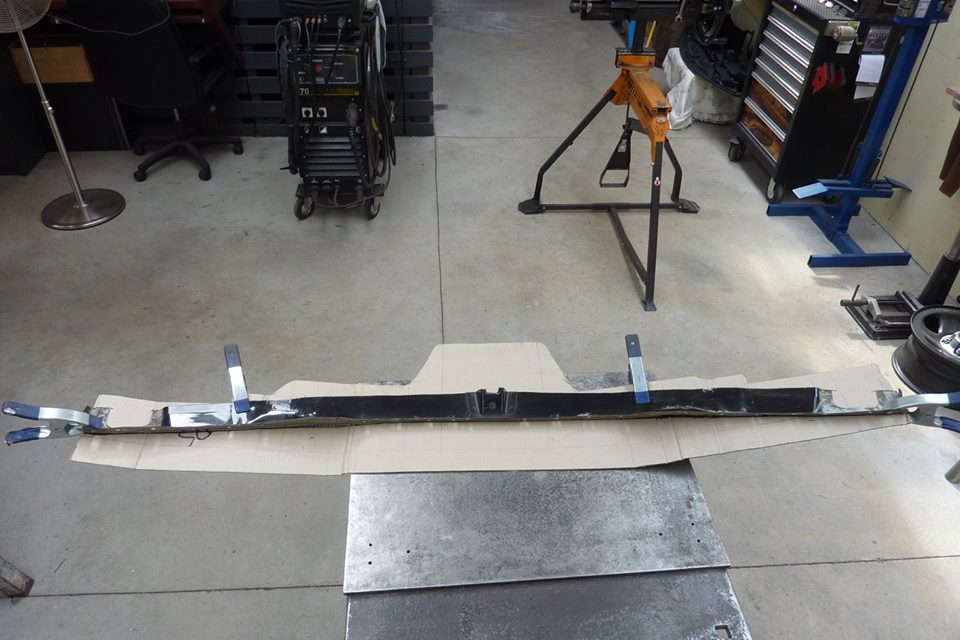

I had only this piece left from the donor cowl that attached to the lower and think it will be just enough. I traced its outline onto some cardboard so I would have somewhere to start.
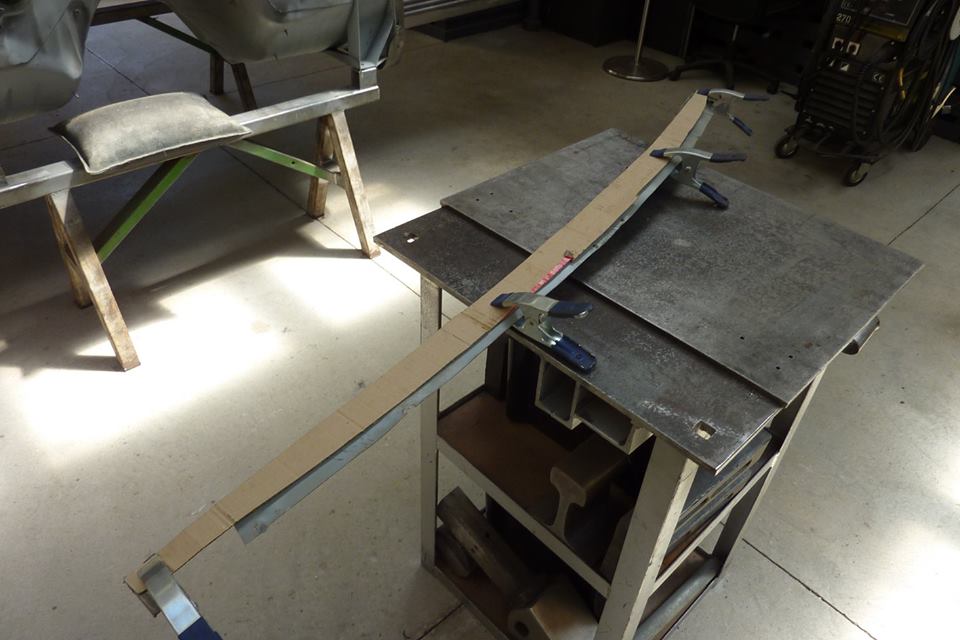

My CAD, cardboard aided design, will give me a line on which to tip a flange across the top under the Willys cowl.
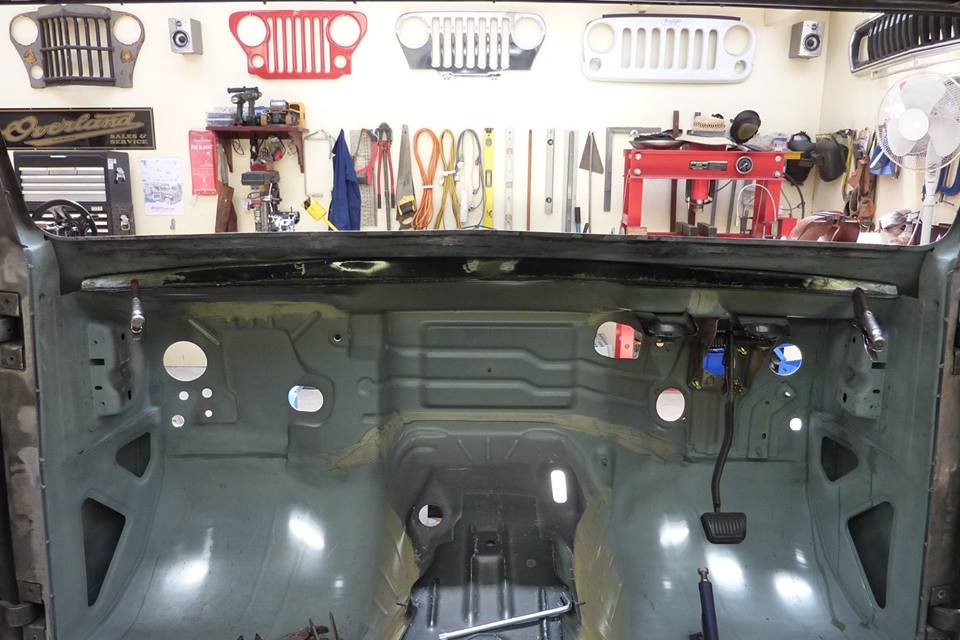

It is getting there. That thick white sealant is not my work BTW. It is factory Jeep work from 2008!
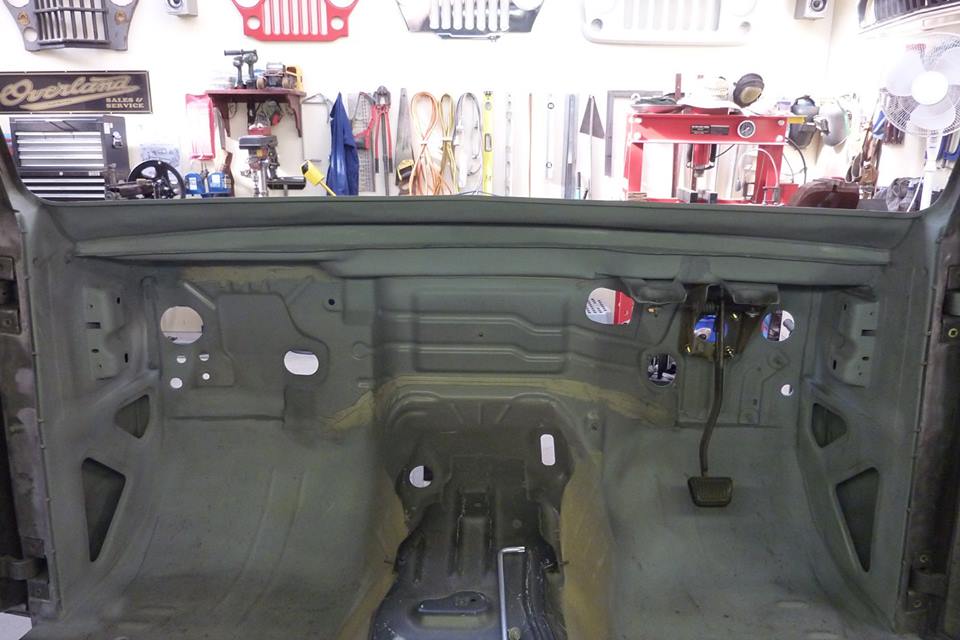

The piece has now been spot welded again to the lower cowl and glued with panel adhesive to the underside of the Willys cowl.
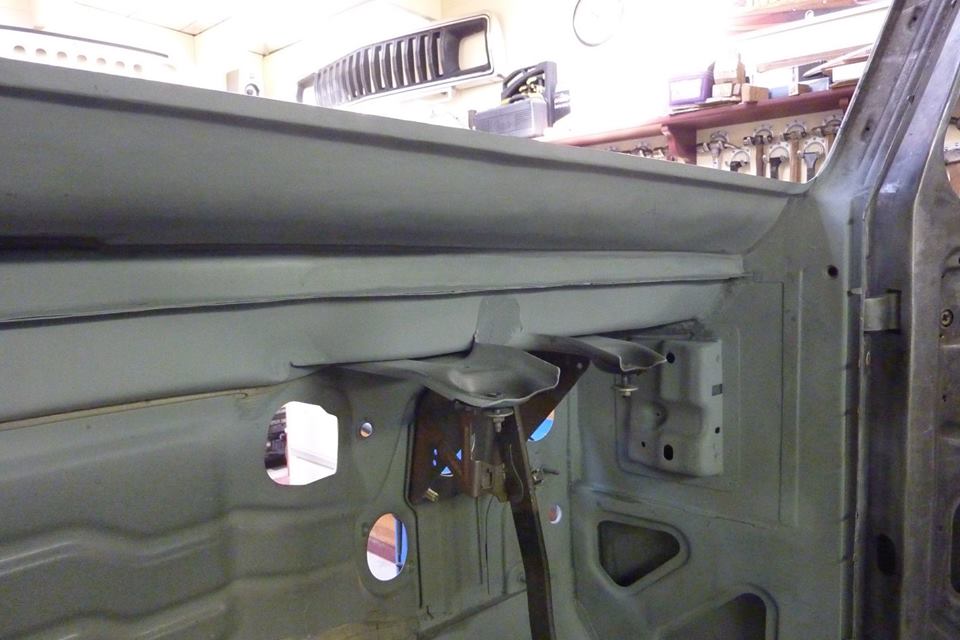

The ends have also had patches shaped and welded into the new piece of the cowl and the A pillar.
__________________
Cheers, Marcus.

My web site:
http://willyshotrod.com Over 5'000 Club
Likes: (6)

Last edited by Gojeep; 14-08-2017 at 06:23 AM.
  #1267  
Old 09-01-2017
bodgie's Avatar
bodgie  bodgie is offline
Rock Munki
 
Join Date: Aug 2009
Location: Castle Hill, NSW
Posts: 2,137
What Jeep do I drive?: WG
Likes: 11
Liked 300 Times in 245 Posts
Default

It will bei nteresting to see how this all goes together. Do you reckon there will be many challenges to address to make it look as good/factory finished?
Post New Thread  Reply


Posting Rules
You may not post new threads
You may not post replies
You may not post attachments
You may not edit your posts

BB code is On
Smilies are On
[IMG] code is On
HTML code is On


All times are GMT +10. The time now is 09:16 AM.


Advertisements


AJOR does not vouch for or warrant the accuracy, completeness or usefulness of any message, and are not responsible for the contents of any message. The messages express the views of the author of the message, not necessarily the views of AJOR or any entity associated with AJOR, nor should any advice be substituted as technical advice replacing that of a mechanic. You agree, through your use of this service, that you will not use AJOR to post any material which is knowingly false and/or defamatory, inaccurate, abusive, vulgar, hateful, harassing, obscene, profane, sexually oriented, threatening, invasive of a person's privacy, religious, political or otherwise violative of any law. You agree not to post any copyrighted material unless the copyright is owned by you or by AJOR. The owner, administrators and moderators of AJOR reserve the right to delete any message or members for any or no reason whatsoever. You remain solely responsible for the content of your messages, and you agree to indemnify and hold harmless AJOR, the administrators, moderators, and their agents with respect to any claim based upon transmission of your message(s). The use of profile signatures to intentionally mislead or misdirect any member on this forum is not acceptable and may result in your account being suspended. Any trip that is organised through the AJOR forum is participated at your own risk. If you or your vehicle is damaged it is your responsibility, not that of the person that posted the thread, message or topic initiating the trip, nor the organisers of AJOR or moderators of any specific forum. This forum and associated website is the property of AJOR. No user data is harvested and no information supplied in your registration will be sold for profit.


Powered by vBulletin® Version 3.8.7
Copyright ©2000 - 2024, vBulletin Solutions, Inc.

AJOR © 2002 - 2024 AUSJEEPOFFROAD.COM. All corporate trademarked names and logos are property of their respective owners. Ausjeepoffroad is in no way associated with DaimlerChrysler Corporation or Fiat Jeep.
www.ausjeep.com www.ausjeep.com.au www.midlifemate.com ausjeepforum.com www.r9kustoms.com
vB Ad Management by =RedTyger=