KK: In Dad's memory - Page 8 - AUSJEEPOFFROAD.COM Jeep News Australia and New Zealand

Go Back   AUSJEEPOFFROAD.COM Jeep News Australia and New Zealand > JEEP GARAGE > Jeep build up
Register Forums Trading Your Jeep My Garage Mark All Read

Post New Thread  Reply
 
Thread Tools Search this Thread
  #50  
Old 05-01-2019
Pilch's Avatar
Pilch  Pilch is offline
I just registered
 
Join Date: Apr 2010
Location: Melbourne
Posts: 21
What Jeep do I drive?: KK
Likes: 0
Liked 4 Times in 4 Posts
Check out my Ride(s)
Default

Great build so far Marcus. Really like the attention to detail you are applying. I'm going to do the LED headlight conversion to my KK also, and was contemplating the rear door modification the other week, so your write-up is very useful. If you haven't already done it you may want to move the accelerator pedal out, a nice little change and would compliment the footrest you fabricated nicely.
__________________
'10 KK Cheroke
Likes: (1)
  #51  
Old 31-01-2019
Gojeep's Avatar
Gojeep  Gojeep is offline
LokRinger
 
Join Date: Jul 2002
Location: Victoria
Posts: 6,870
Likes: 789
Liked 1,754 Times in 556 Posts
Default


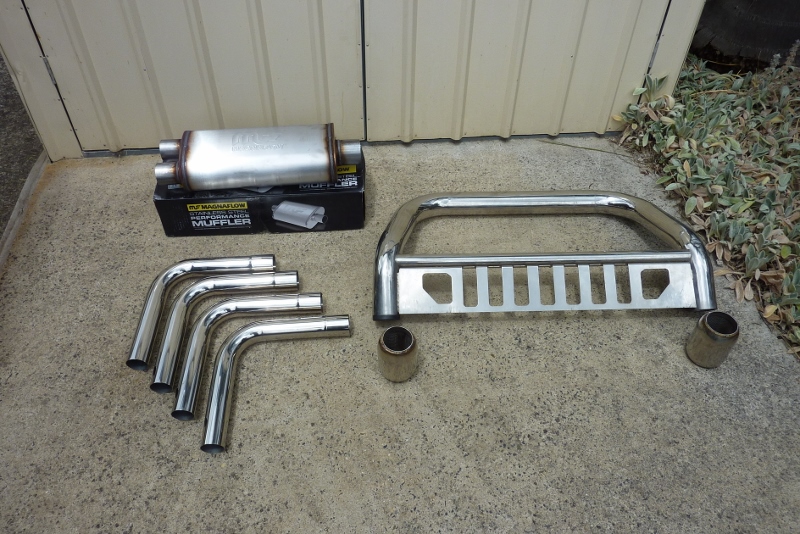
The Jeep is a bit breathless at higher revs, especially while towing in the hills. So going to upgrade the exhaust from the cats back using dual 2.25" tubes from the cats back and into the muffler. I'm using the Mopar nudge bar that came on it, to make the 3" stainless tail pipe along with left over resonators from the 5.7 HEMI system on the Willys.
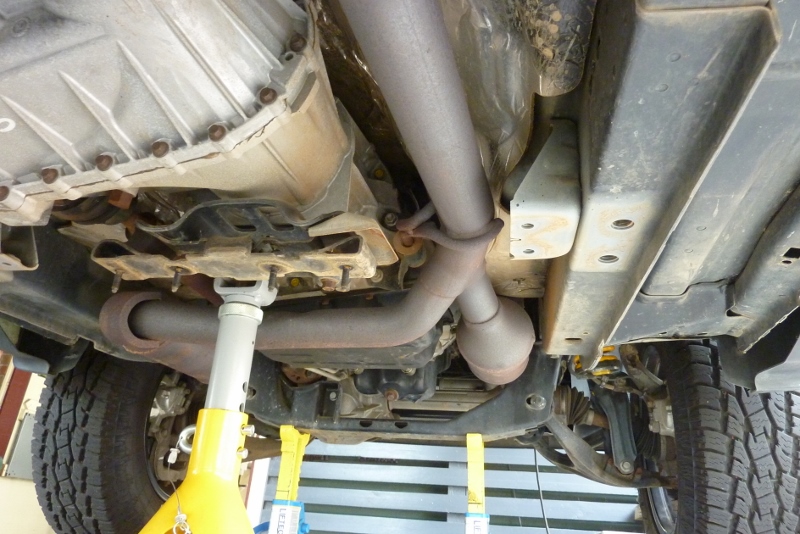

The hard part is going to be getting two 2.25" tubes through the gap after the merge next to the gearbox mount.
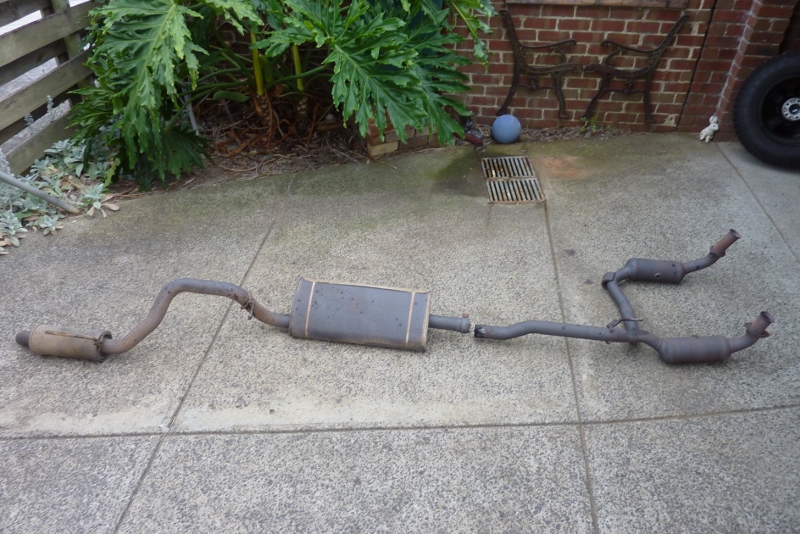

This is the stock complete system. The down pipes and out of the cats is dual 2.25" tubes. Then they merge in a short distance into only 2.5" the rest of the way. That is 38% smaller tube before the exhaust volume has had time to shrink after being heated by the engine and the cats!
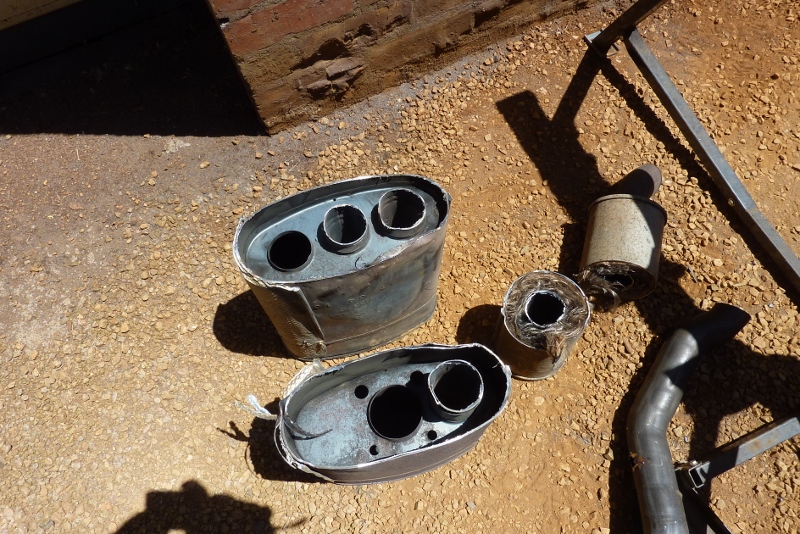

I cut the stock muffler in half to show how restrictive it is. I show a cutaway of one to show how they work. The resonator on the other hand is not a restriction at all, apart from the factory tube size, as it is just a straight through design with acoustic material. Cutting it off the end of the stock exhaust will give you no performance gain at all.
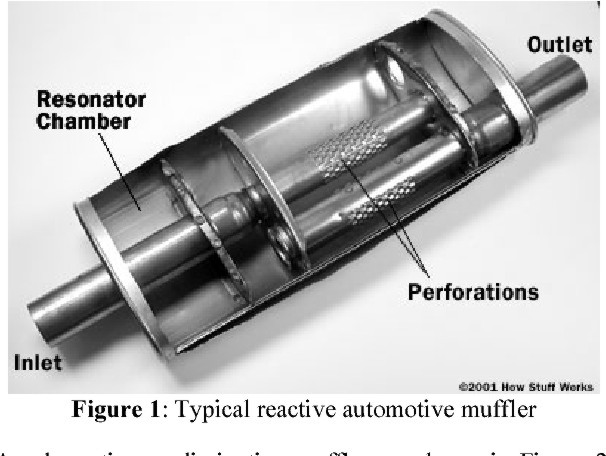

This is the same as the stock muffler and the exhaust enters on the left in the middle and slams into the other end of the muffler. Then has to find its way up the left side of the muffler before hitting the next chamber. Then eventually across to the right hand side and out!
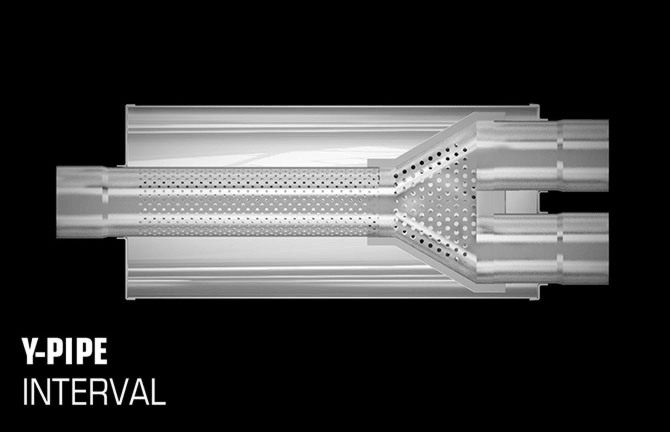

I'm replacing this with a straight through design like the resonator. Magnaflow 12288 that actually has dual 2.5" inlets and a 3" outlet. They are normally used on Ford, Chevy and Dodge V8 pickup trucks. The merge of the two tubes will be inside the muffler of my two 2.25" tubes into one 3" outlet. That is only 11% smaller but the exhaust has had time to cool and lose volume over the longer distance.
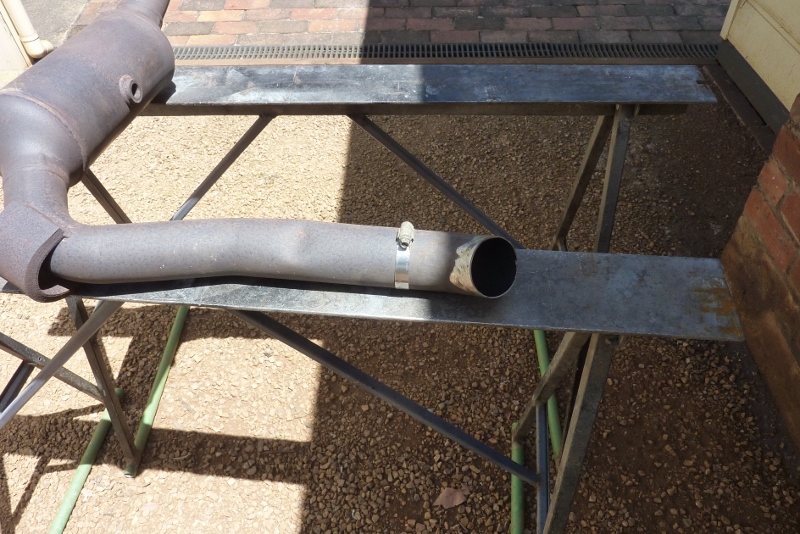

To mark smaller tubes for cutting I just use a hose clamp to scribe around and then take it off before cutting. I am shortening this tube and rotating the bend to where I want it before welding it back together again.
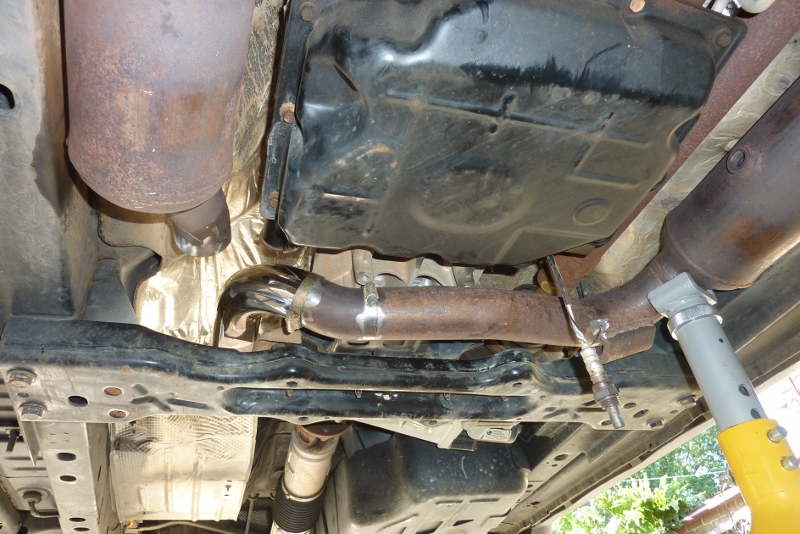

I also had to cut the first bend out of the cat on the back of it part of the way so I could reduce the bend to get it where I wanted. I have got the tube now over the crossmember leaving as much space as I could for the other tube.
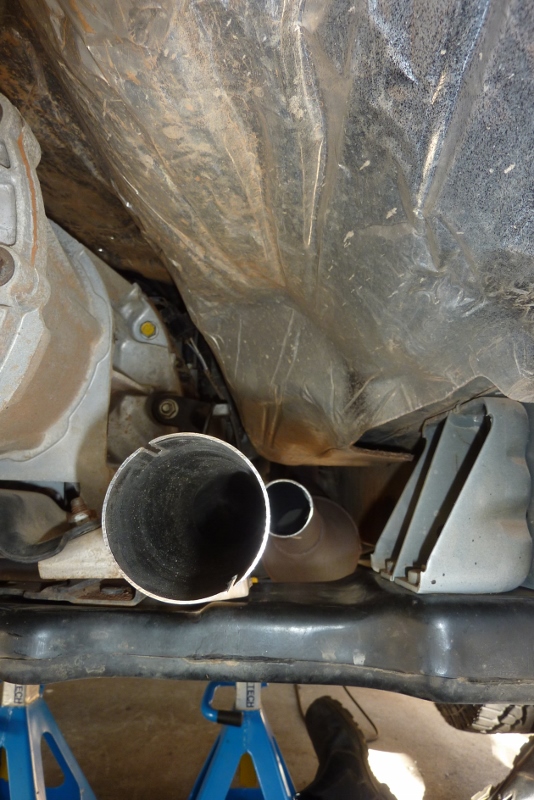

The right side tube will need to move over more to fit through the space left.
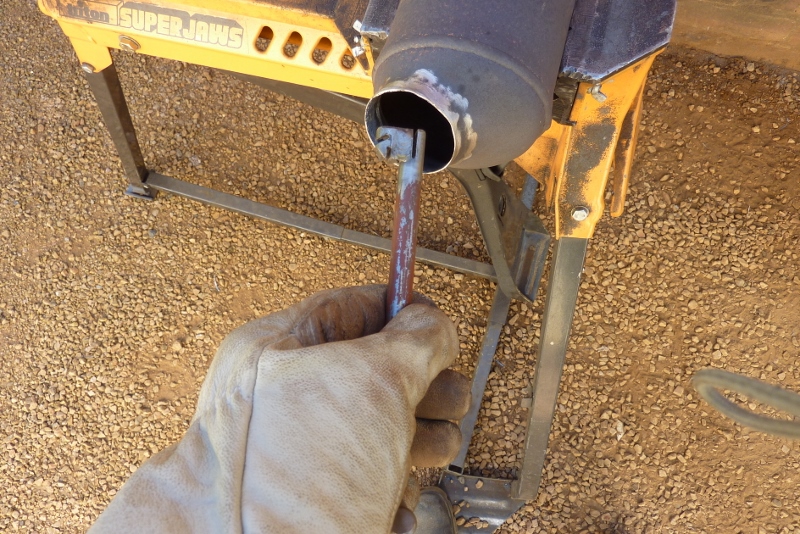

I cut the tubes out of the end of the cat and am moving the flare over in the direction I need as much as possible. Made this little tool from solid rod.
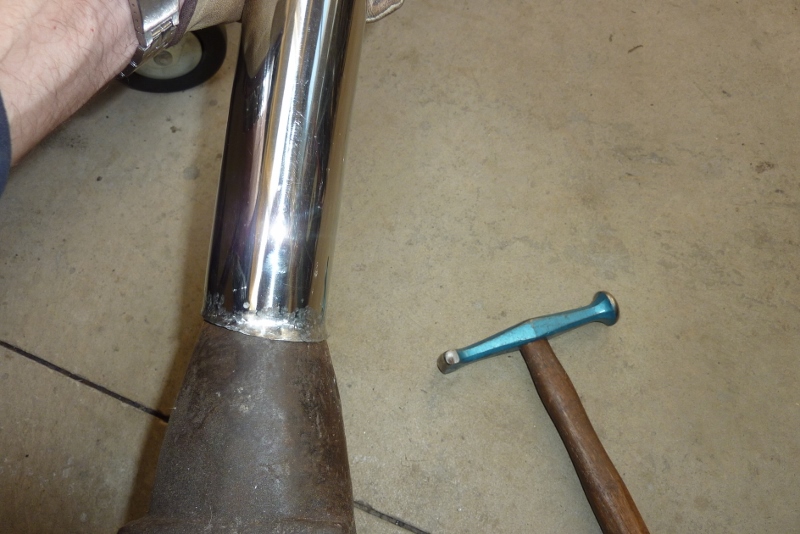

My old farriers anvil still gets used. Just flaring the end on part of the tube so it matches up with the hole shape left in the cat.
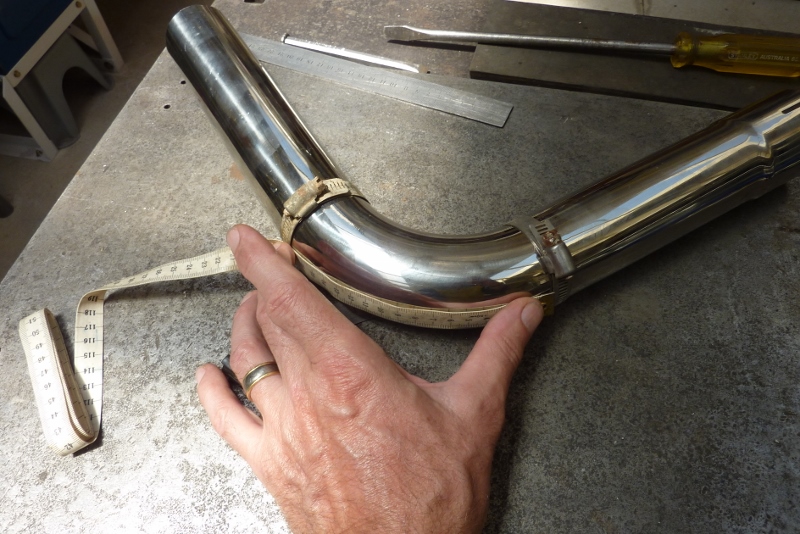

I want to cut this 90* bend exactly in half to get two 45* ones. Put the hose clamps at the start of the bend and measured the distance between them inside and out.
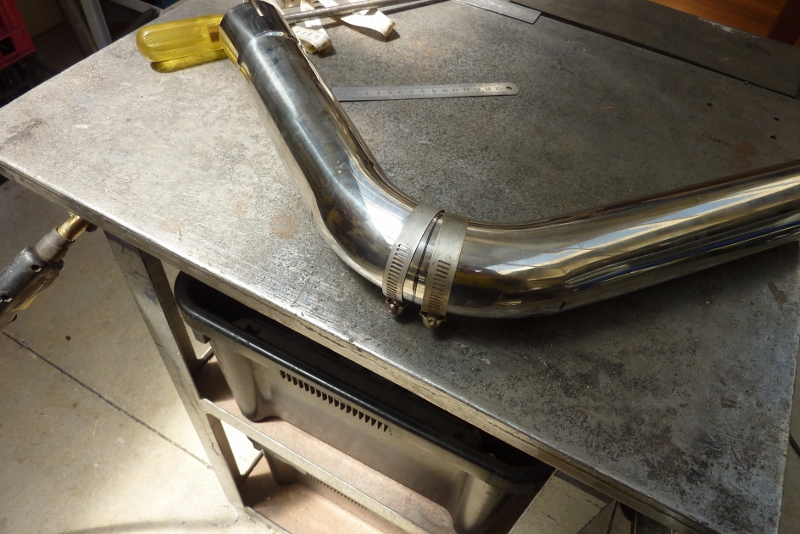

Then slid the clamps as close as I could to the centre and marked up between them.
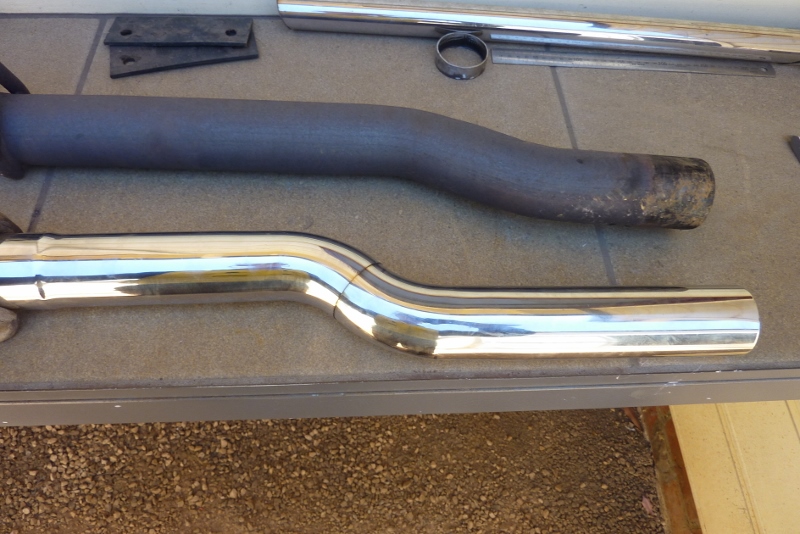

Just cut it with a 5" thin cutoff wheel. They matched up without alteration. If you cut a 90* bend in half and put them together like this, you will get a drop of the tubes diameter. Cutting a 45* bend in half and doing the same, will give you a drop of half the tubes diameter. Like the factory one above, I needed to drop both my tubes from the crossmember down to the inlet of the muffler.
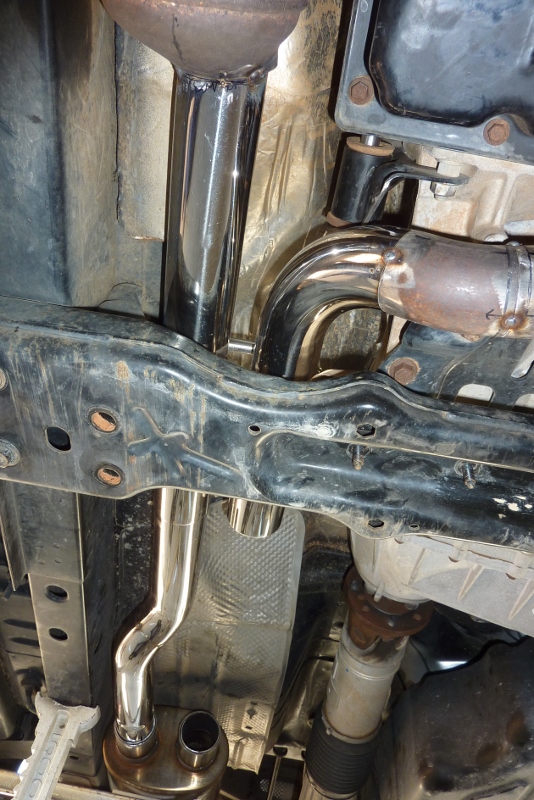

The drop also had to go over to meet the bigger offset on the dual inlets of the muffler.
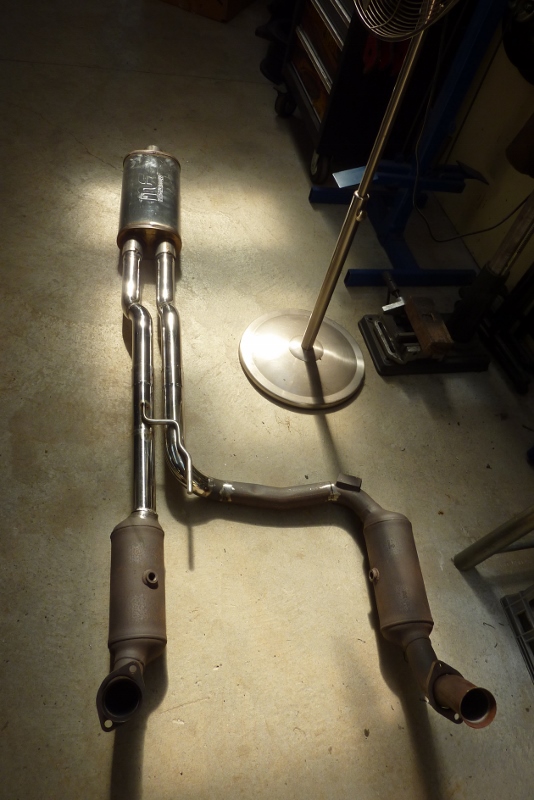

So here is the system so far until the end of the muffler tack up ready to weld. You can see the exhaust hanger I made as well to support both tubes and it fits into the factory support housing.
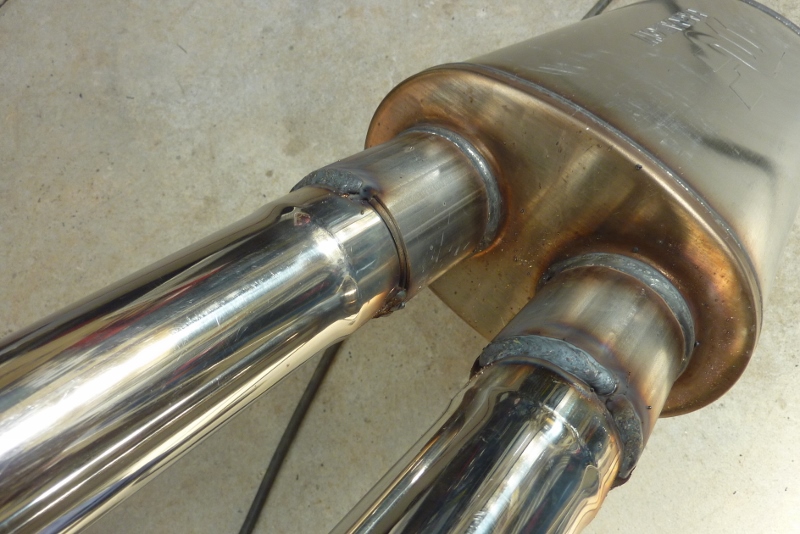

Because I had to step up my 2.25" tube into the 2.5" inlets, I slide some 2.5" tube inside the inlets a bit longer than them so I could weld all the tubes in one pass. I'm just MIG welding it with 304 stainless wire.
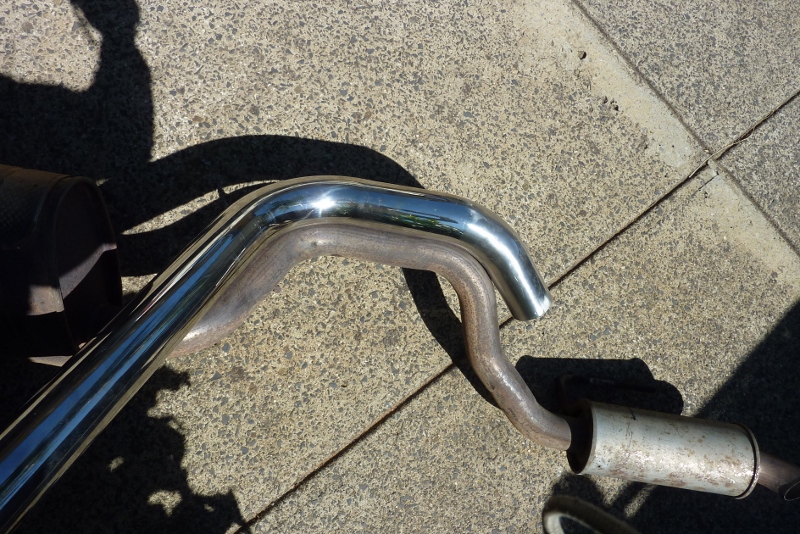

I have only cut everything away from the nudge bar tube. Hoping I can use a couple of bends in a row to save time. Might be lucky!
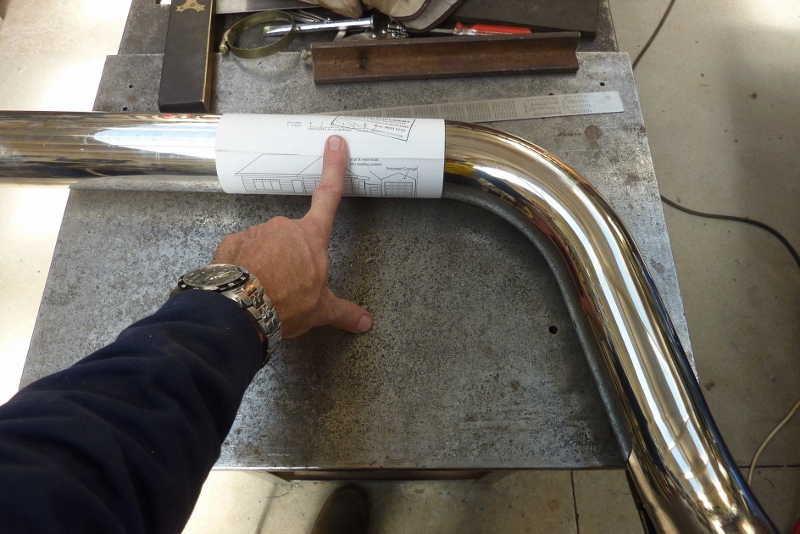

To mark bigger tube to cut, wrap some A4 paper around it. Make sure the overlap all lines up so you know it is square.
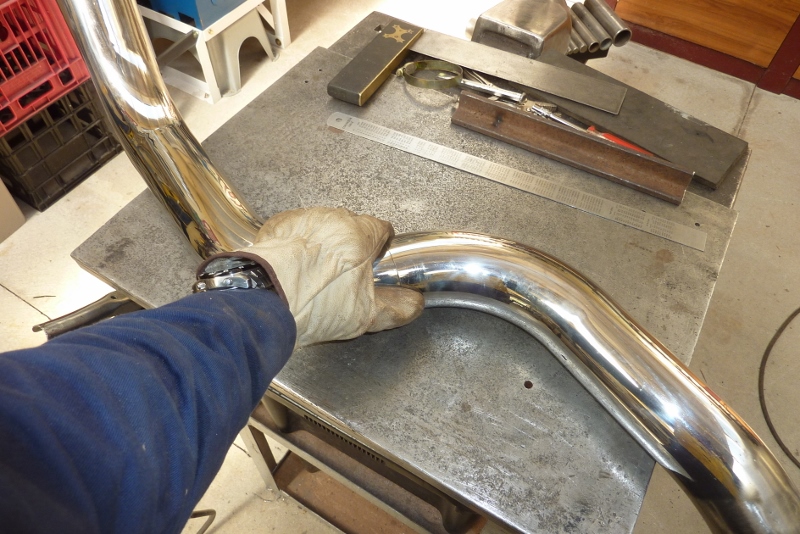

Can see the join fits well after cutting.
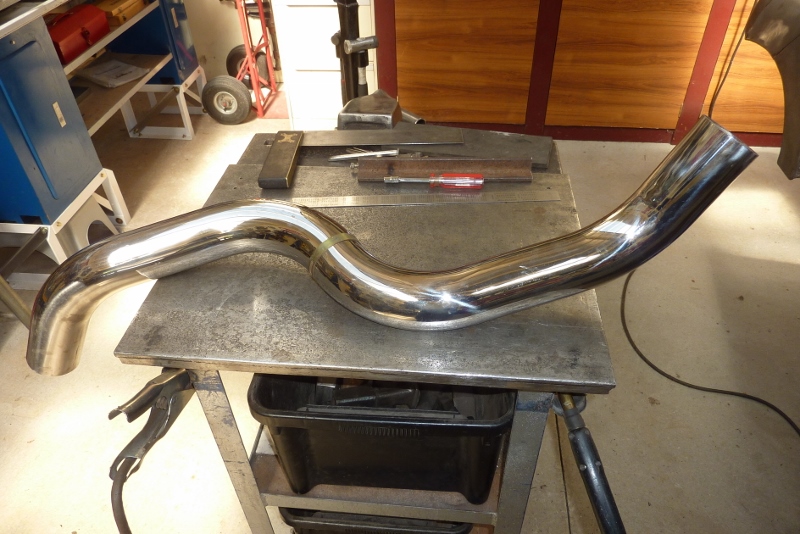

Using some hose clamps to see how it fits so I can easily rotate or shorten parts if needed.
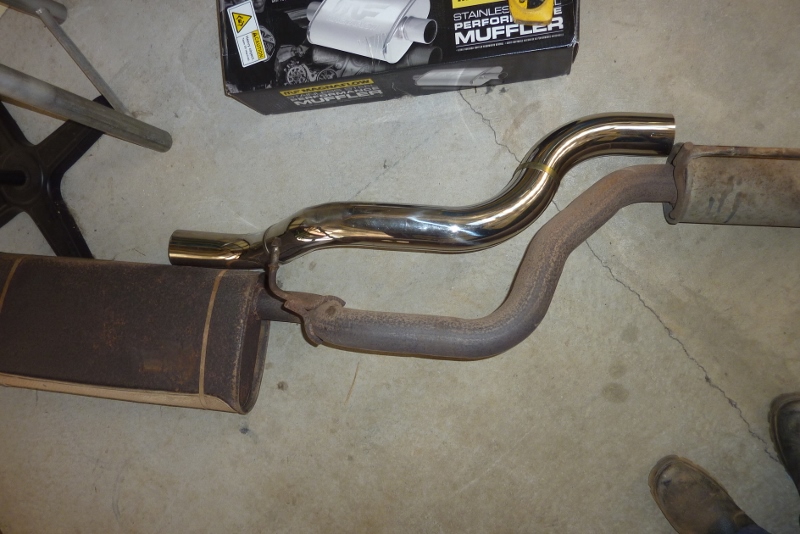

Getting close but will need to add some between the last bends on the right as my muffler has a centre outlet.
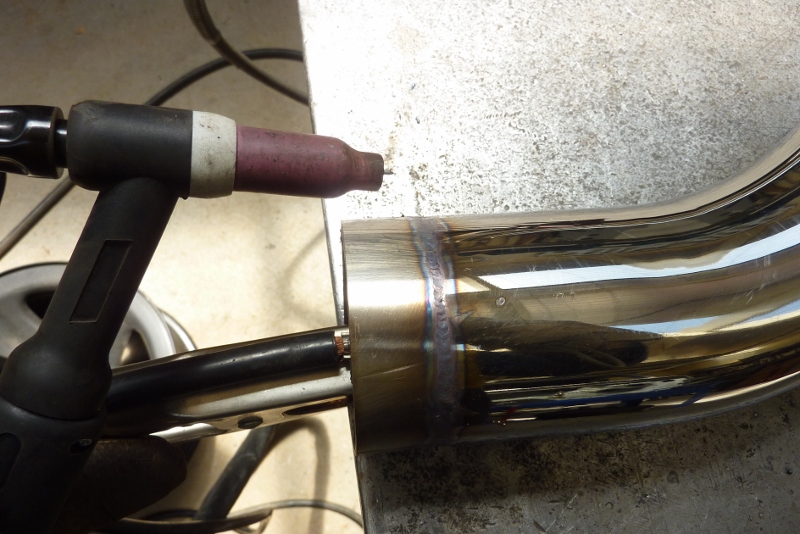

I haven't welded stainless before with a TIG and the MIG was playing up so thought I might as well give it a go. Secret to TIG welding thin material is to match the tungsten diameter to the thickness of the metal. Far more heat control over a smaller area, so less chance of blowing holes through it and and less distortion as well.
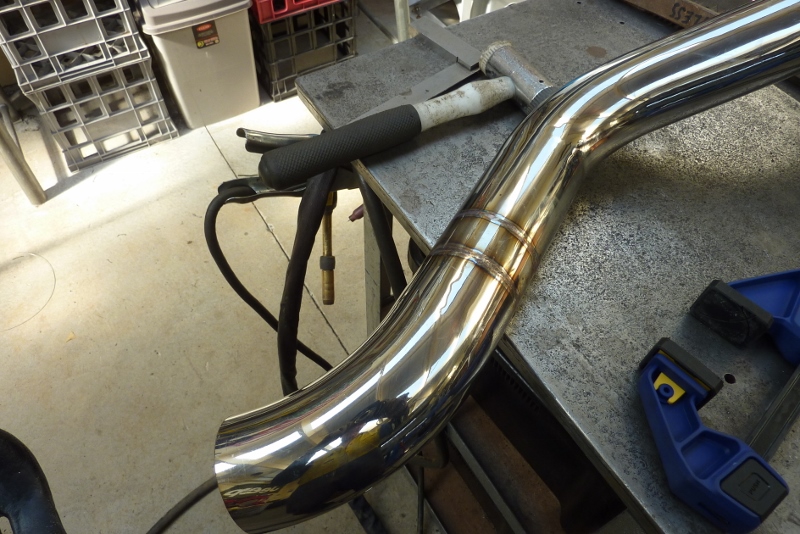

Came out better than I expected!
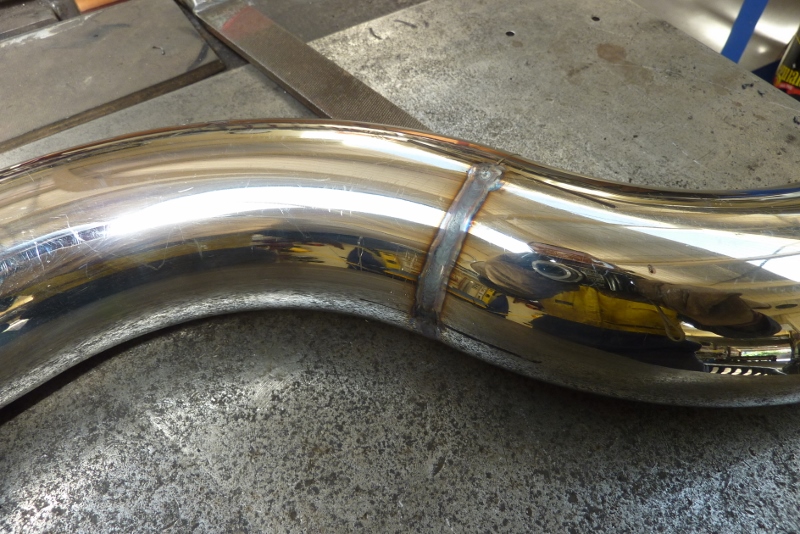

This is fuse welding only with no filler wire added at all. Nice small heat affected zone from using the small tungsten.
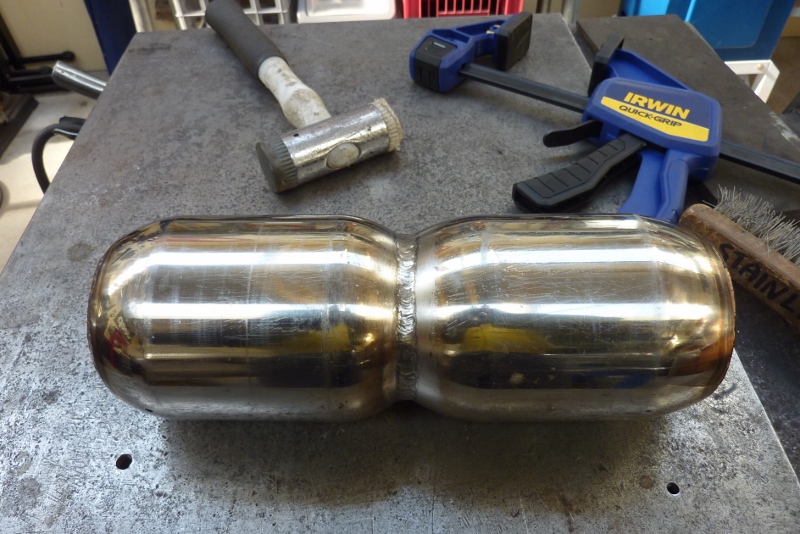

I had already MIG welded these together but wanted to improve the appearance to match the rest, so washed over the weld with the TIG.
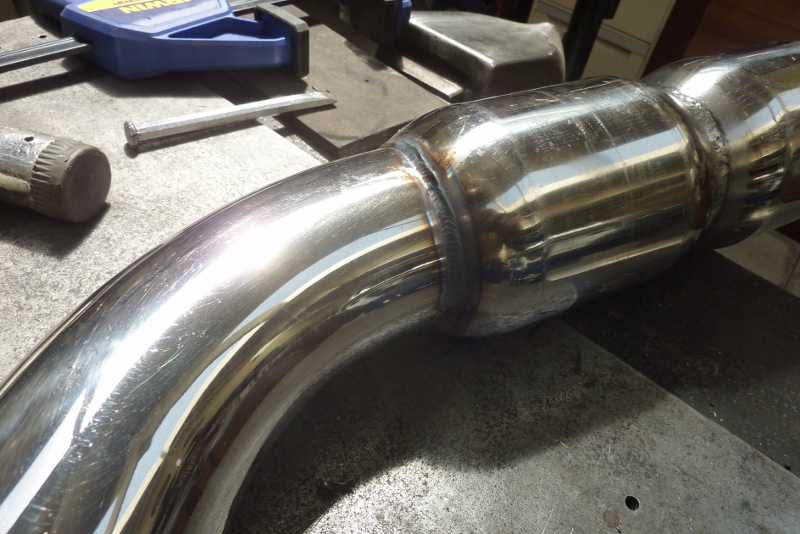

Melted the original resonator TIG weld into the tubing.
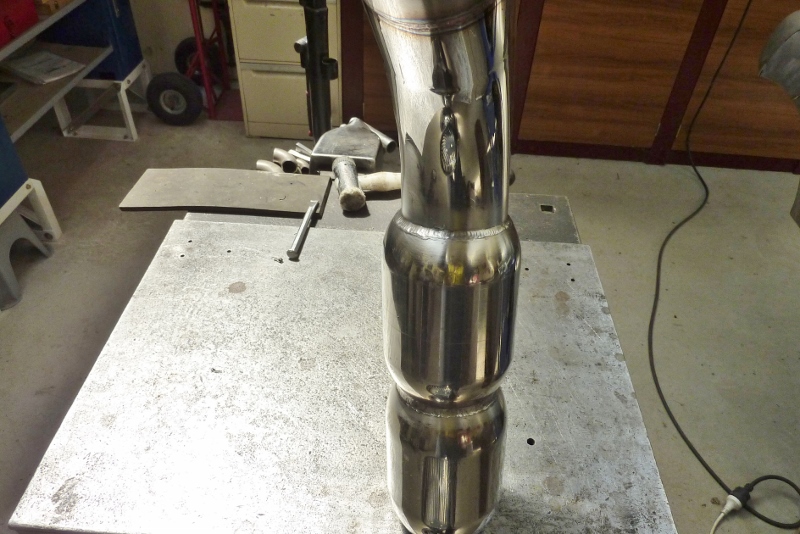

Used a stainless steel wire brush to clean it up some. Never use a steel one as will leave deposits that will rust later. I'm not sure how well these cheap resonators will work due to the lack of acoustic packing being only an inch bigger overall in diameter. Worth a shot anyway.
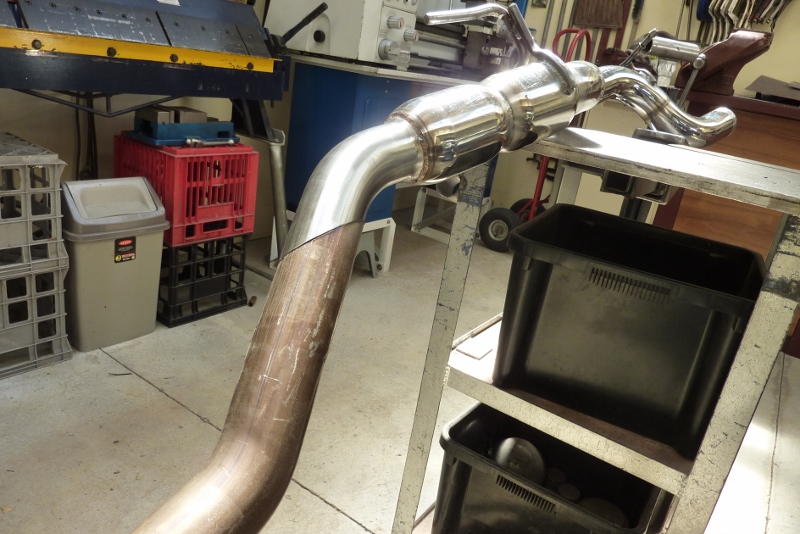

Just showing how I made the turn down tip from the 2.75" stainless exhaust tubing that was stock on my HEMI WH Grand Cherokee parts donor for my Willys Truck. It was the only bend I was short to make the whole tailpipe but it was lost when sent with the other bends during freight, and now the replacement has been lost too! So the best I could do to get the Jeep back on the road was to flare the end of it to match the 3" outlet of the resonator using the hammer and anvil. It is just tacked on there as I will replace it if I ever get my order!
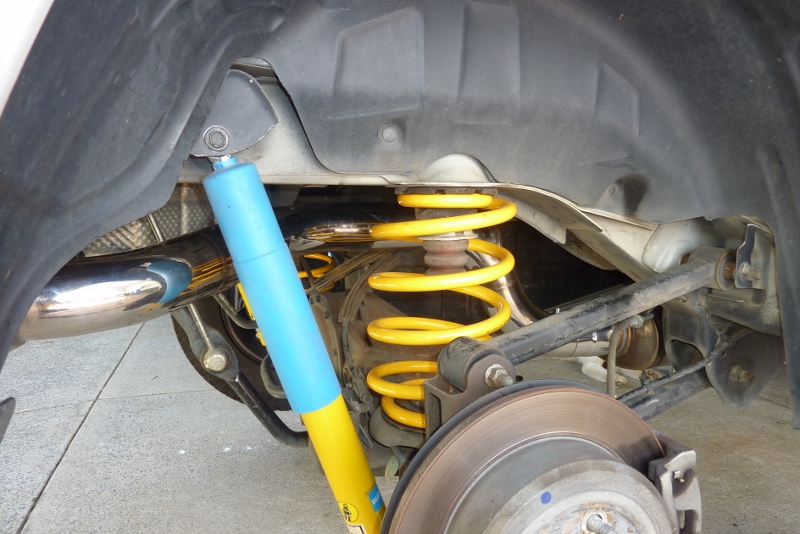

So it comes out of the muffler and up above the rear axle before turning and threading between the swaybar link and the shock absorber. Managed to get through there with one less bend than the factory.
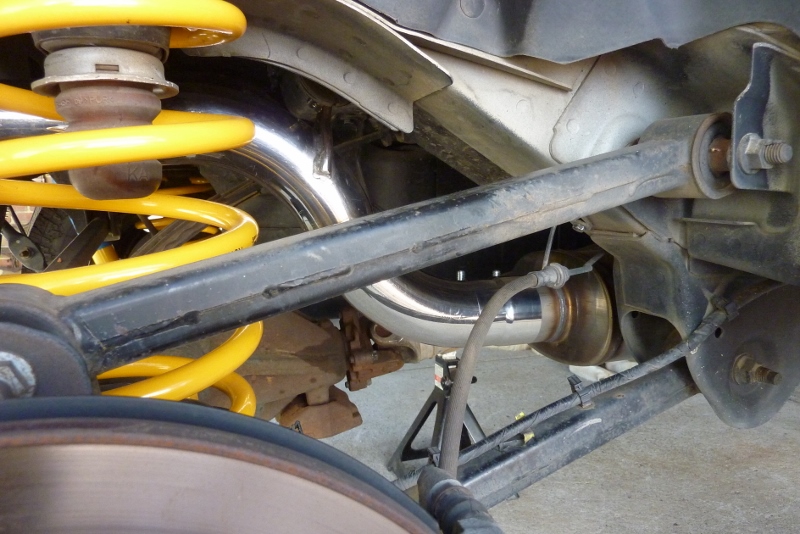

I used a stainless band clamp to hold it in place so it is easier to remove the system should I ever need too.
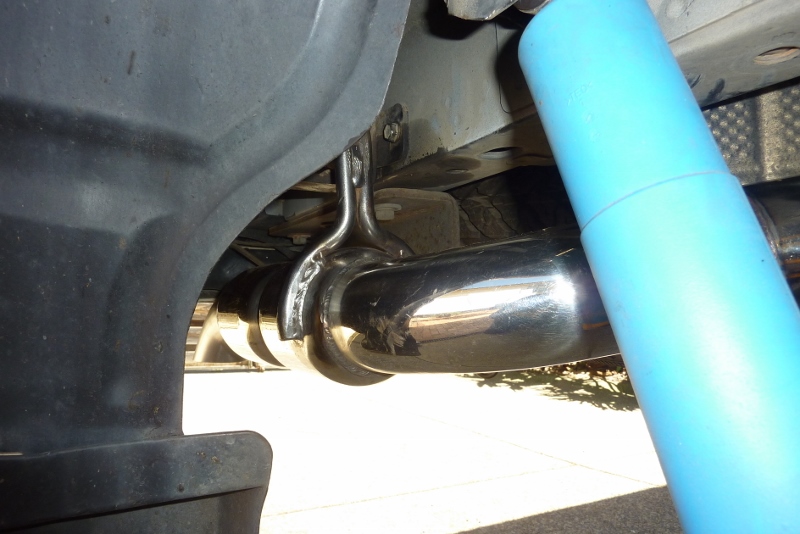

I modified the factory exhaust hanger to hold the resonators up.
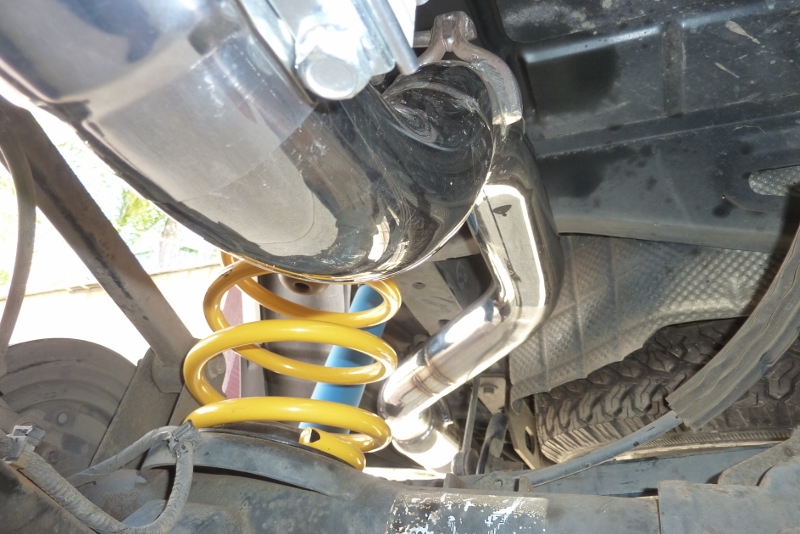

The mid one I also used the factory hanger mount and modified to suit. Can see I have plenty of clearance to the shock absorber as that is more critical to keep heat away from than the swaybar link.

I have put together a few clips during the construction to show the differences in sound. The road segment at the end is quieter than reality as the camera doesn't pick up sound over distance very well.
__________________
Cheers, Marcus.

My web site:
http://willyshotrod.com Over 5'000 Club
Likes: (2)

Last edited by Gojeep; 31-01-2019 at 06:46 PM.
  #52  
Old 31-01-2019
KKnut's Avatar
KKnut  KKnut is offline
AJOR Silver
 
Join Date: Oct 2011
Location: Blue Mountains
Posts: 1,401
What Jeep do I drive?: KK
Likes: 150
Liked 110 Times in 80 Posts
Default

That’s great design and work, I’d want mine the same if upgrading.
__________________
2010 KK Sport, LPG, Mygig, Uconnect, JBA UCAs, 3" CRDstu lift & Uneek bull bar.
Likes: (1)
  #53  
Old 12-02-2019
Gojeep's Avatar
Gojeep  Gojeep is offline
LokRinger
 
Join Date: Jul 2002
Location: Victoria
Posts: 6,870
Likes: 789
Liked 1,754 Times in 556 Posts
Default


The better resonator came in but I ended up ordering the wrong one somehow! I was after the 5" round and got the 4" round, so hope it will still workout alright.


As you could see from the last photo is is a lot longer so going to be a tight squeeze to fit in between the last bend past the shock absorber and the bumper. So cut the length down as much as I could. The 3" 45 degree bend finally came in too to make the exhaust tip from.


TIG welded the 45 degree bend on.


Think it is a touch long! The length makes it easier to line everything up and also decide the final length.


Can see the stainless has already started to change colour from the exhaust heat compared to the new muffler and tip.


Hanger was cut off and welded onto the new muffler.


I prefer the bend cut this way rather than the full droop version I had on before.


Didn't want the 'ricer' look so think this is nice a subtle.

__________________
Cheers, Marcus.

My web site:
http://willyshotrod.com Over 5'000 Club
  #54  
Old 12-02-2019
KKnut's Avatar
KKnut  KKnut is offline
AJOR Silver
 
Join Date: Oct 2011
Location: Blue Mountains
Posts: 1,401
What Jeep do I drive?: KK
Likes: 150
Liked 110 Times in 80 Posts
Default

So damn good, can I bring my KK to you? [emoji16]
__________________
2010 KK Sport, LPG, Mygig, Uconnect, JBA UCAs, 3" CRDstu lift & Uneek bull bar.
Likes: (1)
  #55  
Old 12-02-2019
Gojeep's Avatar
Gojeep  Gojeep is offline
LokRinger
 
Join Date: Jul 2002
Location: Victoria
Posts: 6,870
Likes: 789
Liked 1,754 Times in 556 Posts
Default

Short clip of the new muffler added.

__________________
Cheers, Marcus.

My web site:
http://willyshotrod.com Over 5'000 Club
  #56  
Old 26-02-2019
Gojeep's Avatar
Gojeep  Gojeep is offline
LokRinger
 
Join Date: Jul 2002
Location: Victoria
Posts: 6,870
Likes: 789
Liked 1,754 Times in 556 Posts
Default

BTW, listening to exhaust clips on your phone makes it sound awful!


This is the stock arrangement from the airbox to the throttle body on my 2010 model.


To match my bigger free flowing exhaust it time to get the same treatment on the intake side too. The bigger one on the right is from a 4.7 V8.


The intake bolt pattern is exactly the same as the 4.7 and the bore is bigger than the stock throttle body.


I just searched eBay for 4.7 throttle body and made sure it was the drive by wire version which was used on Jeeps and Dodges from 2008 on. Mine was $75 US and came off a 2011 Dodge 1500 Pickup. I looked for the one with the least mileage as that is more important than the age of it, and this had only done 61k.


Stock bore is 63mm/2.5"


4.7 version measures 74mm/3".


Some rotate the new throttle body to avoid cutting the assembly stubs. It's 2 minutes work to just cut them off.


The did the final trim with a knife facing away from the seal so I didn't slip and cut it.


This is the OEM part number of mine.


The Jeep harness just plugs straight in!. No modification at all.


Can't use the stock intake hose as the end narrows down to only 2.5". But it is 3.25" at the airbox and the convoluted section is still 3". So I put a hose clamp around the end of the 3" part to act as a guide while I cut it off with a hacksaw before linishing it.


I had a 3" rubber elbow from a Donaldson air cleaner system so thought I would use that. It was tight getting over the outside of the throttle body, but worked out well.


Need to remove the air intake temperature sensor and install it on the new elbow. Just levered it out carefully with a screwdriver


Rubber doesn't drill well with a standard twist bit as ends up way undersized. So just drilled it with a bit and brace as didn't have a punch the right size.


Used so soap to help push in the sensor the same distance in as stock, 32mm/1.25"


Seated nicely.


I used some 3" stainless steel tube left over from my tailpipe to make up the difference in length. First start up gave a very erratic idle like you had a huge cam in it! It settled down, and after going around the block, it had learned to adjust for it and idle is back to normal.
I have taken a 400 km round trip since fitting it and definitely have better throttle response and revs out far easier than before and powers up the hills. It compliments the exhaust upgrade really well and even had to turn down my throttle controller some more! I will give feedback on the economy changes once I do a run the same as I recorded before all my modifications. But must say I don't feel the loss of gearing from the 245/70R17, 30.5", tyres anymore. I have noticed also since the exhaust and throttle body mods that the ECO message is on a lot more now.
__________________
Cheers, Marcus.

My web site:
http://willyshotrod.com Over 5'000 Club
Likes: (2)
Post New Thread  Reply


Posting Rules
You may not post new threads
You may not post replies
You may not post attachments
You may not edit your posts

BB code is On
Smilies are On
[IMG] code is On
HTML code is On


All times are GMT +10. The time now is 12:24 AM.


Advertisements


AJOR does not vouch for or warrant the accuracy, completeness or usefulness of any message, and are not responsible for the contents of any message. The messages express the views of the author of the message, not necessarily the views of AJOR or any entity associated with AJOR, nor should any advice be substituted as technical advice replacing that of a mechanic. You agree, through your use of this service, that you will not use AJOR to post any material which is knowingly false and/or defamatory, inaccurate, abusive, vulgar, hateful, harassing, obscene, profane, sexually oriented, threatening, invasive of a person's privacy, religious, political or otherwise violative of any law. You agree not to post any copyrighted material unless the copyright is owned by you or by AJOR. The owner, administrators and moderators of AJOR reserve the right to delete any message or members for any or no reason whatsoever. You remain solely responsible for the content of your messages, and you agree to indemnify and hold harmless AJOR, the administrators, moderators, and their agents with respect to any claim based upon transmission of your message(s). The use of profile signatures to intentionally mislead or misdirect any member on this forum is not acceptable and may result in your account being suspended. Any trip that is organised through the AJOR forum is participated at your own risk. If you or your vehicle is damaged it is your responsibility, not that of the person that posted the thread, message or topic initiating the trip, nor the organisers of AJOR or moderators of any specific forum. This forum and associated website is the property of AJOR. No user data is harvested and no information supplied in your registration will be sold for profit.


Powered by vBulletin® Version 3.8.7
Copyright ©2000 - 2024, vBulletin Solutions, Inc.

AJOR © 2002 - 2024 AUSJEEPOFFROAD.COM. All corporate trademarked names and logos are property of their respective owners. Ausjeepoffroad is in no way associated with DaimlerChrysler Corporation or Fiat Jeep.
www.ausjeep.com www.ausjeep.com.au www.midlifemate.com ausjeepforum.com www.r9kustoms.com
vB Ad Management by =RedTyger=