WJ: Build on a Budget - Page 7 - AUSJEEPOFFROAD.COM Jeep News Australia and New Zealand

Go Back   AUSJEEPOFFROAD.COM Jeep News Australia and New Zealand > JEEP GARAGE > Jeep build up
Register Forums Trading Your Jeep My Garage Mark All Read

Post New Thread  Reply
 
Thread Tools Search this Thread
  #43  
Old 22-04-2013
Turismo07's Avatar
Turismo07  Turismo07 is offline
Full Flexer
 
Join Date: Aug 2008
Location: Perth
Posts: 919
What Jeep do I drive?: XJ
Likes: 185
Liked 121 Times in 86 Posts
Default Fitted BB

Pretty straight forward process.

The only thing I did differently was cut the front spacers down to 1.25” instead of keeping the full 2”. Ideally if you’re doing this you want to use a bandsaw as it’s the safest and easiest way to cut it. I couldn’t find anyone with a bandsaw close enough to me so I just used my sawzall, was not a clean cut and very dangerous considering I didn’t have a vice… I do not recommend this..

The reason I did this was that my WJ already has the factory ‘Up Country’ susp that gives 1” of lift (arguably it would’ve sagged a bit over the years, but so would have a stock susp so its relative), and if I had just added the full 2” then it’d be sitting approx 2.5-3” higher than normal. This would put it right in the danger zone for front driveshaft issues and DW when only upgrading the springs/spacers and shocks without touching anything else.. And considering that my WJ has over 250,000km on it the tie rods, CA bushes, and trackbar bushes would not be up to the task. So just wanted to keep things as simple as possible in order to gain a little lift and also get the new (to me) shocks in. I kept the rear spacers at 2” to get some rake on the WJ when its empty but to also compensate for the extra sag that my stock rear springs has compared to the front.

Cutting the spacers down was fun as they normally fit on the front upper soil locator on the WJ’s but this is not straight forward as the locators have a cone shape to them and the spacers incorporate new locators etc. It would be very difficult to successfully cut them down to fit in this location safely. So I cut them down and just fitted them under the front coil instead where they fit much nicer around the lower coil locator.

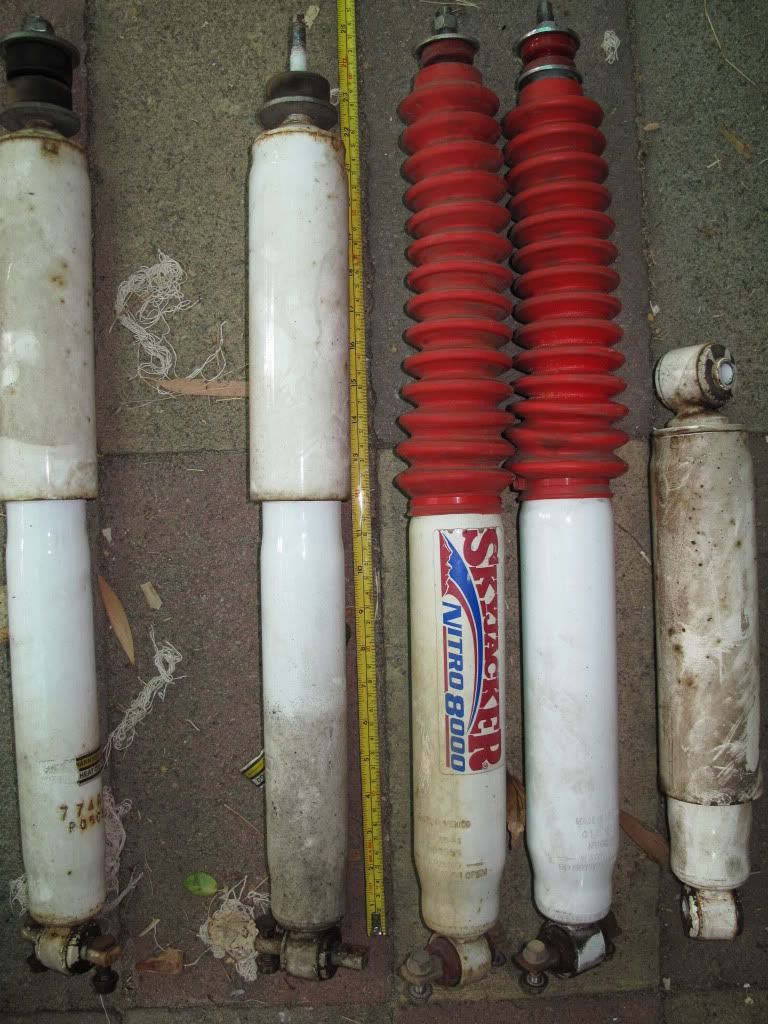
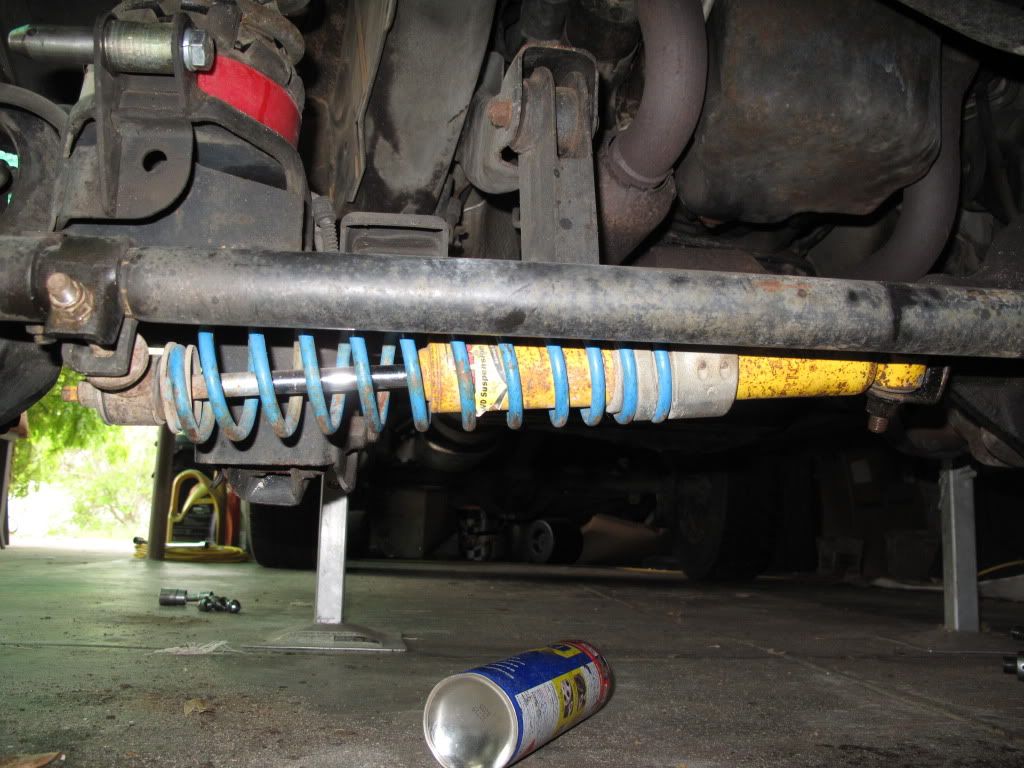
The new shocks are Skyjackers and the fronts are 23” long fully extended and the rears are 25” fully extended.

Hub to fender measurements:
Before:
FL = 470mm, FR = 445mm, RL = 475mm, RR = 455mm
After (this after approx 30kms of driving around including deliberately on the side of the road on dirt at speed to try and settle the susp a little):
FL = 495mm, FR = 490mm, RL = 515mm, RR = 515mm
Because the right side of my WJ was lower than the left, I swapped the front coils around to try and get it level again, which I came close but ah well (didn’t swap the rears over because I didn’t want to go to the other extreme and have the left side sit lower than the right).

Some important measurements for susp setups that I made while doing this:
• If you have the rzeppa to rzeppa style front driveshaft, you can only allow the front left shock to extend 20” before the front driveshaft CV joint max's out (at the TC end the shaft will bind on the cap resulting a cut CV boot)… This is bad news for me as my front shocks are 23” long (maybe need a limit strap). The way around this is to get a upgraded driveshaft with at least a ‘double carden’ joint at the TC end and a slip joint on the main shaft (more $$$ to spend ).
• With the stock rear swaybar endlinks, the rear susp will only extend 22” before the rear swaybar hits the lower coil seat. The way around this is to get longer swaybar endlinks to reduce the angle of the rear swaybar at full droop.

Also fitted the Tough Dog RTC steering damper. Pretty straight forward, nothing special here.

I also swapped my JKS discos to mount on the outside of the swaybar so that they would clear the chassis at less than 2” lift when trying to disco (although by lifting my WJ I now didn’t need to do this, but thought I’d do it anyway).

Also made a way to secure the swaybar when disco’d by drilling a couple of holes in the wheel well and will just cable tie the bar up there when needed. Will cost me a couple of cable ties each time but I always carry a bunch anyway.

Totally stoked with my purchase, best $100 I’ve ever spend on a vehicle . Its given me some extra much needed ground clearance and drives sooo much better than before. I didn’t think my WJ drove bad before, not great or anything, but it was sloppy and wallowing (thanks to the rear Addco swaybar and waterbed like, but the new Skyjacker shocks (even though they’re not rated as a top of the line shock) were so much better than the garbage Aussie no-name-brand shocks that were on there. And according to my Jeep’s service history these Aussie aftermarket shocks were fitted by Ultratune 18 months ago and when I pulled them out, the rear right was completely stuffed, a baby could’ve compressed it, it had absolutely no damping force whatsoever, and not to mention my front shock’s stripped thread issue! Also the TD TRC steering damper is a interesting unit, never had one before and the extra coil really makes a difference to the steering feel. The steering literally just wants to return to centre all the time, and the further you turn the steering away from centre the harder the resistance. Its not a bad thing and its not overbearing, but you can def feel the diff. not sure if I love or dislike it.

But hey, I would not have personally chose any of the above myself if buying new, but $100 for the lot, I’m not complaining!!

Next on the list is along these lines are:
• Adjust bumpstops to suit shocks (just didn’t have time and the resources to get it done all at once, so have to take it easy offroad so I don’t hammer the shocks in their compressed state)
• Source a double carden front driveshaft
• Keep an eye out for new bigger tyres (mine are almost illegally bald, and they don’t grip on anything..)


Pics:

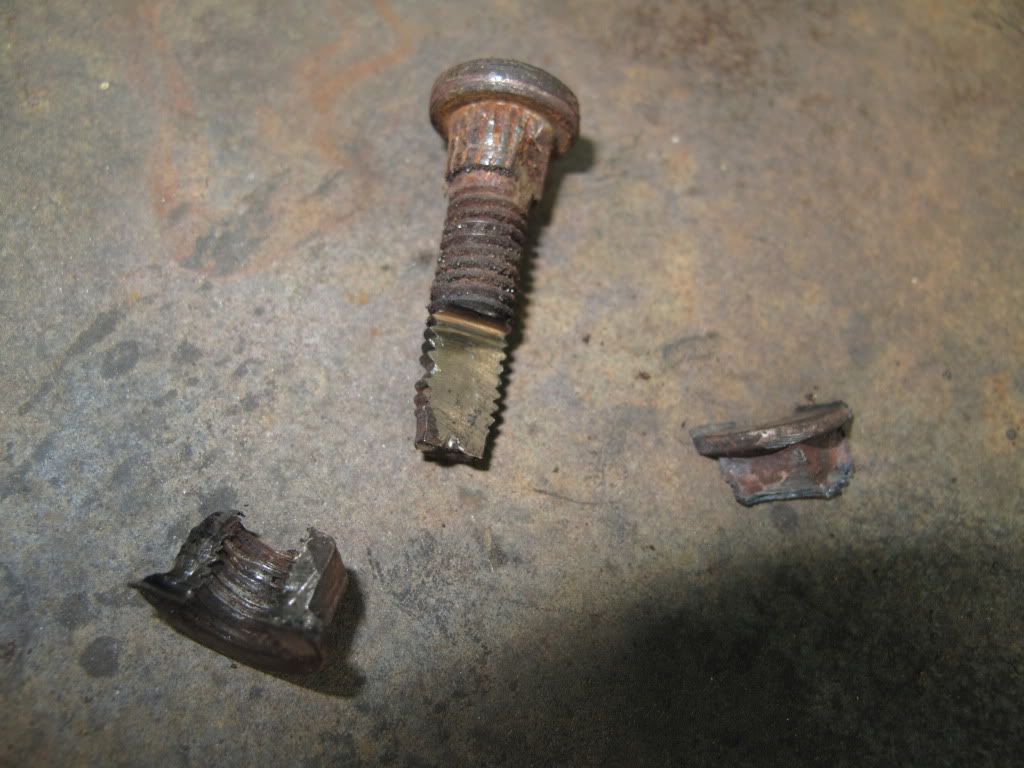
The ceased/rusted front lower bar pin shock bolt that I cut off in order to remove the front right shock:


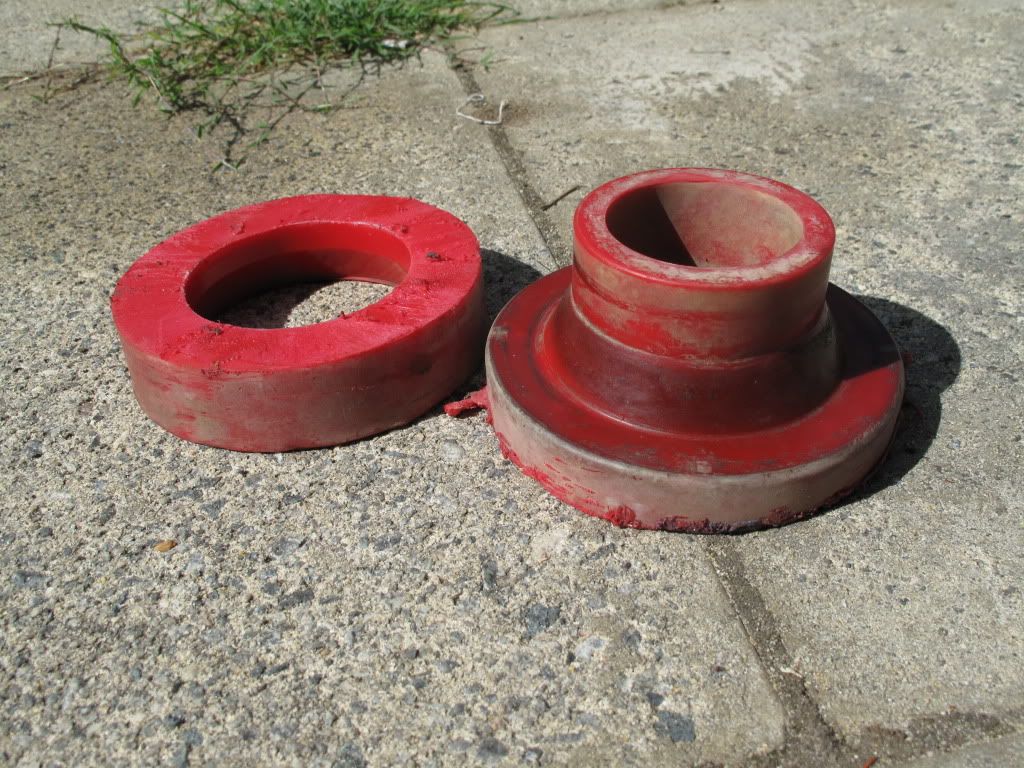
2” front BB spacer cut in 2 pieces:


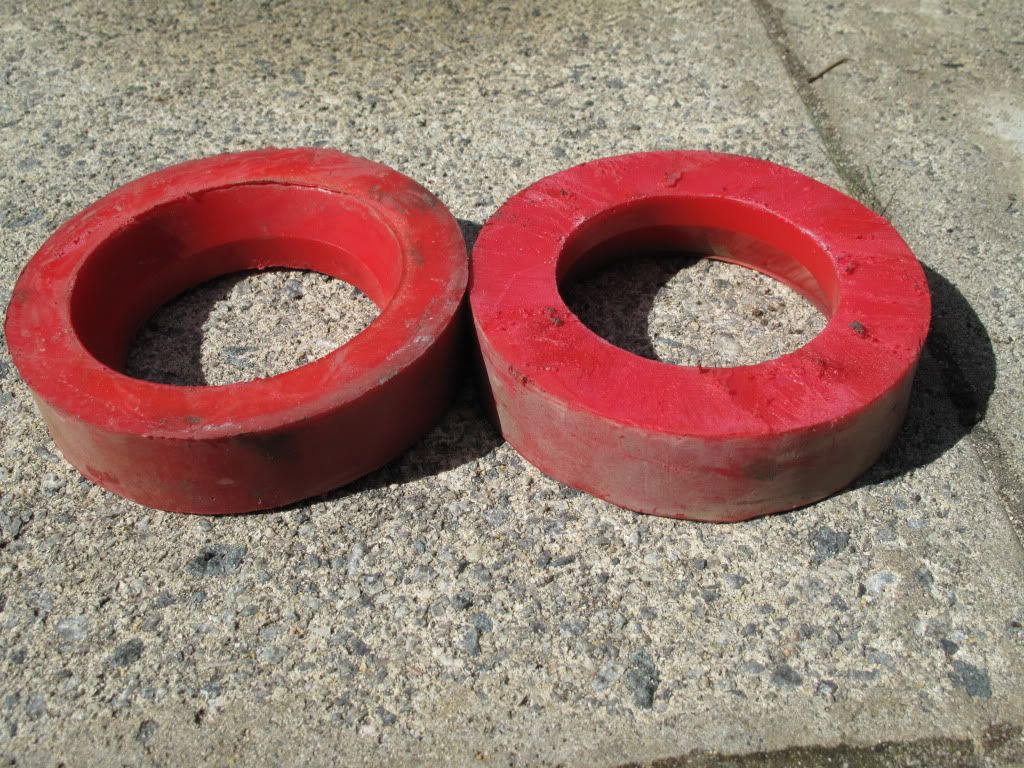
Here’s the x2 new front spacers cut down, one upside down to show the bevelled inner edge (this bevelled edge fits perfectly around the lower front coil locator – without it and the spacer would not fit at all on the lower coil locator):


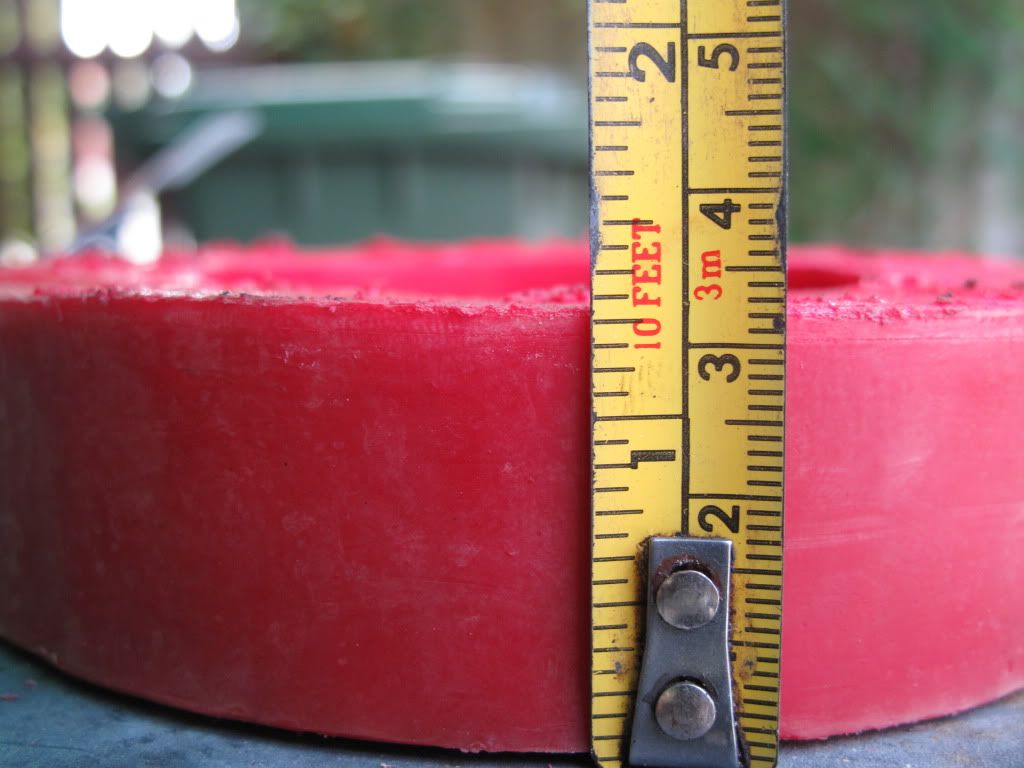
The cut down spacer’s measure 1.25”:


This is the lower coil locator where the spacers will sit, they are just under 2” tall and with the 1.25” spacer mounted there will be 0.5-0.75” exposed that the lower coil isolator will hang onto and locate the coil:


Front shock side by side (Skyjacker shock = 23” fully extended, and 14” compressed):
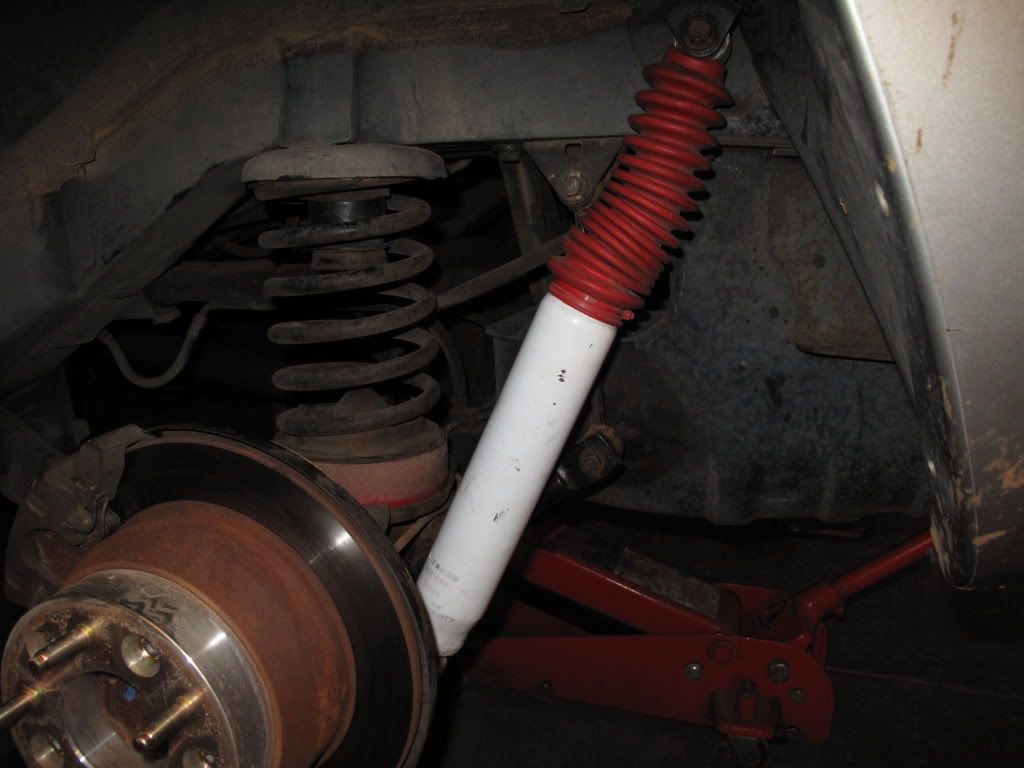

Fronts done:


Rear 2” spacer fitted as normal, at full droop with the rear swaybar connected showing where it binds using ‘standard’ length endlinks (will only allow the rear shock to extend 22” with this setup, therefore need longer endlinks to get around this):


Rear shock side by side (Skyjacker shock = 25” fully extended, and 16” compressed):


Rears done:


Tough Dog steering damper fitted:


Holes cut for the cable tie, did this on both sides, these cable ties will remain here permanently and another cable tie will be used to loop through the disco and the permanent cable tie to secure the disco:


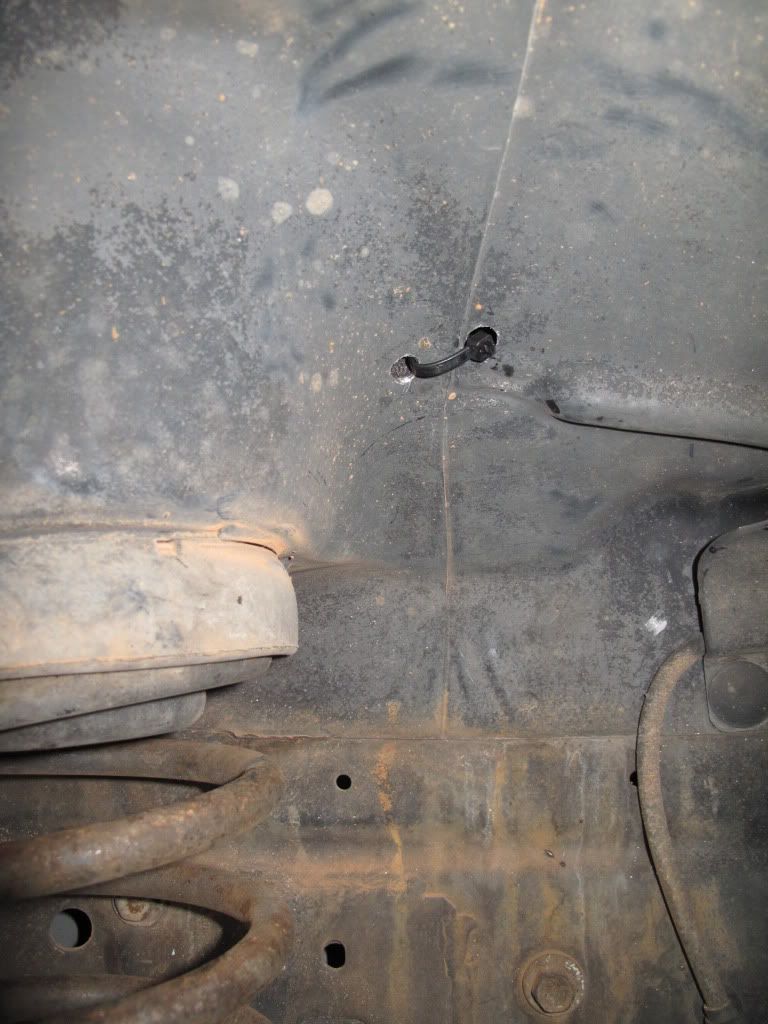
Disco secured out of the way:


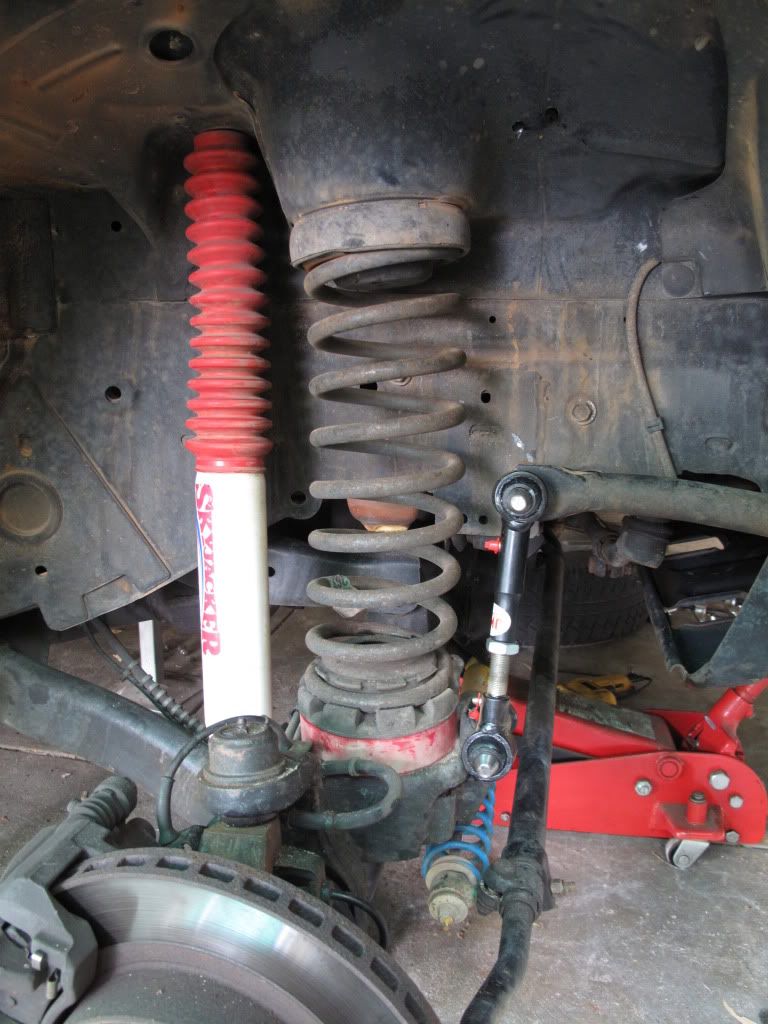
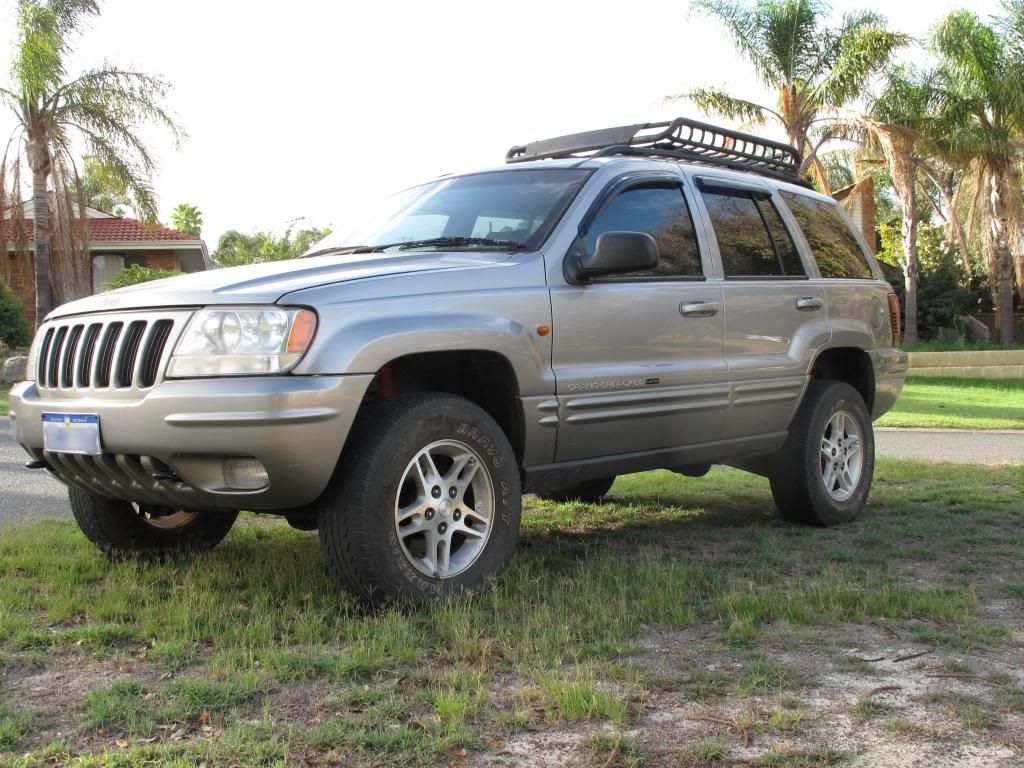
How the WJ sits now:


__________________
JK CRD
KK
WJ Build - Sold
http://www.ausjeepoffroad.com/forum/...d.php?t=121119

Last edited by Turismo07; 20-05-2013 at 06:07 PM.
  #44  
Old 22-04-2013
Turismo07's Avatar
Turismo07  Turismo07 is offline
Full Flexer
 
Join Date: Aug 2008
Location: Perth
Posts: 919
What Jeep do I drive?: XJ
Likes: 185
Liked 121 Times in 86 Posts
Default Roof Rack Crossbars

Replaced my factory crossbars with some tubing.

The factory crossbars started to get a bit loose in the way that I could grab onto Rola roof basket and rattle it and the movement was in the crossbars as they mounted in the roof rails. This would allow the whole rack when loaded up to rattle around on the roof which isn’t good esp when driving on corrugations.

I already had some square tubing at home that I was going to do something similar with, but when I was getting the BB from the wrecked WJ the guy had already done this to his so I just grabbed them off his WJ as they were already cut to length and the holes were already drilled and it saved me a bit of time..

They are rough looking with some rust on them etc so will need to sand it down and paint it later on but for now I just wanted to get them on as time running out to prep for my trip.

Pretty simple install, just literally needed to drill through the factory roof rails and the tubing and put a bolt through.

The roof basket is totally solid now without any movement at all and can easily mount an awning and other stuff on the sides if I want.


Pics:

This is before on factory crossbars:


Roof basket mounted on factory crossbar (the factory crossbars mounts into the factory roof rails with a hard plastic fitting, no doubt its tough and durable ‘plastic’, but overtime they do wear and allow movement, and makes me worried that my roof basket is going to fall off on corrugated roads):


Now with square tubing with bolt going through the tube and roof rail and roof basket mounted:


How it looks after - I hate roof racks/baskets that sit unnecessarily high on vehicles so was worried that the tubing might push up high, but its actually not too bad IMO, looks higher in the pic for some reason, could be lower bit its prob the max height I’d tolerate:


Plenty of space there for an awning, hilift, etc:
__________________
JK CRD
KK
WJ Build - Sold
http://www.ausjeepoffroad.com/forum/...d.php?t=121119
  #45  
Old 17-05-2013
Turismo07's Avatar
Turismo07  Turismo07 is offline
Full Flexer
 
Join Date: Aug 2008
Location: Perth
Posts: 919
What Jeep do I drive?: XJ
Likes: 185
Liked 121 Times in 86 Posts
Default ANZAC Weekend Away

I had this trip planned for ages with my mates and the date set to go and explore the D'Entrecastreaux NP in the South West of WA. This is a late post as ANZAC day was a few weeks ago now as I was going to make my trip report a little more tailored to this forum, but can't be bothered now so I've just cut and paste my trip report from a Perth based forum . I've also got some vids which I might edit together etc when I can be bothered..


So myself and a bunch of mates (x4 vehicles in total) wanted to explore D'Entrecastreaux NP primarily visiting places like Fish Creek Hut, Moores Hut, Coodamurrup Beach, Gardner River etc. Basically the coastline between Windy Harbour and Broke Inlet. So first thing ANZAC day morning we headed off with Fish Creek Hut set as our first camp.

Fish Creek Hut:

From top of the hill:


Sunset from top of hill:


From cliffs:


Front entrance/driveway:


Exploring the Cliffs Nearby:


Then we set off to explore the area and find a spot for our next camp

Some of the gorgeous landscape you travel through down here:


Went as far east as we could which I think was West Cliff Point, and then turned around and headed back towards Coodamurrup Beach as every campsite area we came across was already occupied.

As we got to the dunes on Coodamurrup Beach we started to have some fun getting stuck mainly cos our tyres were running about 20psi.

As I was first I found out the hard way but still managed to get around easily enough, but the Cruiser got himself bogged first:


Then me trying to come back up the dune to snatch him - I made it up first time, the Cruiser followed and got stuck at the top, then when I was coming up the 2nd time I lifted off the throttle to drop speed so I didn't hit my mates Cruiser (or anybody standing nearby) and lost too much momentum, then when reversing back down I kept crabbing towards the drop off... , so just got another mate to snatch me back:


After this we all had our tyres down to sand pressures and myself and my mate in the black XJ Cherokee had no issues driving around, we were mainly just messing around in the area as we really didn't need to be here as weren't planning to fish or camp in the area lol. The Cruiser still wasn't too comfortable in the dunes but mainly due to lack of HP and the other ZJ Grand Cherokee was struggling with a misfire which we later found out was the wiring to a O2 sensor that had been ripped off (brand new and only fitted 1 week before our trip..).

The misfire on the ZJ led to lack of power, which led to getting stuck on the same hill as me. But instead of doing what I did by trying to reverse down and end up crabbing over to the drop, we used this opportunity to test out the Cruiser's new winch:


Got the ZJ’s O2 sensor fixed on the track by twisting the wires back together.

Ended up camping not far from Coodmarrup Beach on a nice grassy area as all the other campsites were taken, but we were happy with this:


Full moon that night:


The next day was making our way towards Gardner River.

The Gardner River crossing was easy, approx 1m high max, was enough to get the Cruiser’s diffs completely submerged and he’s running 35” tires, the base is slightly rocky but very hard with plenty of traction. Absolutely nothing to worry about at all.

The road I wanted to take was Lower Gardner River Road which according to maps would take us right down to the river mouth on the west side, but this was closed and meant that we actually had to head all the way out onto Windy Harbour Road, which meant air up again and drive down to Windy Harbour.

Stopped in Windy Harbour and emptied out all our rubbish that we'd accumulated over the last few days in their bins and headed east towards Gardner River.

Again most of the campsites, huts etc were already taken but we did manage to find a nice little one free. Was really tight to fit all of us as there wasn’t much flat ground for the tents and swags:


Our spot on the river where we tried to fish, no luck at all but nice spot to chill out for a while:


On the last day we packed up and headed back to Windy Harbour again to air up before making our way back to Perth:


We all had a great time in The D’Entrecastreaux NP. It's is an absolutely beautiful place to visit, and I can’t wait to head back now that I sort of know my way around there a bit better, will also like to check out Broke Inlet next time as we didn’t have time to this trip.
__________________
JK CRD
KK
WJ Build - Sold
http://www.ausjeepoffroad.com/forum/...d.php?t=121119

Last edited by Turismo07; 17-05-2013 at 03:36 PM.
  #46  
Old 20-07-2013
Turismo07's Avatar
Turismo07  Turismo07 is offline
Full Flexer
 
Join Date: Aug 2008
Location: Perth
Posts: 919
What Jeep do I drive?: XJ
Likes: 185
Liked 121 Times in 86 Posts
Default New Front Driver's Seat

My front driver's seat always had a tare in the leather. it didn't bother me too much cos the WJ didn't cost me very much. Torn leather is to be expected for a vehicle of this age, but overall apart from the driver's seat the rest was in great condition.

So lucky me I came across a guy selling the exact same seat as my WJ (throughout the WJ models and years, they had 7 different interior trims). Went and checked it out, it was in great condition, so gave him $50 for it.


Pics:

Old seat:


New seat:
__________________
JK CRD
KK
WJ Build - Sold
http://www.ausjeepoffroad.com/forum/...d.php?t=121119
  #47  
Old 20-07-2013
Turismo07's Avatar
Turismo07  Turismo07 is offline
Full Flexer
 
Join Date: Aug 2008
Location: Perth
Posts: 919
What Jeep do I drive?: XJ
Likes: 185
Liked 121 Times in 86 Posts
Default Mundaring Powerlines

http://youtu.be/LOkemjF9Gow

How do I embed a vid like I see most people do on forums..?
__________________
JK CRD
KK
WJ Build - Sold
http://www.ausjeepoffroad.com/forum/...d.php?t=121119

Last edited by Turismo07; 20-07-2013 at 12:15 PM.
  #48  
Old 20-07-2013
Clarky's Avatar
Clarky  Clarky is offline
Irok Bandit
 
Join Date: Apr 2012
Location: Wang NSW
Age: 56
Posts: 4,431
What Jeep do I drive?: JT
Likes: 479
Liked 1,189 Times in 788 Posts
Check out my Ride(s)
Default

paste the web address of the youtube video
http://www.youtube.com/watch?v=LOkem...ature=youtu.be
Delete http:// & =youtu.be

www.youtube.com/watch?v=LOkemjF9Gow&feature
__________________
SOLD 06 Limited G/C QuadraDrive II Lovells 2"Lift +30 rims 265/70/17 Imported Saguaro Bar Stedi
  #49  
Old 20-07-2013
Turismo07's Avatar
Turismo07  Turismo07 is offline
Full Flexer
 
Join Date: Aug 2008
Location: Perth
Posts: 919
What Jeep do I drive?: XJ
Likes: 185
Liked 121 Times in 86 Posts
Default

Quote:
Originally Posted by Clarky View Post
paste the web address of the youtube video
Thanks Clarky
__________________
JK CRD
KK
WJ Build - Sold
http://www.ausjeepoffroad.com/forum/...d.php?t=121119
Post New Thread  Reply


Thread Tools Search this Thread
Search this Thread:

Advanced Search

Posting Rules
You may not post new threads
You may not post replies
You may not post attachments
You may not edit your posts

BB code is On
Smilies are On
[IMG] code is On
HTML code is On


All times are GMT +10. The time now is 05:09 PM.


Advertisements


AJOR does not vouch for or warrant the accuracy, completeness or usefulness of any message, and are not responsible for the contents of any message. The messages express the views of the author of the message, not necessarily the views of AJOR or any entity associated with AJOR, nor should any advice be substituted as technical advice replacing that of a mechanic. You agree, through your use of this service, that you will not use AJOR to post any material which is knowingly false and/or defamatory, inaccurate, abusive, vulgar, hateful, harassing, obscene, profane, sexually oriented, threatening, invasive of a person's privacy, religious, political or otherwise violative of any law. You agree not to post any copyrighted material unless the copyright is owned by you or by AJOR. The owner, administrators and moderators of AJOR reserve the right to delete any message or members for any or no reason whatsoever. You remain solely responsible for the content of your messages, and you agree to indemnify and hold harmless AJOR, the administrators, moderators, and their agents with respect to any claim based upon transmission of your message(s). The use of profile signatures to intentionally mislead or misdirect any member on this forum is not acceptable and may result in your account being suspended. Any trip that is organised through the AJOR forum is participated at your own risk. If you or your vehicle is damaged it is your responsibility, not that of the person that posted the thread, message or topic initiating the trip, nor the organisers of AJOR or moderators of any specific forum. This forum and associated website is the property of AJOR. No user data is harvested and no information supplied in your registration will be sold for profit.


Powered by vBulletin® Version 3.8.7
Copyright ©2000 - 2024, vBulletin Solutions, Inc.

AJOR © 2002 - 2024 AUSJEEPOFFROAD.COM. All corporate trademarked names and logos are property of their respective owners. Ausjeepoffroad is in no way associated with DaimlerChrysler Corporation or Fiat Jeep.
www.ausjeep.com www.ausjeep.com.au www.midlifemate.com ausjeepforum.com www.r9kustoms.com
vB Ad Management by =RedTyger=