Grand Willys Project - Page 256 - AUSJEEPOFFROAD.COM Jeep News Australia and New Zealand

Go Back   AUSJEEPOFFROAD.COM Jeep News Australia and New Zealand > JEEP GARAGE > Jeep build up
Register Forums Trading Your Jeep My Garage Mark All Read

Post New Thread  Reply
 
Thread Tools Search this Thread
  #1786  
Old 03-05-2021
billygoat  billygoat is offline
Senior Newbie
 
Join Date: Nov 2010
Location: Queanbeyan
Posts: 83
What Jeep do I drive?: WG
Likes: 54
Liked 11 Times in 8 Posts
Default

A mud flap on the rear would give the illusion of the front being higher
Likes: (2)
  #1787  
Old 03-05-2021
CJ6np435's Avatar
CJ6np435  CJ6np435 is offline
Lowranger Shocker
 
Join Date: Oct 2003
Location: Hobart TAS
Age: 62
Posts: 1,679
What Jeep do I drive?: CJ
Likes: 41
Liked 133 Times in 100 Posts
Default

looks better wider, I think shorter too.....
__________________
Not another V8!
Likes: (1)
  #1788  
Old 03-05-2021
Gojeep's Avatar
Gojeep  Gojeep is offline
LokRinger
 
Join Date: Jul 2002
Location: Victoria
Posts: 6,870
Likes: 789
Liked 1,754 Times in 556 Posts
Default

Quote:
Originally Posted by bodgie View Post
The guards help a lot and they definitely needed the extra length. I'm thinking the leading edge of the guard needs to be a little bit shorter, to me it doesn't look quite right.

Jason

Might look different once the step is added to it and the skirts.
__________________
Cheers, Marcus.

My web site:
http://willyshotrod.com Over 5'000 Club
  #1789  
Old 03-05-2021
Gojeep's Avatar
Gojeep  Gojeep is offline
LokRinger
 
Join Date: Jul 2002
Location: Victoria
Posts: 6,870
Likes: 789
Liked 1,754 Times in 556 Posts
Default


I wanted to get a better idea of close to final ride height. The centre coil is the stock Grand Cherokee donor one and had the rear sitting up 50mm-2" higher than stock due to so much less weight. On the right is a new Grand Cherokee SRT Eibach lowering coil that had it sitting 25mm-1" lower than stock. The only other spring I had on hand on the left was a stock rear coil spring from my KK Cherokee. Happened to have the same top and bottom coil size as the Grand Cherokee. When I fitted those it brought the back down to the stock donor height!


Just have the guard balanced on a block but gives a better idea of how the guard shape sits over the tyre.


This still leaves just under 25mm-1" of rake which is how I usually set my vehicles up. That way with the offroad camper trailer hitched and load it will sit level.
__________________
Cheers, Marcus.

My web site:
http://willyshotrod.com Over 5'000 Club
Likes: (7)
  #1790  
Old 09-05-2021
Gojeep's Avatar
Gojeep  Gojeep is offline
LokRinger
 
Join Date: Jul 2002
Location: Victoria
Posts: 6,870
Likes: 789
Liked 1,754 Times in 556 Posts
Default

Video update.

https://youtu.be/M_8LNajyc-I
__________________
Cheers, Marcus.

My web site:
http://willyshotrod.com Over 5'000 Club
Likes: (2)
  #1791  
Old 26-05-2021
Gojeep's Avatar
Gojeep  Gojeep is offline
LokRinger
 
Join Date: Jul 2002
Location: Victoria
Posts: 6,870
Likes: 789
Liked 1,754 Times in 556 Posts
Default


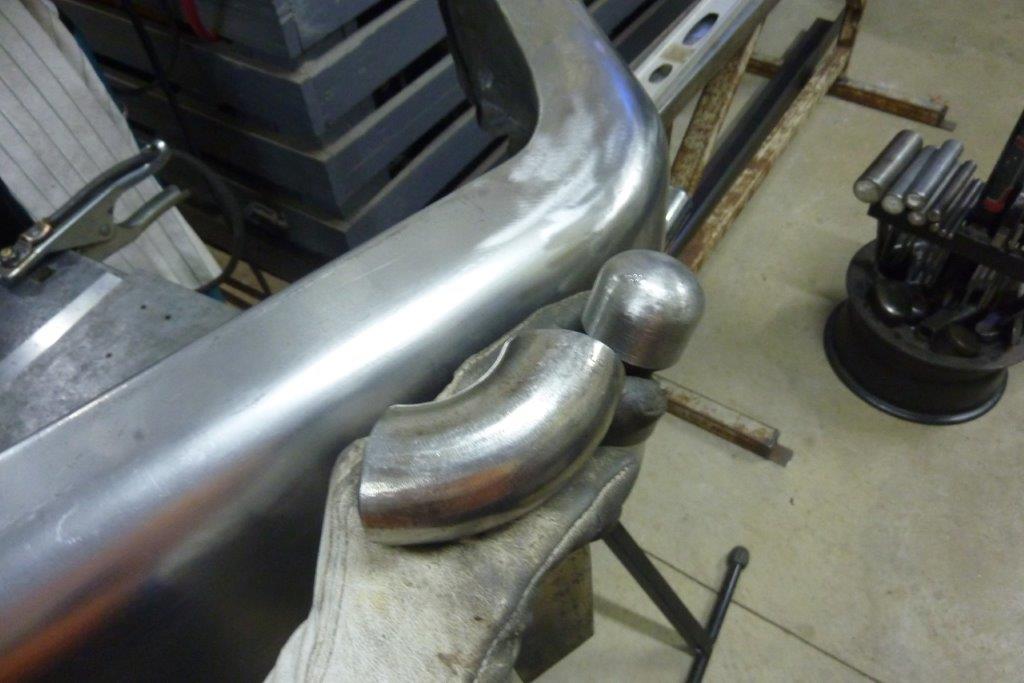
Been working out more of the dents in the radius. Found a modified tow ball and a steam pipe elbow made good dollies for the corners.


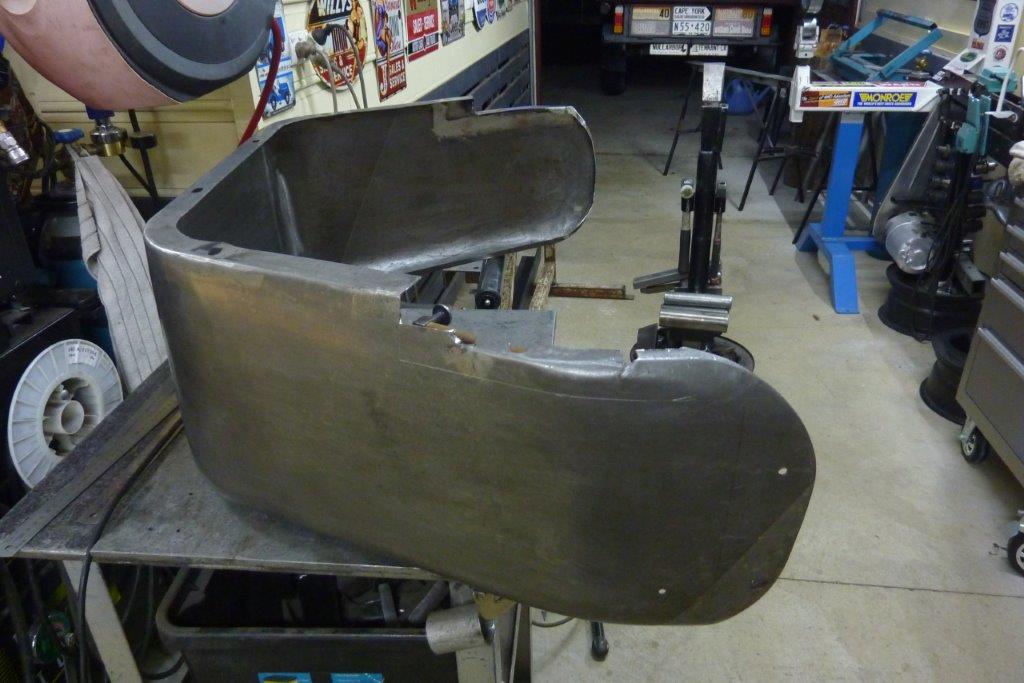
Also needed to address all the fatigue cracks where the skirts mount. Might be able to make out the line for the material I'm going to cut away.


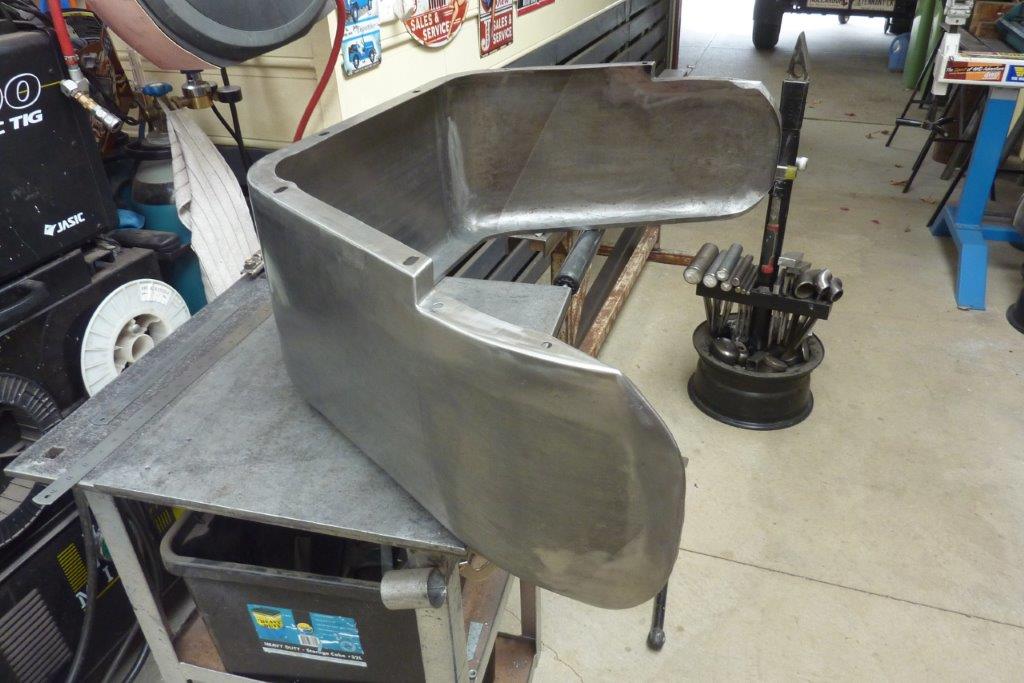
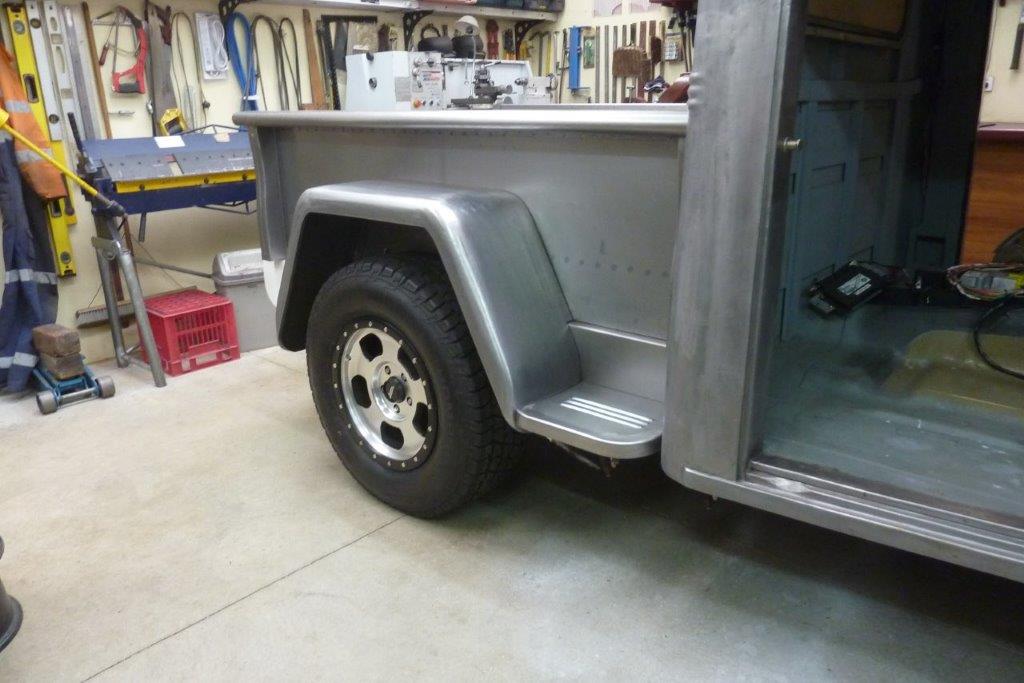
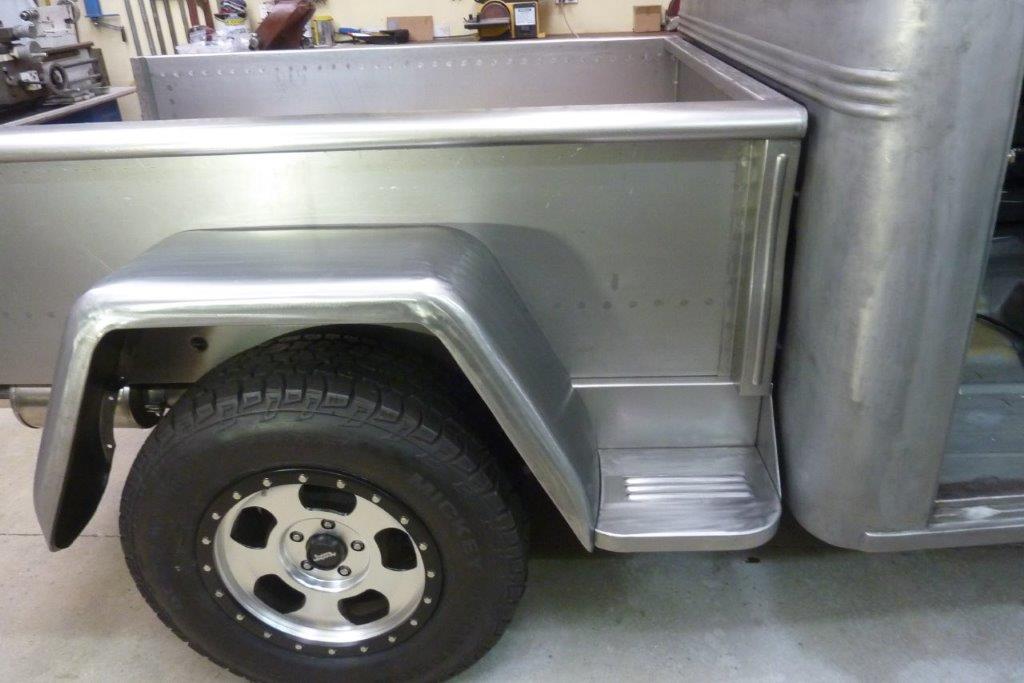
The area above the skirts was made longer to suit my deeper than stock bed sides. Also removed some of the crown where it meets the skirts to make it flow better.


What I also did was run the flange down into the cut away as the stock one on the right was way too thin there causing a stress riser and fatigue.


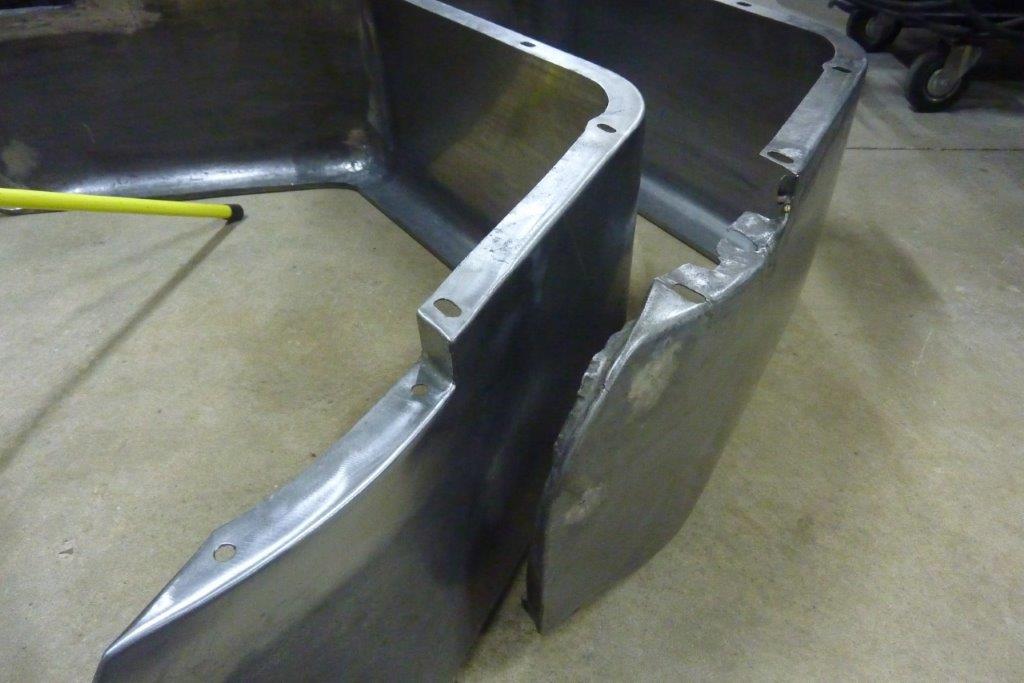
I looked into making the skirt and step in one piece. Problem was it actually reduced the amount of material right at the fold where the guard meets it. Don't like the shape either.


Tried a narrower version but still not nice, so will make them more like the stock ones.


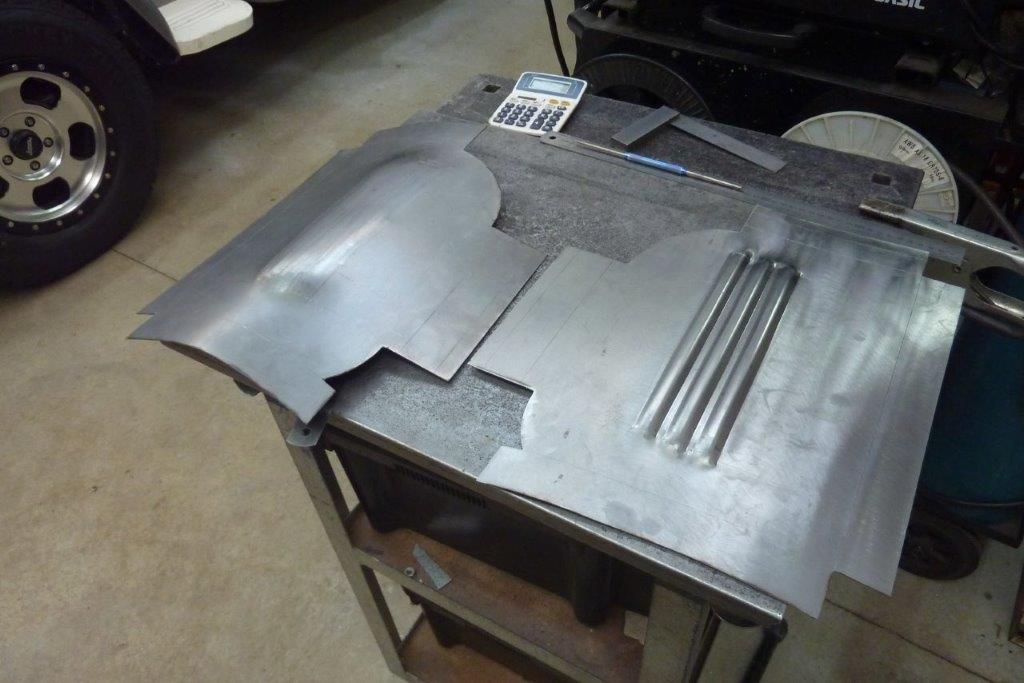
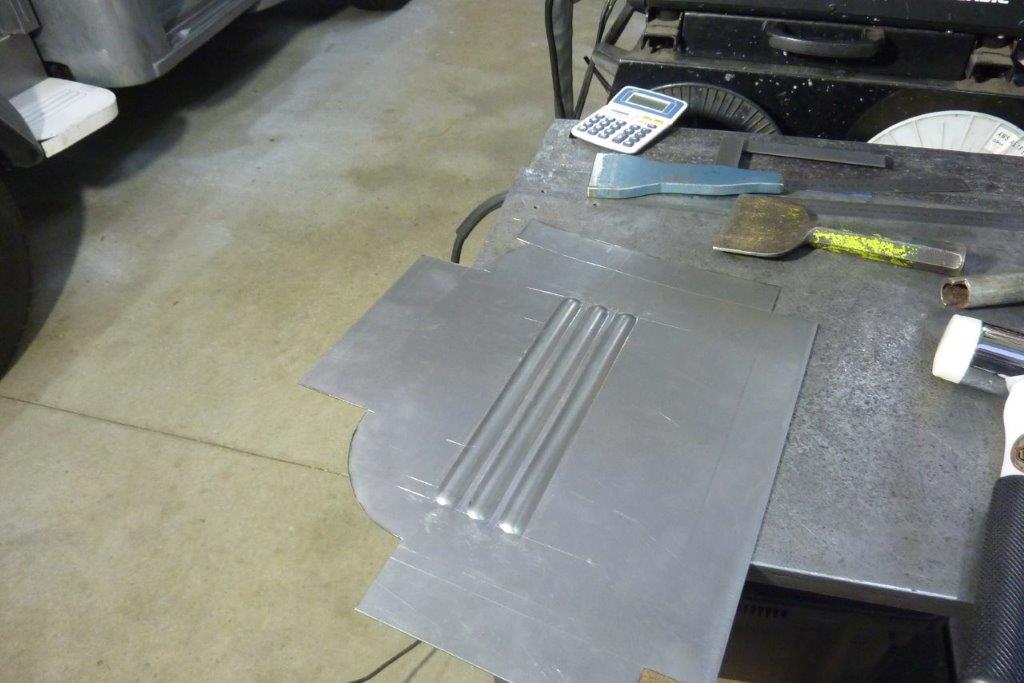
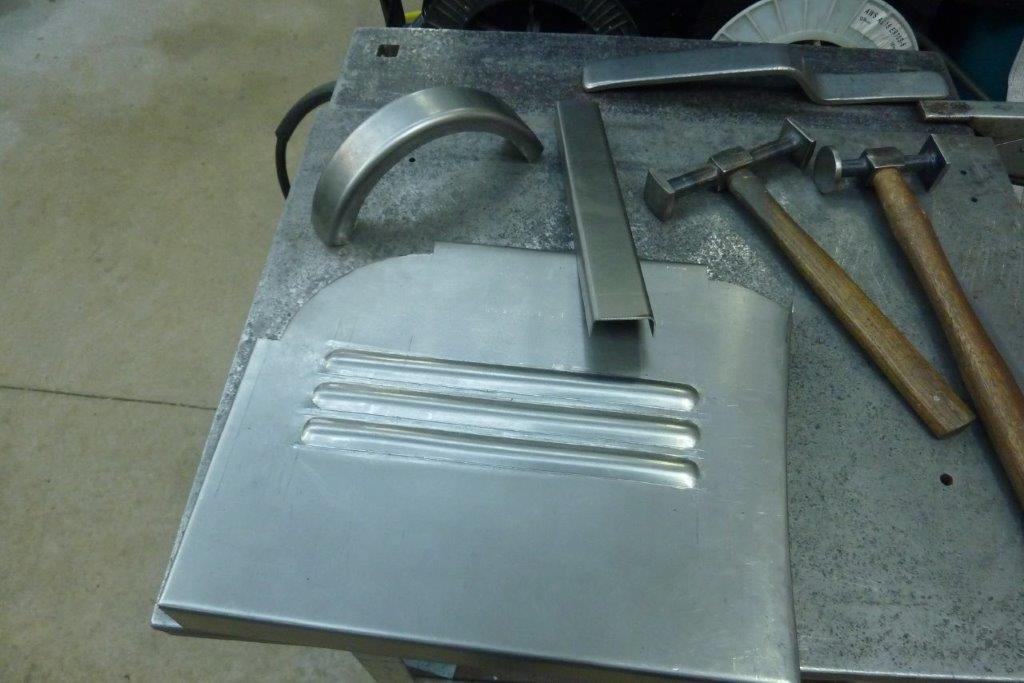
Made the skirt up first as a separate piece.


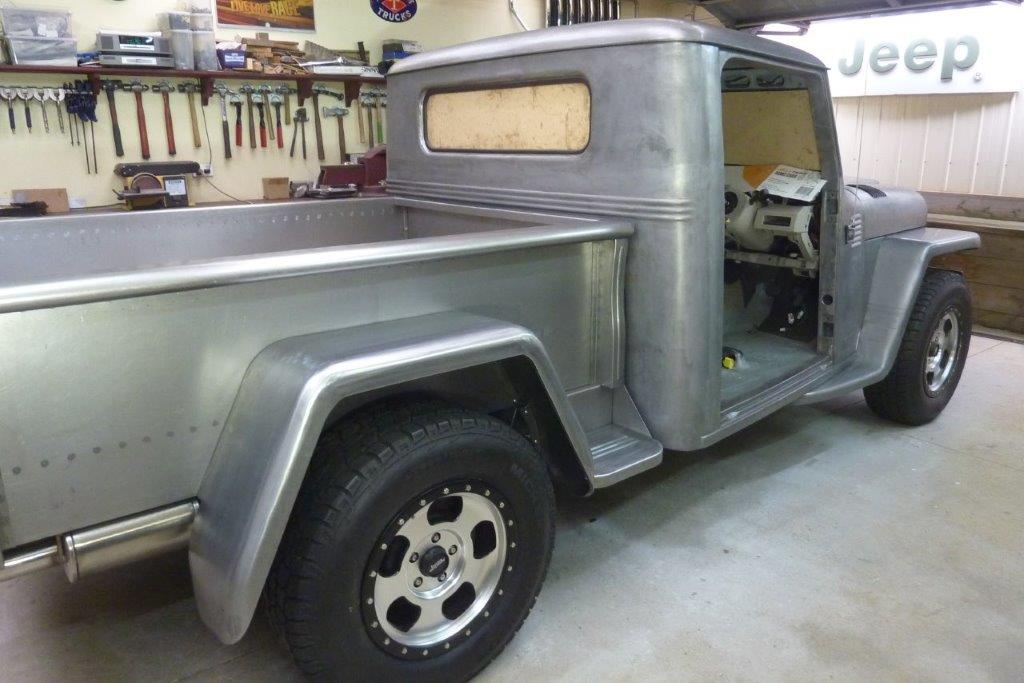
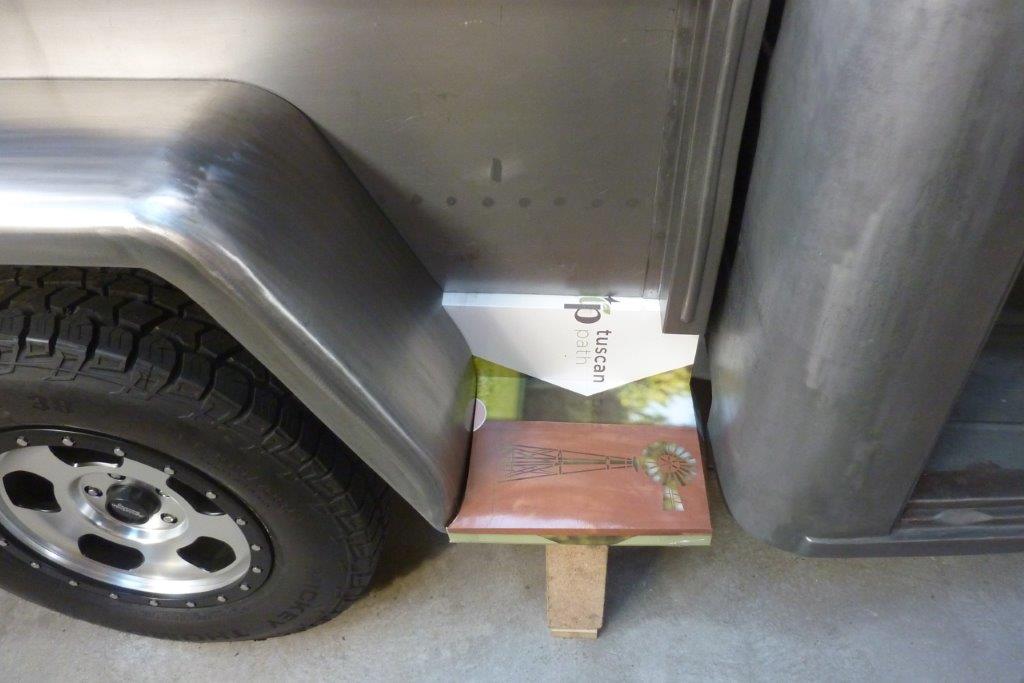
I have the depth matching the bottom of the cab.


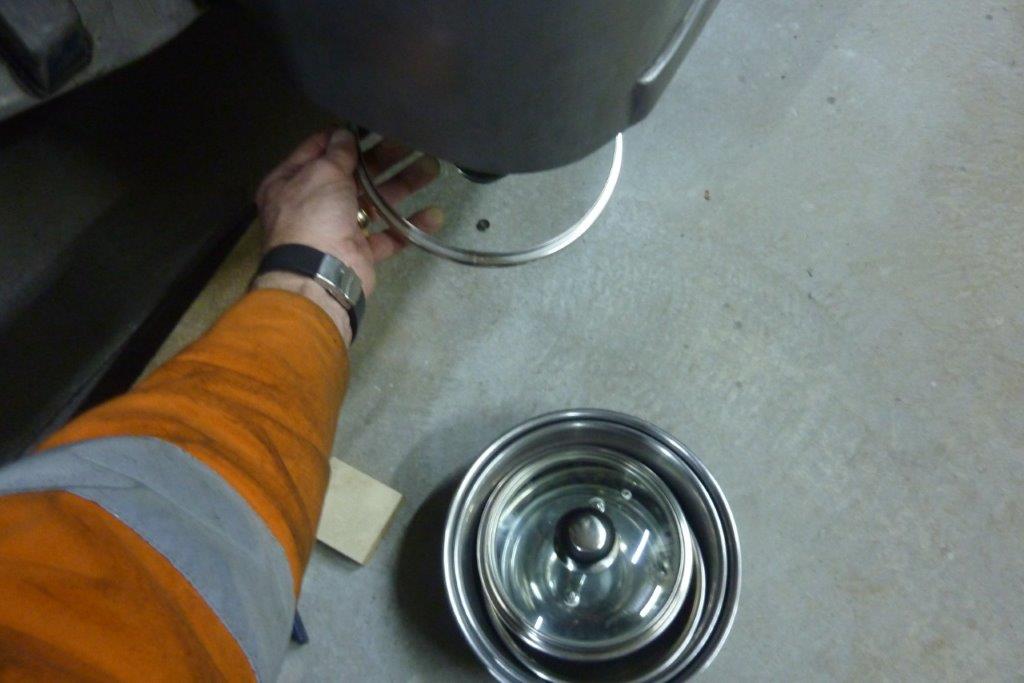
The stock ones had a curve like the back of the cab. Raided the kitchen to find a matching radius. 😃


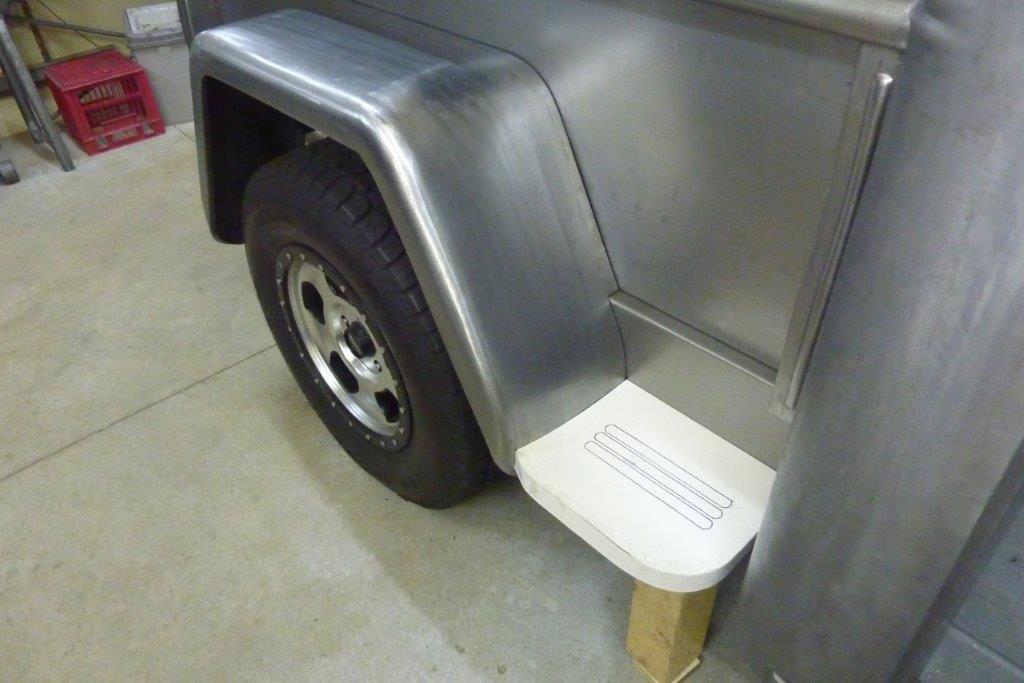
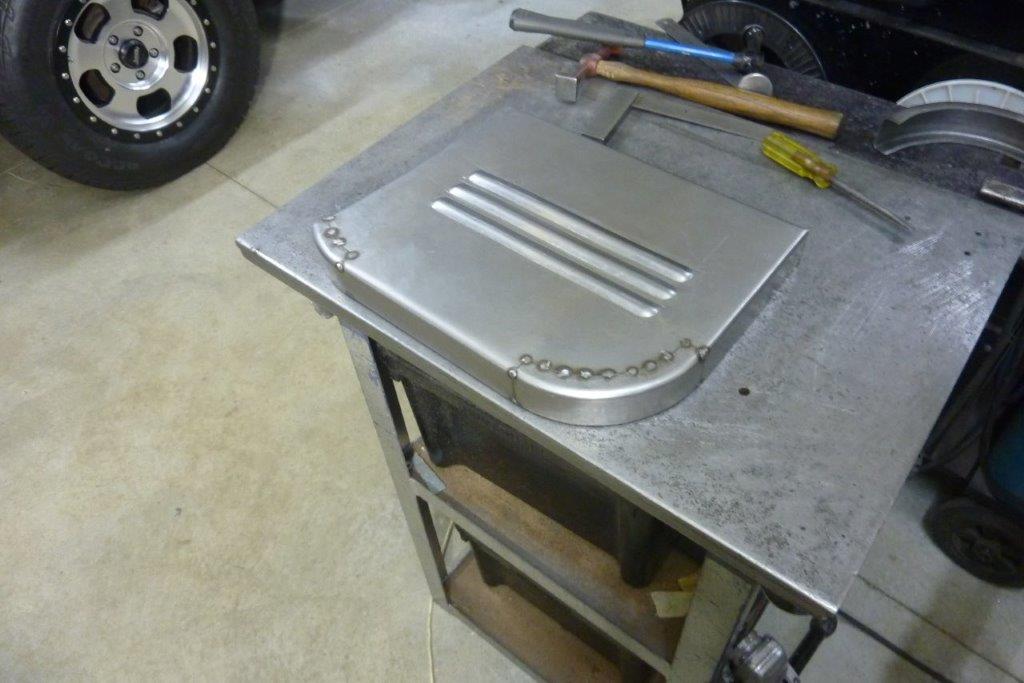
With the curves to the leading and trailing edges like stock, it looks much better.


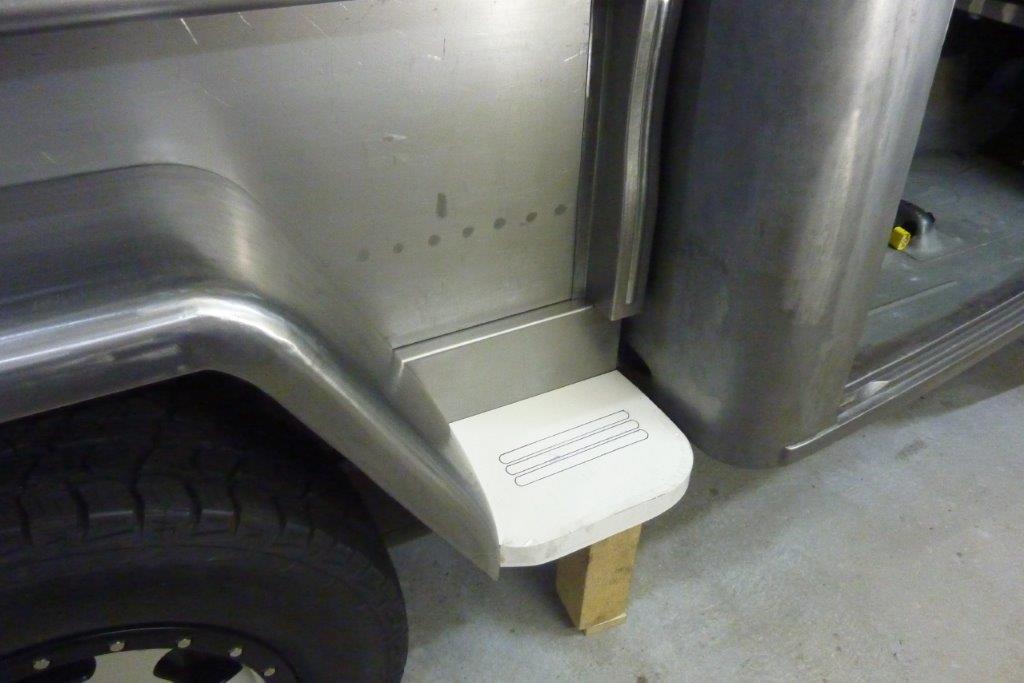
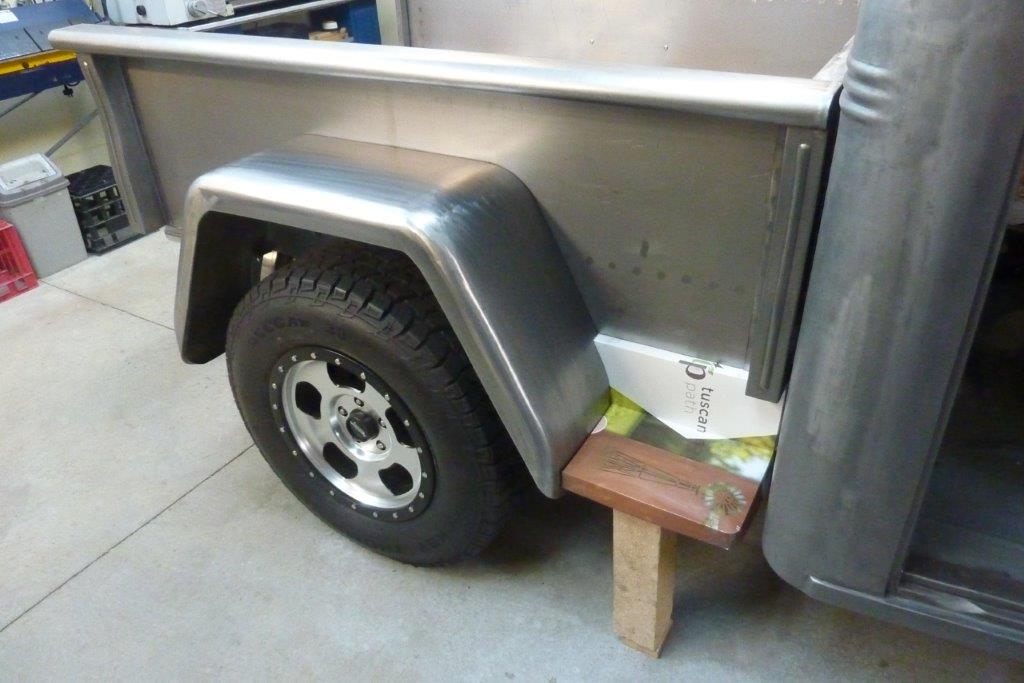
Will also add the bead rolls that the stock ones had. I don't like seeing the 'hole' in the corner under the cab where the sill curves up to meet the floor. This is normally not seen but is now because of my wider cab.


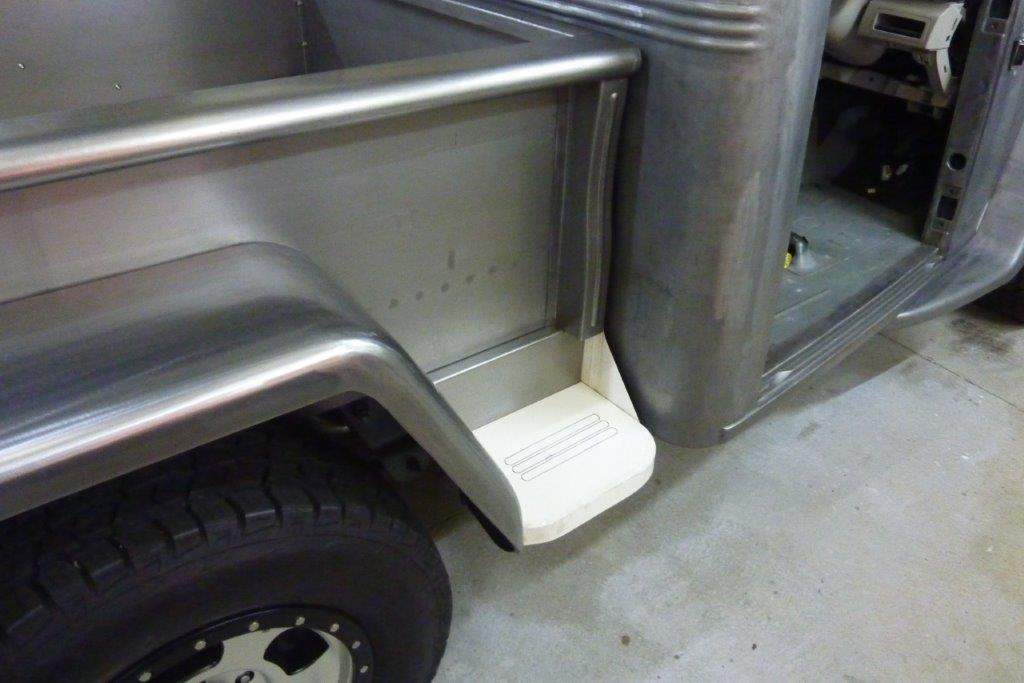
Thinking I will also add a brace at the front to act as a support, but also cover that hole in the corner. Frames the step better too.
__________________
Cheers, Marcus.

My web site:
http://willyshotrod.com Over 5'000 Club
Likes: (6)
  #1792  
Old 05-06-2021
Gojeep's Avatar
Gojeep  Gojeep is offline
LokRinger
 
Join Date: Jul 2002
Location: Victoria
Posts: 6,870
Likes: 789
Liked 1,754 Times in 556 Posts
Default


Making the steps. Doing both sides at once as quicker and it also makes sure I don't make two of the same side. Think we all have done that before! Also showing how much I have pre-stretched the right one where the beads will be formed.


Looks like I guessed well as very flat straight off the bead roller before any other work has commenced. Left one ready to go next.


I had these bead dies made for me the last time I was in the USA by Hoosier Profiles. I designed them to be offset so that the thin side would match the stock bead spacing. Last bead is only on the first pass.


I dressed the ends by rounding them using some notched water pipe. Also used the bolster and chaser down the sides of the beads.


Came out dead flat in every direction.


I had decided on doing the curved sections separately by folding some channel and then shrinking the flanges to match the curve.


Tacked in place ready for tig welding.


I used a softer radius for the front top edge and made the other bends the same as normal for that thickness of sheet. The shallow curved side is to match the crown of the guard.


Got it clamped into position to check fitment.


All bolted in. I also added support straps from the bottom of the skirts back to the chassis which greatly removed the flex the guard had. Stock they ran a rod from the bottom of the guard back to the chassis as well, but most times they are missing which leads to all the fatigue cracks.


The step also stops racking and will minimise the stone chipping on the front face of the guard. Rear skirts next.
__________________
Cheers, Marcus.

My web site:
http://willyshotrod.com Over 5'000 Club
Likes: (4)
Post New Thread  Reply


Posting Rules
You may not post new threads
You may not post replies
You may not post attachments
You may not edit your posts

BB code is On
Smilies are On
[IMG] code is On
HTML code is On


All times are GMT +10. The time now is 01:26 AM.


Advertisements


AJOR does not vouch for or warrant the accuracy, completeness or usefulness of any message, and are not responsible for the contents of any message. The messages express the views of the author of the message, not necessarily the views of AJOR or any entity associated with AJOR, nor should any advice be substituted as technical advice replacing that of a mechanic. You agree, through your use of this service, that you will not use AJOR to post any material which is knowingly false and/or defamatory, inaccurate, abusive, vulgar, hateful, harassing, obscene, profane, sexually oriented, threatening, invasive of a person's privacy, religious, political or otherwise violative of any law. You agree not to post any copyrighted material unless the copyright is owned by you or by AJOR. The owner, administrators and moderators of AJOR reserve the right to delete any message or members for any or no reason whatsoever. You remain solely responsible for the content of your messages, and you agree to indemnify and hold harmless AJOR, the administrators, moderators, and their agents with respect to any claim based upon transmission of your message(s). The use of profile signatures to intentionally mislead or misdirect any member on this forum is not acceptable and may result in your account being suspended. Any trip that is organised through the AJOR forum is participated at your own risk. If you or your vehicle is damaged it is your responsibility, not that of the person that posted the thread, message or topic initiating the trip, nor the organisers of AJOR or moderators of any specific forum. This forum and associated website is the property of AJOR. No user data is harvested and no information supplied in your registration will be sold for profit.


Powered by vBulletin® Version 3.8.7
Copyright ©2000 - 2024, vBulletin Solutions, Inc.

AJOR © 2002 - 2024 AUSJEEPOFFROAD.COM. All corporate trademarked names and logos are property of their respective owners. Ausjeepoffroad is in no way associated with DaimlerChrysler Corporation or Fiat Jeep.
www.ausjeep.com www.ausjeep.com.au www.midlifemate.com ausjeepforum.com www.r9kustoms.com
vB Ad Management by =RedTyger=