Grand Willys Project - Page 264 - AUSJEEPOFFROAD.COM Jeep News Australia and New Zealand

Go Back   AUSJEEPOFFROAD.COM Jeep News Australia and New Zealand > JEEP GARAGE > Jeep build up
Register Forums Trading Your Jeep My Garage Mark All Read

Post New Thread  Reply
 
Thread Tools Search this Thread
  #1842  
Old 15-08-2021
CJ6np435's Avatar
CJ6np435  CJ6np435 is offline
Lowranger Shocker
 
Join Date: Oct 2003
Location: Hobart TAS
Age: 62
Posts: 1,679
What Jeep do I drive?: CJ
Likes: 41
Liked 133 Times in 100 Posts
Default

it's Sunday night?
__________________
Not another V8!
Likes: (1)
  #1843  
Old 18-08-2021
Gojeep's Avatar
Gojeep  Gojeep is offline
LokRinger
 
Join Date: Jul 2002
Location: Victoria
Posts: 6,870
Likes: 789
Liked 1,754 Times in 556 Posts
Default


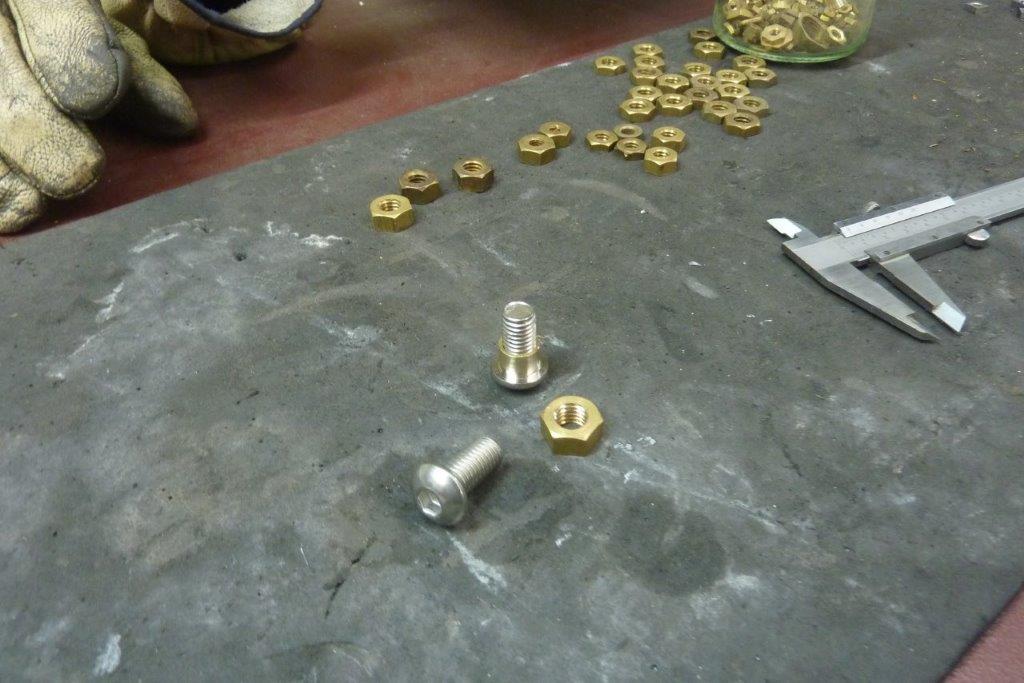
Decided to build my own hinges for the tailgate. I couldn't buy shouldered bolts in the size I wanted, so used a brass nut and machined it down on the lathe to become a threaded collar.
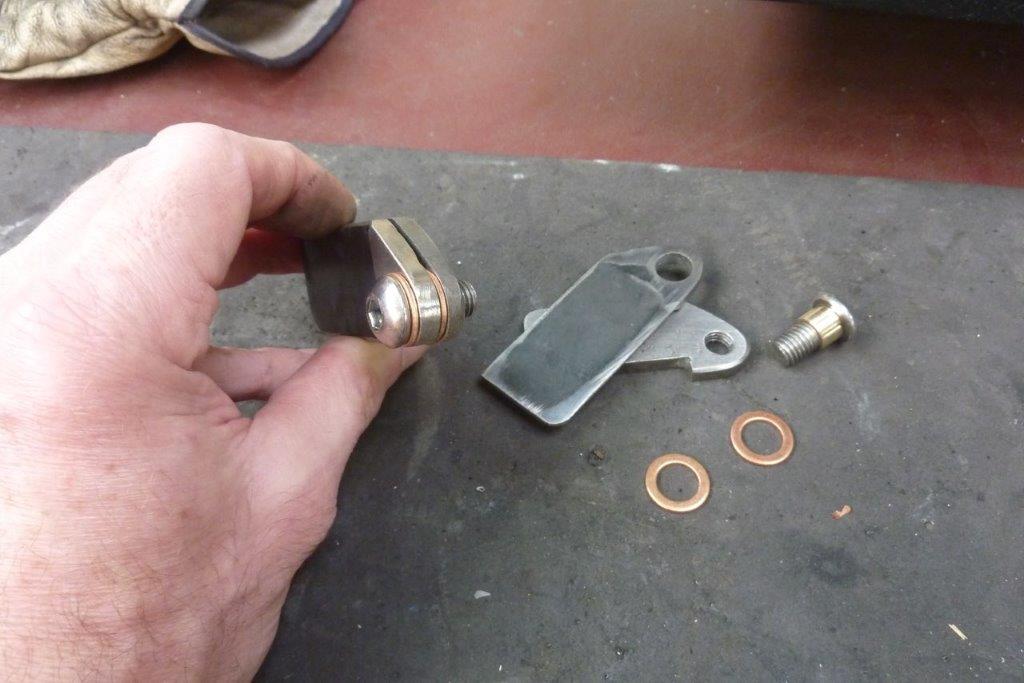

I made the brass collar slightly wider than the two copper washers and one side of the hinge plate. The other side was drilled and tapped.
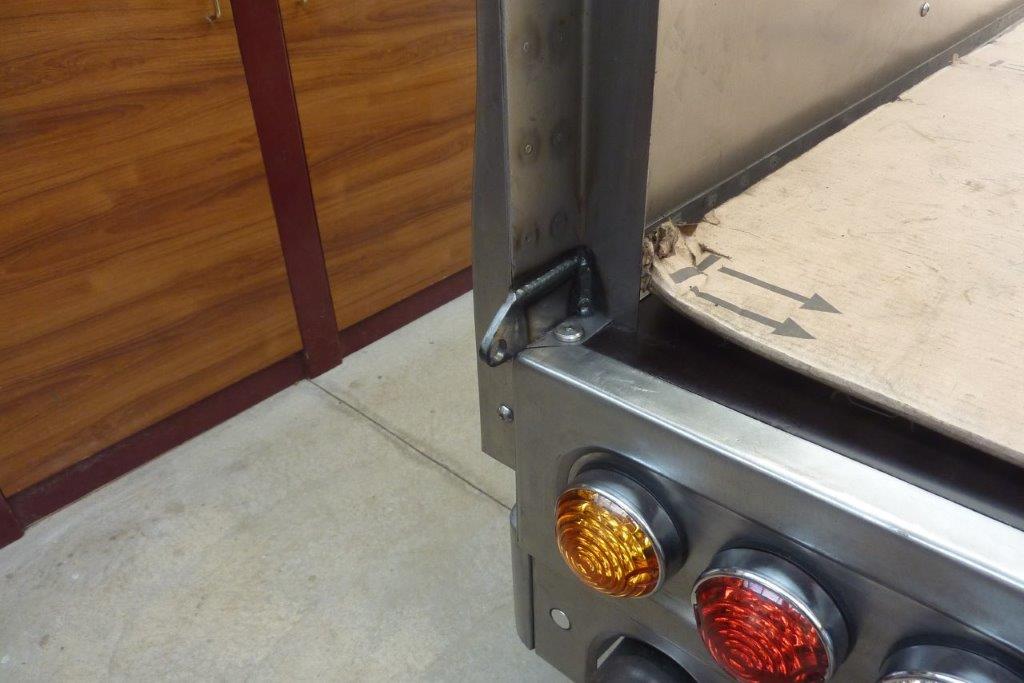

Welded one side to the bedside.
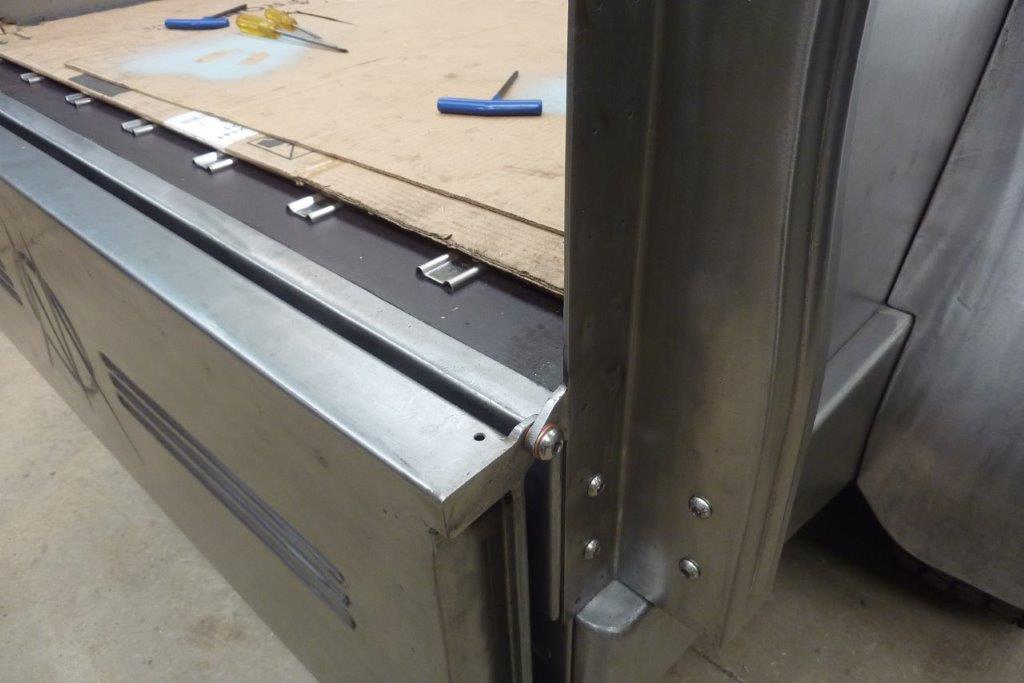

The other side of the hinge was welded to the tailgate becoming the cap for the bottom folded section. Notice the drain hole too. I drilled three 5mm-3/16" drain holes, the same as the factory tailgate has. The seal will sit on the other side of them. Tailgate can hinge down vertically if wanted and rests on the spare tyre.
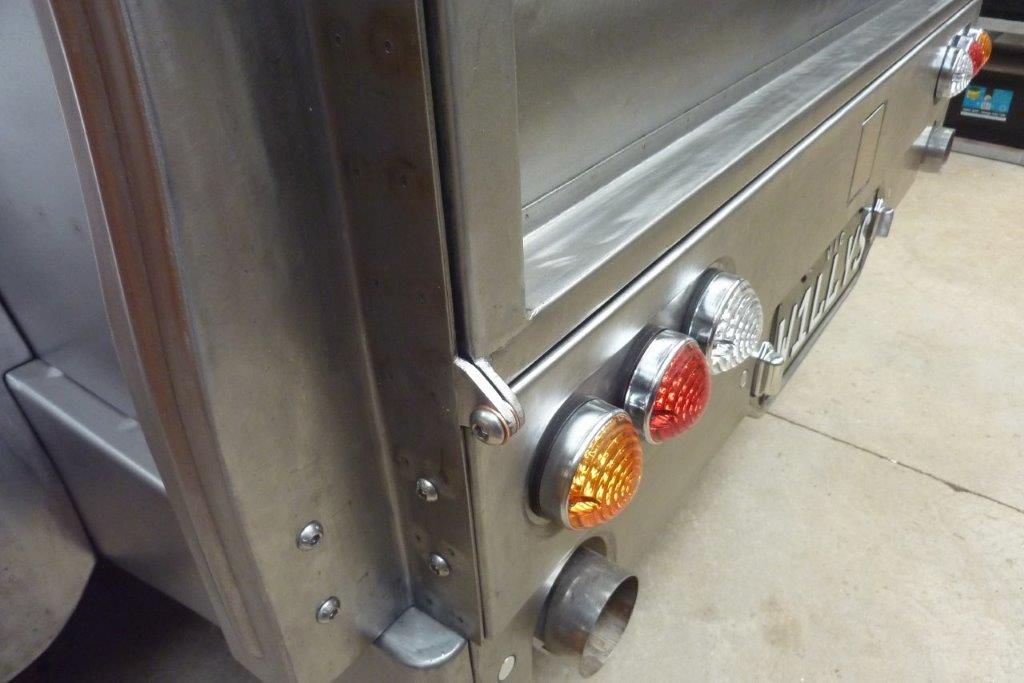

Think they are neater than a long piano hinge or the bulky gate looking ones you often see. The tailgate is not heavy at all and only weighs 20 lbs or less than 10 kg.
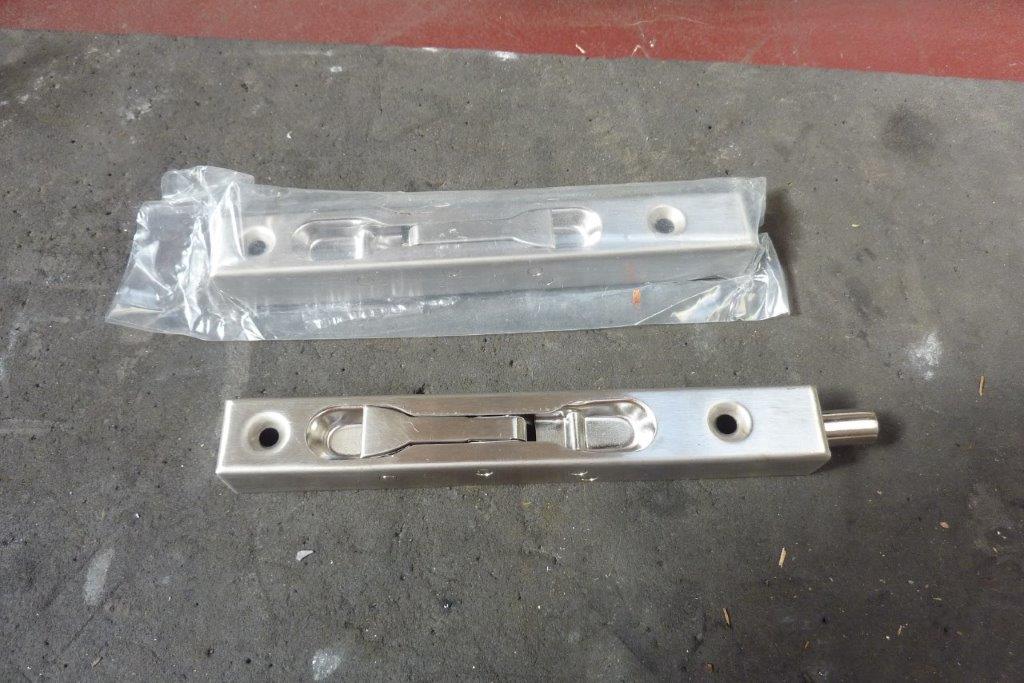

For the latches I didn't like the cheap looking, but expensive to buy, concealed latches. I thought these flush door bolts might do the trick which are made from stainless steel. They are normally used in buildings to latch one door closed on a set of double doors.
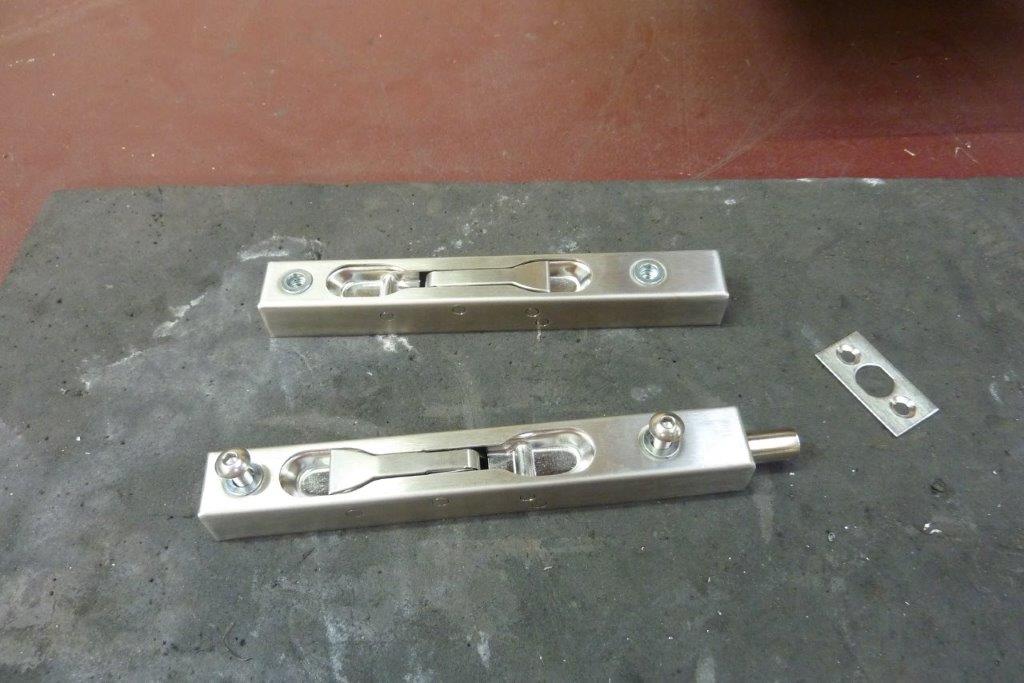

I put some threaded inserts in the mounting holes as I wouldn't be able to get to the back of them once mounted. The other way to mount them would be to french them into a piece of channel and use the provided stainless counter sunk self tappers.
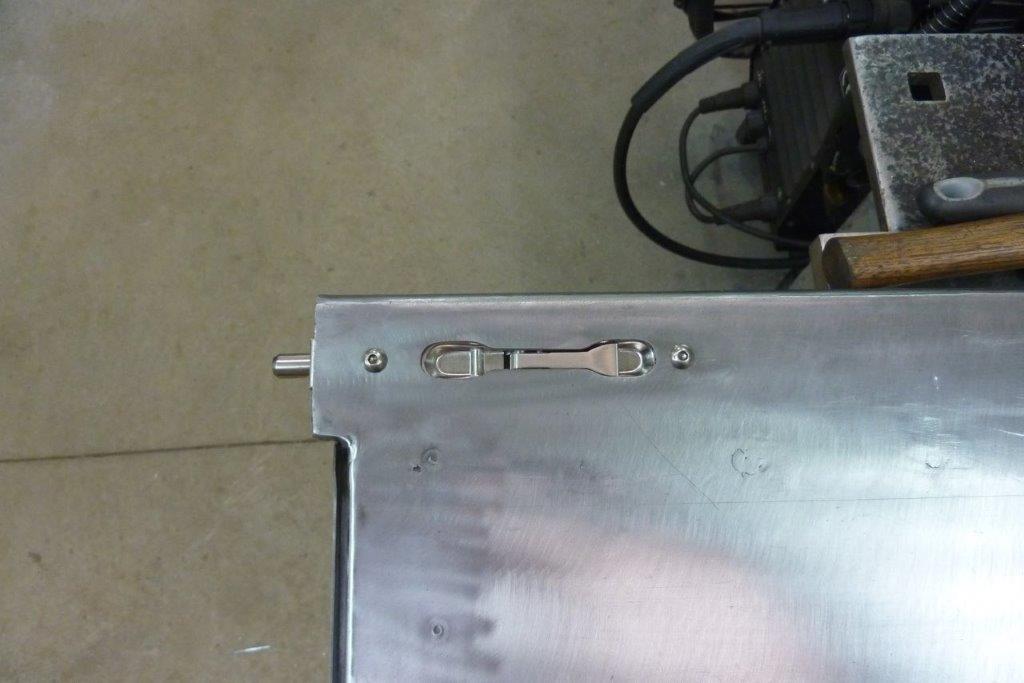

I cut a hole that showed the minimum possible to operate the lever. A straight sided slot with rounded ends would have been easier though!
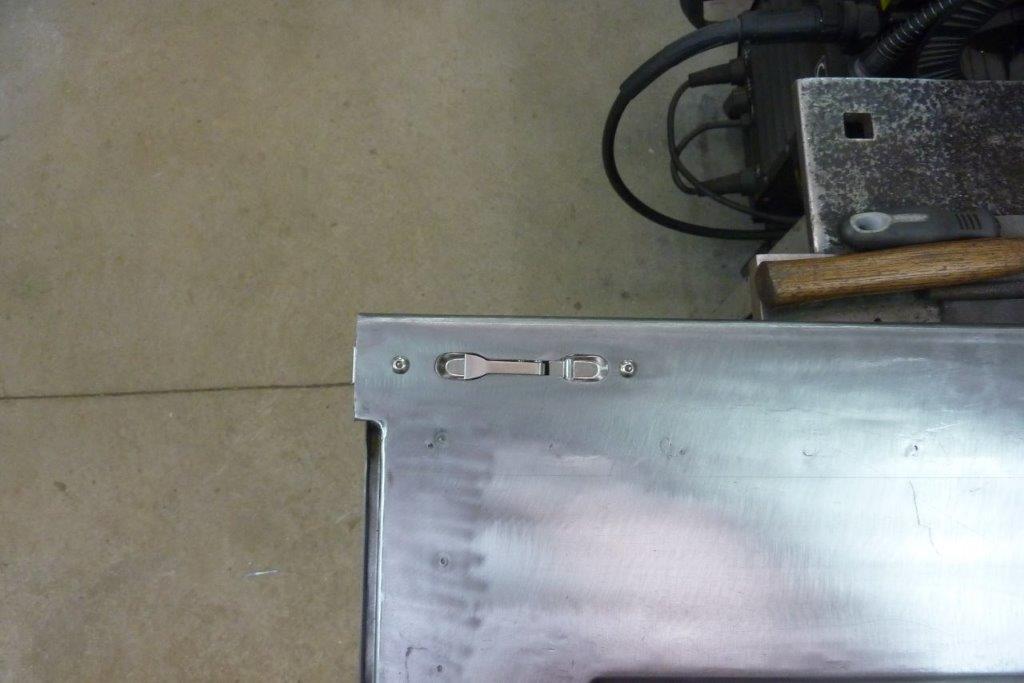

The lever lifts up and then closes flush facing the other way withdrawing the 10mm bolt.
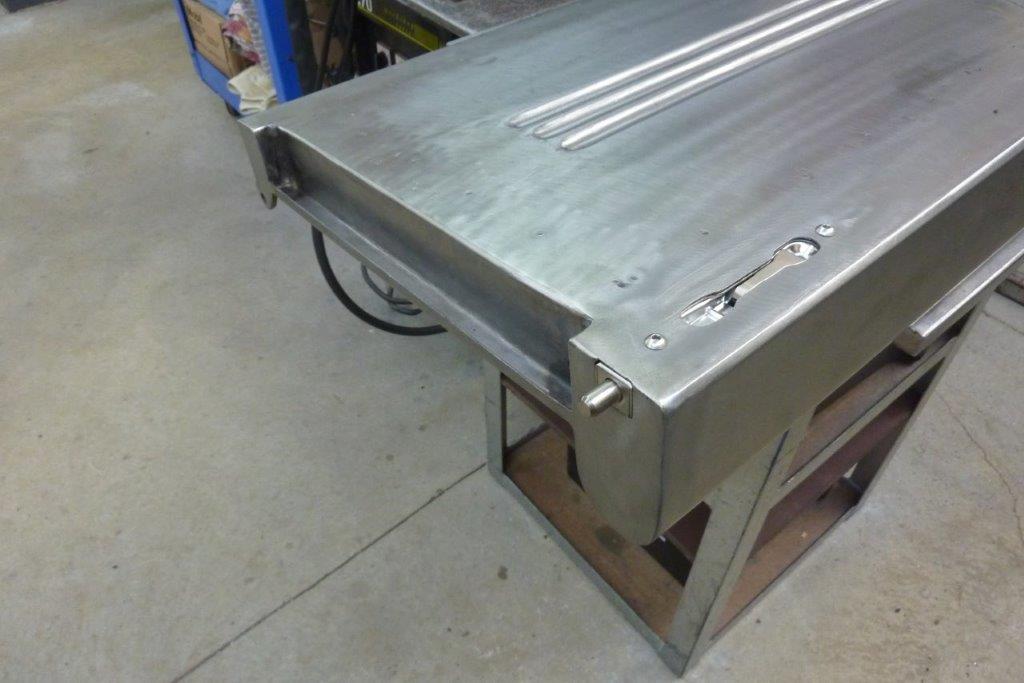

I made the end cap go around the end so I can slide the whole fitting back out at any time.
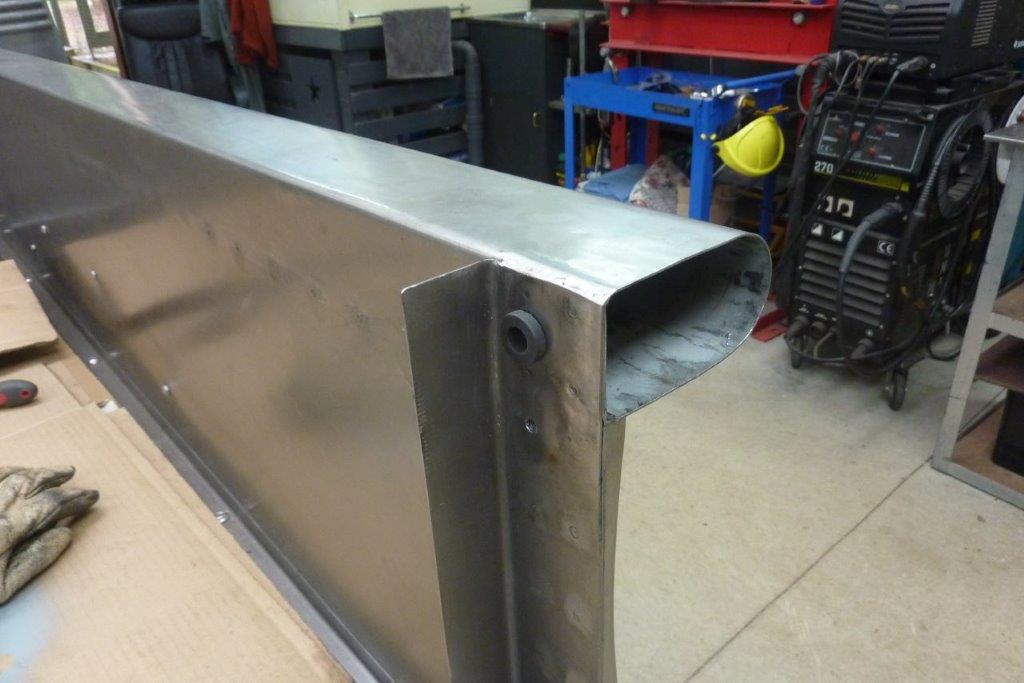

Rather than have it rattling in a hole, I fitted a grommet I had to cushion it.
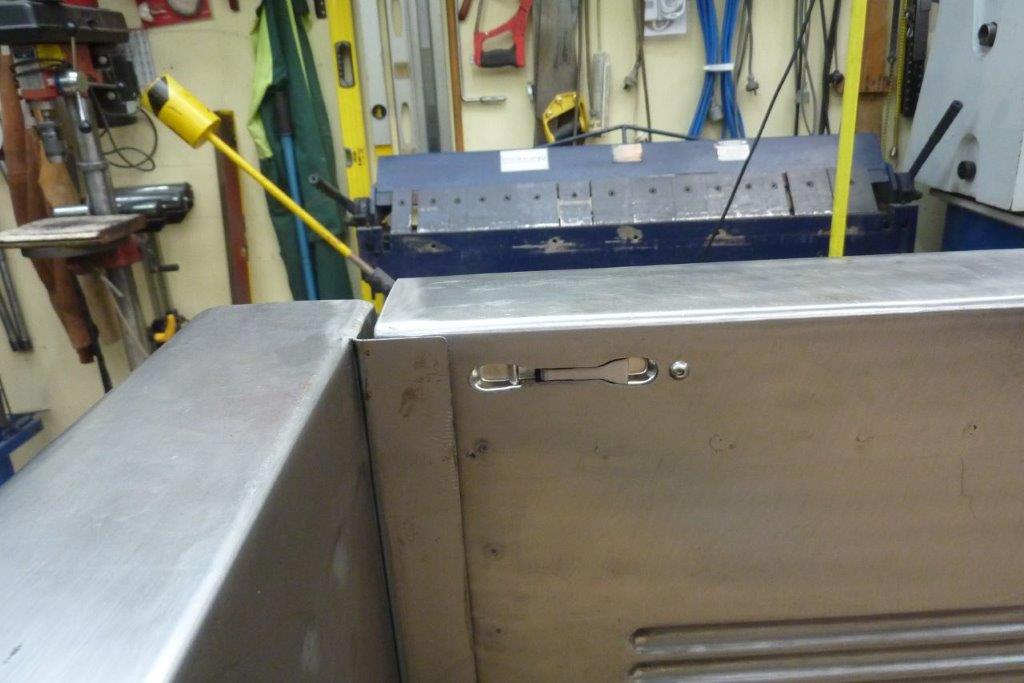

Nice and neat.
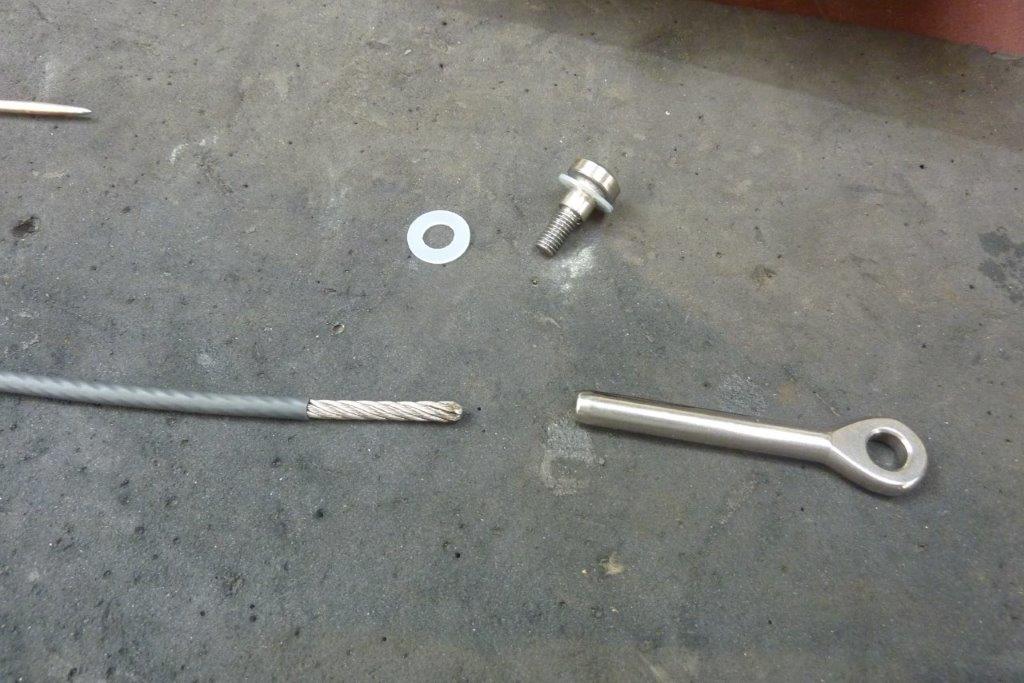

Decided to make my own cable stays. Using 4mm-5/32" stainless steel balustrade cable. The terminal eye came from a marine supplier. The shouldered stainless bolt is actually to hold a fairing on a Honda. Bought some nylon washers to go each side of the eye.
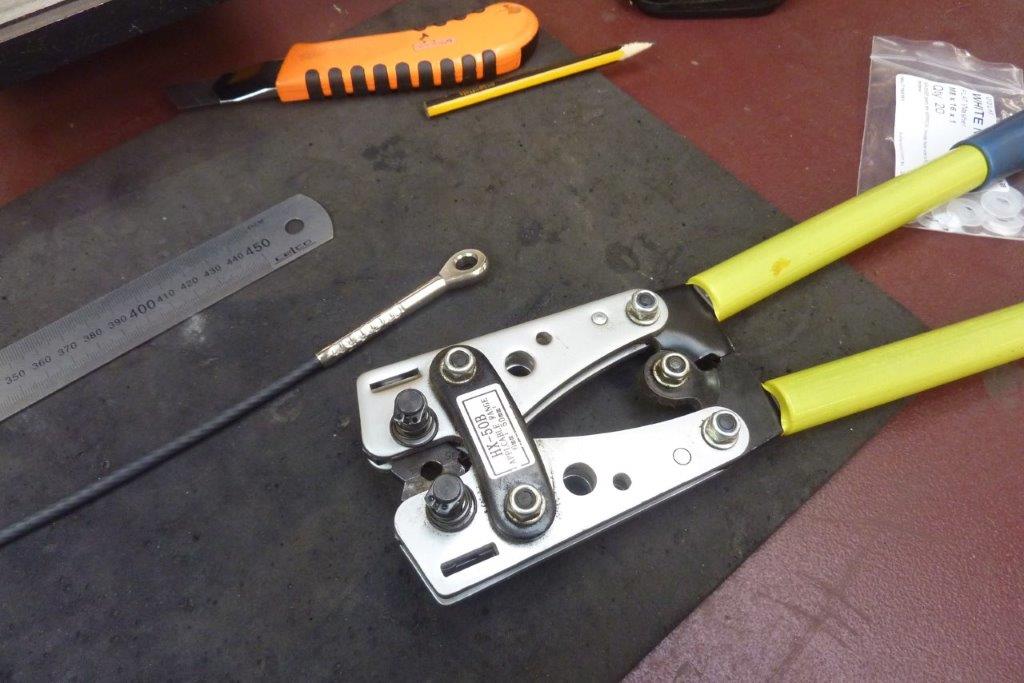

I swaged the eye on just using a cable swaging tool, but is not designed for the stainless. I have a hydraulic swager with hardened dies coming. Rather have the tool than pay someone to do it.
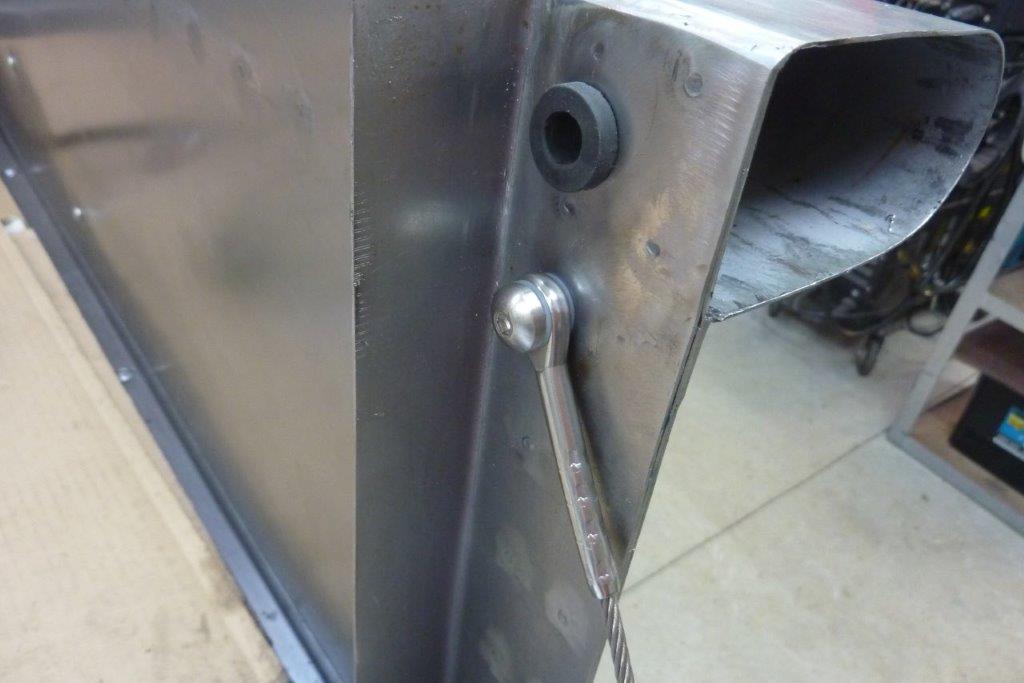

This is how it sits with a nylon washer each side to keep it from rubbing on the sides. It is free to move even once fully tight against the shoulder of the bolt.


Before putting on the other end, I put some heat shrink over the stainless cable to stop it rubbing on the paint later on.
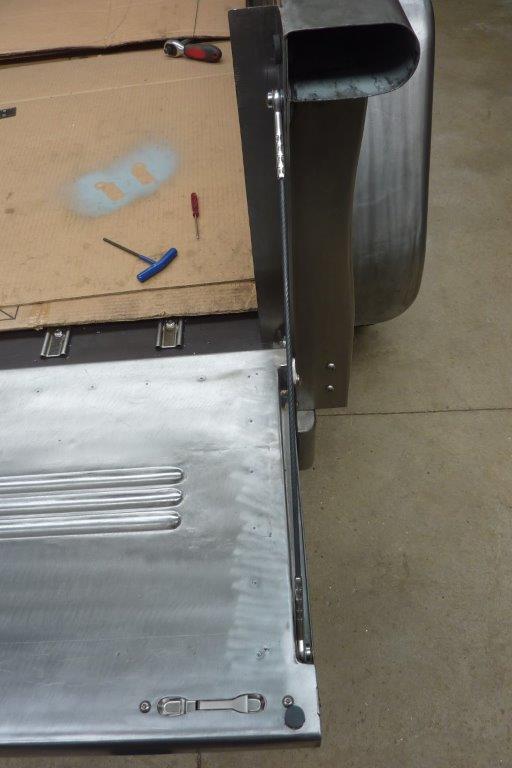

Can see now why I made a pocket in the end of the tailgate to take the cable stays.
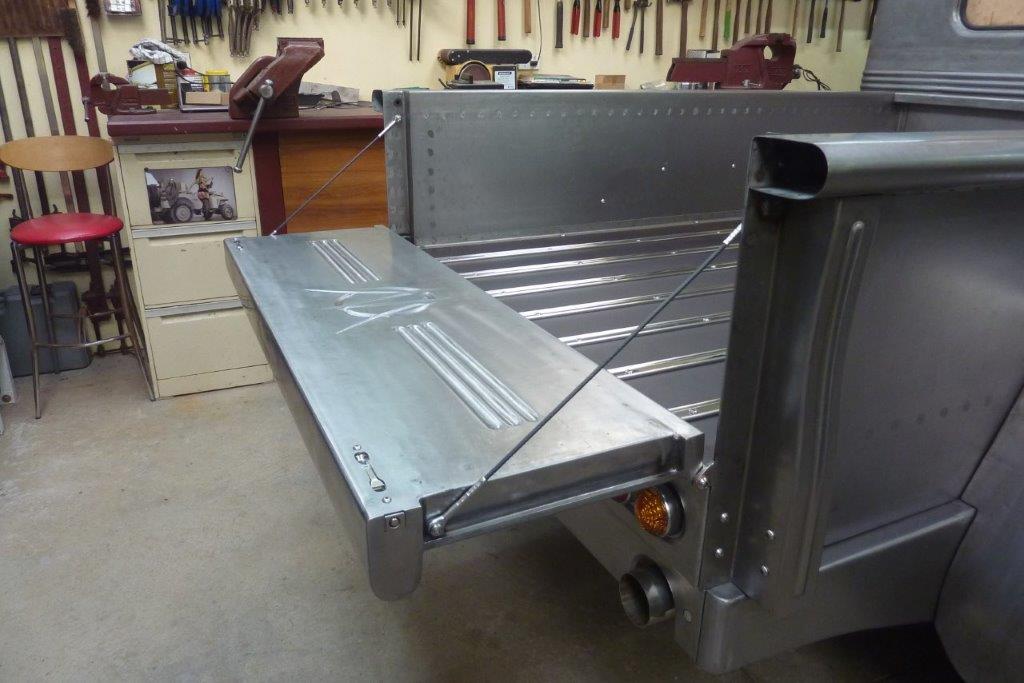

The tailgate has some threaded plate on the inside, as does the bedside, that the bolt screws into.
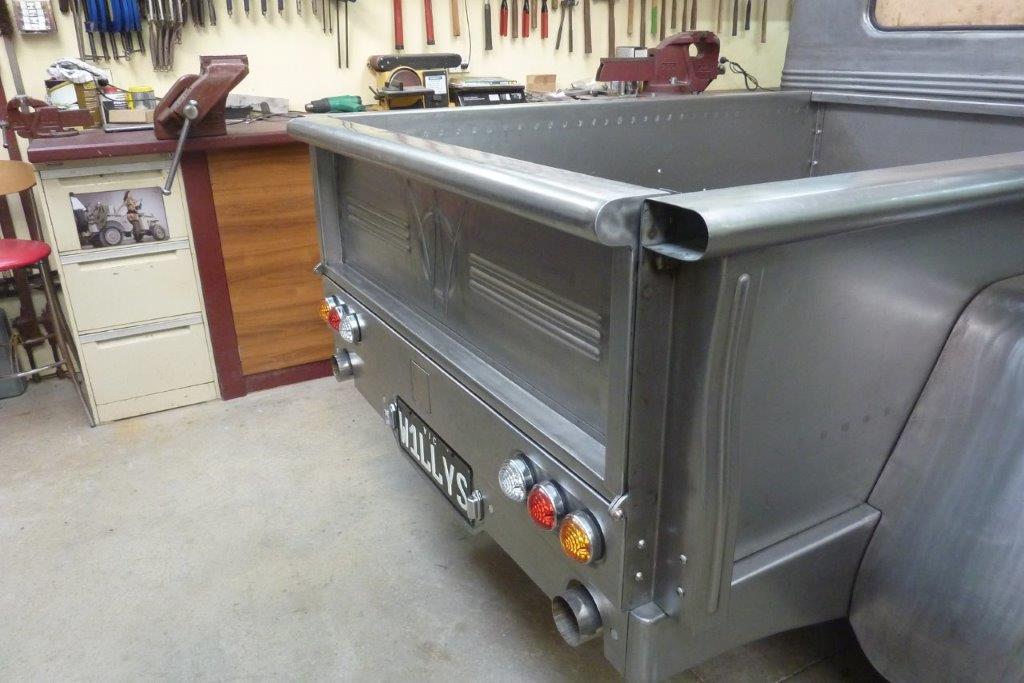

The cable stay bolts end up sitting next to each other and the cables are out of sight.
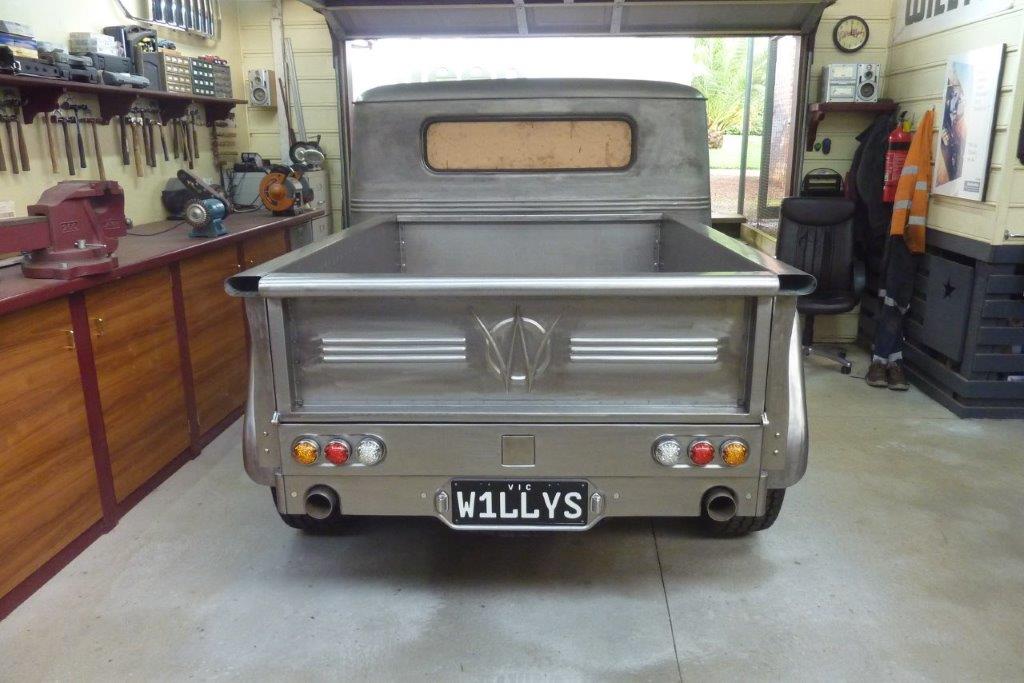

I have also finished framing the ends of the tailgate and made the hitch cover flush by skinning the stainless cover. Has calmed that area down a bit more. The bedside rounded ends can be done next.
__________________
Cheers, Marcus.

My web site:
http://willyshotrod.com Over 5'000 Club
Likes: (5)
  #1844  
Old 18-08-2021
CJ6np435's Avatar
CJ6np435  CJ6np435 is offline
Lowranger Shocker
 
Join Date: Oct 2003
Location: Hobart TAS
Age: 62
Posts: 1,679
What Jeep do I drive?: CJ
Likes: 41
Liked 133 Times in 100 Posts
Default

well thought out Gojeep, some great solutions!, I got down to the sliding bolt and thought yeah I'd put a bush in there to stop it rattling, next pic!!, love the way the cable stay is neatly hidden, beautiful work
__________________
Not another V8!
Likes: (1)
  #1845  
Old 18-08-2021
bodgie's Avatar
bodgie  bodgie is offline
Rock Munki
 
Join Date: Aug 2009
Location: Castle Hill, NSW
Posts: 2,136
What Jeep do I drive?: WG
Likes: 11
Liked 300 Times in 245 Posts
Default

Looks good. You forget how old truck beds like this were just a box with a dropdown end. No flush loading tray for you
Likes: (1)
  #1846  
Old 18-08-2021
Gojeep's Avatar
Gojeep  Gojeep is offline
LokRinger
 
Join Date: Jul 2002
Location: Victoria
Posts: 6,870
Likes: 789
Liked 1,754 Times in 556 Posts
Default

Thanks guys.
__________________
Cheers, Marcus.

My web site:
http://willyshotrod.com Over 5'000 Club
  #1847  
Old 23-08-2021
Gojeep's Avatar
Gojeep  Gojeep is offline
LokRinger
 
Join Date: Jul 2002
Location: Victoria
Posts: 6,870
Likes: 789
Liked 1,754 Times in 556 Posts
Default


Starting on the rounded corners for the bedsides. These are 304 stainless, as being in a lockdown, could only choose from what I could find online locally. Would have preferred steel but they also had a larger radius than what I was after. I laid the bend down flat and rubbed it over the sandpaper to show where the top and bottom horizontal plane was. Then cut away the inside radius.


I am only using the other shell so it can get a proper butt weld that can be planished after welding. Also makes it less likely that the weld line will show up later with temperature changes.


I first welded the corner shell on and ground and planished the weld. Then added the fill in triangle at the top and doing the same again.


Always making sure it was brought back into alignment which each piece added.


By doing it in stages in situ, I had better access to the last weld done.


Last piece was the end cap to finish off this corner.


I have the same gap right around the tailgate of 4mm-5/32" like my doors etc.


For the other side I tried a different approach to see if it was any better or faster. Made the corner piece completely and was much easier and faster as could hammer it over a stake to planish it.


The down side is the weld is now deep inside the corner and can see how much it pulled the corner down out of alignment. I even used the popular tack and let cool method here to try and minimize it.


I supported the corner with the timber, not to force it upwards, but to stop the bottom edge getting bent downwards as I manipulated the metal using things like an old jack hammer bit!


What I did see happen is a fine crack appear in the mig weld after using the cold tack method. I don't have this happen if I do the hot tack stacking technique. It only happened on section on the top rather than the bottom. Only difference was that there was a small gap in the join along the bottom and shows why some that do the cold tack method, leave a gap or grind a bevel to the edge. I fixed it by cutting a groove and hot tack staking the weld. The extra shrinkage helped pull the corner up as well.


I also used some PDR tools, Paintless Dent Removal, to lift a few small low spots to finish it off.


Both corners now complete.


Looks much more integrated now with the bedsides flowing into the tailgate.


Overall shot. Looks custom without being in your face obvious.
__________________
Cheers, Marcus.

My web site:
http://willyshotrod.com Over 5'000 Club
Likes: (2)
  #1848  
Old 23-08-2021
BENAMON  BENAMON is offline
Established Member
 
Join Date: Aug 2008
Location: Gold Coast
Posts: 190
What Jeep do I drive?: JK
Likes: 23
Liked 29 Times in 26 Posts
Default

That looks incredible. It's amazing how just adding the corner pieces has totally changed the look of the rear. Great work as always

Just a thought with the cables for holding the drop tailgate - have you considered making quick releases so you can drop the tailgate all the way (180 deg) like you have done in those pics, which would give you a flat no-step slide onto the tray? (and would require rubber stoppers to prevent marks on the paintwork when fully dropped).
Likes: (1)

Last edited by BENAMON; 23-08-2021 at 09:24 PM.
Post New Thread  Reply


Posting Rules
You may not post new threads
You may not post replies
You may not post attachments
You may not edit your posts

BB code is On
Smilies are On
[IMG] code is On
HTML code is On


All times are GMT +10. The time now is 06:28 AM.


Advertisements


AJOR does not vouch for or warrant the accuracy, completeness or usefulness of any message, and are not responsible for the contents of any message. The messages express the views of the author of the message, not necessarily the views of AJOR or any entity associated with AJOR, nor should any advice be substituted as technical advice replacing that of a mechanic. You agree, through your use of this service, that you will not use AJOR to post any material which is knowingly false and/or defamatory, inaccurate, abusive, vulgar, hateful, harassing, obscene, profane, sexually oriented, threatening, invasive of a person's privacy, religious, political or otherwise violative of any law. You agree not to post any copyrighted material unless the copyright is owned by you or by AJOR. The owner, administrators and moderators of AJOR reserve the right to delete any message or members for any or no reason whatsoever. You remain solely responsible for the content of your messages, and you agree to indemnify and hold harmless AJOR, the administrators, moderators, and their agents with respect to any claim based upon transmission of your message(s). The use of profile signatures to intentionally mislead or misdirect any member on this forum is not acceptable and may result in your account being suspended. Any trip that is organised through the AJOR forum is participated at your own risk. If you or your vehicle is damaged it is your responsibility, not that of the person that posted the thread, message or topic initiating the trip, nor the organisers of AJOR or moderators of any specific forum. This forum and associated website is the property of AJOR. No user data is harvested and no information supplied in your registration will be sold for profit.


Powered by vBulletin® Version 3.8.7
Copyright ©2000 - 2024, vBulletin Solutions, Inc.

AJOR © 2002 - 2024 AUSJEEPOFFROAD.COM. All corporate trademarked names and logos are property of their respective owners. Ausjeepoffroad is in no way associated with DaimlerChrysler Corporation or Fiat Jeep.
www.ausjeep.com www.ausjeep.com.au www.midlifemate.com ausjeepforum.com www.r9kustoms.com
vB Ad Management by =RedTyger=