Grand Willys Project - Page 277 - AUSJEEPOFFROAD.COM Jeep News Australia and New Zealand

Go Back   AUSJEEPOFFROAD.COM Jeep News Australia and New Zealand > JEEP GARAGE > Jeep build up
Register Forums Trading Your Jeep My Garage Mark All Read

Post New Thread  Reply
 
Thread Tools Search this Thread
  #1933  
Old 18-02-2022
BENAMON  BENAMON is offline
Established Member
 
Join Date: Aug 2008
Location: Gold Coast
Posts: 190
What Jeep do I drive?: JK
Likes: 23
Liked 29 Times in 26 Posts
Default

Great choice with the new mirrors, much prefer them over the others you had planned on using.
Likes: (1)
  #1934  
Old 18-02-2022
Gojeep's Avatar
Gojeep  Gojeep is offline
LokRinger
 
Join Date: Jul 2002
Location: Victoria
Posts: 6,870
Likes: 789
Liked 1,754 Times in 556 Posts
Default

Quote:
Originally Posted by BENAMON View Post
Great choice with the new mirrors, much prefer them over the others you had planned on using.
I'm glad I made the change too. I can see way more out of the review mirror than expected so could go to smaller sides ones. I'll add a small convex mirror to it like I do on all my vehicles as well later.
__________________
Cheers, Marcus.

My web site:
http://willyshotrod.com Over 5'000 Club
Likes: (1)
  #1935  
Old 11-03-2022
Gojeep's Avatar
Gojeep  Gojeep is offline
LokRinger
 
Join Date: Jul 2002
Location: Victoria
Posts: 6,870
Likes: 789
Liked 1,754 Times in 556 Posts
Default


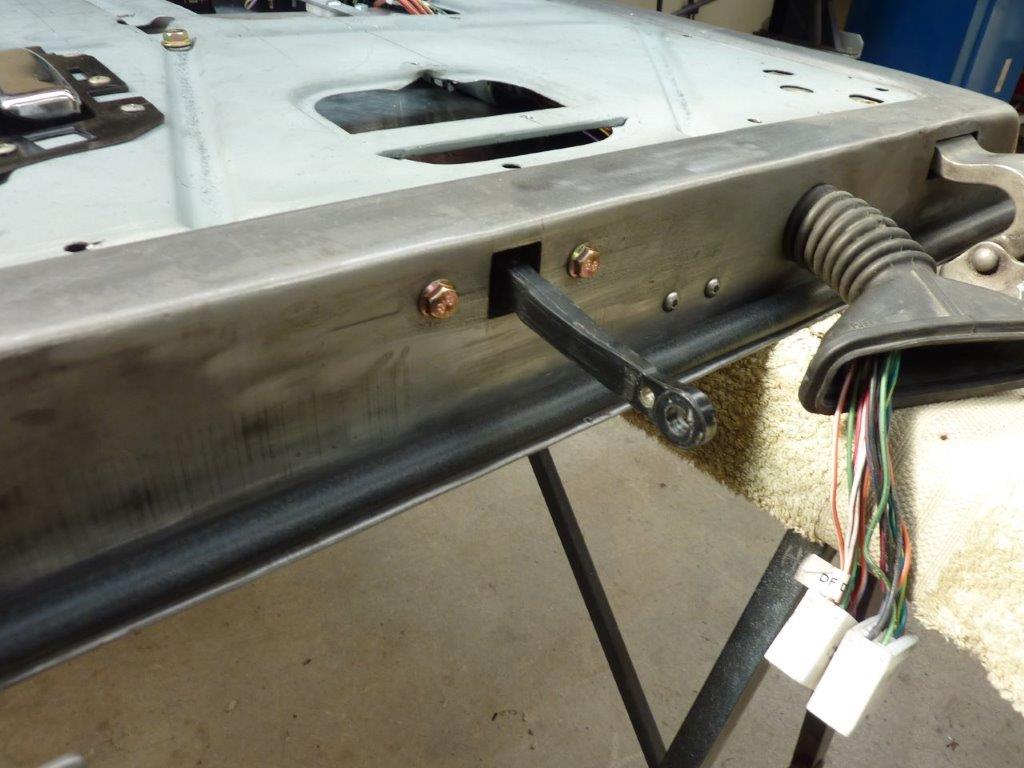
I always wanted a better setup than the leather check strap to stop the door opening too far. When you convert to one piece windows like I did, you run out of room where the stock one went. So spent several hours walking around a wrecking yard to find some that would fit between the glass and the side of the door instead. I was unsure of what length or shape I would need to make this work, so started with this one from a Kia Carnival.


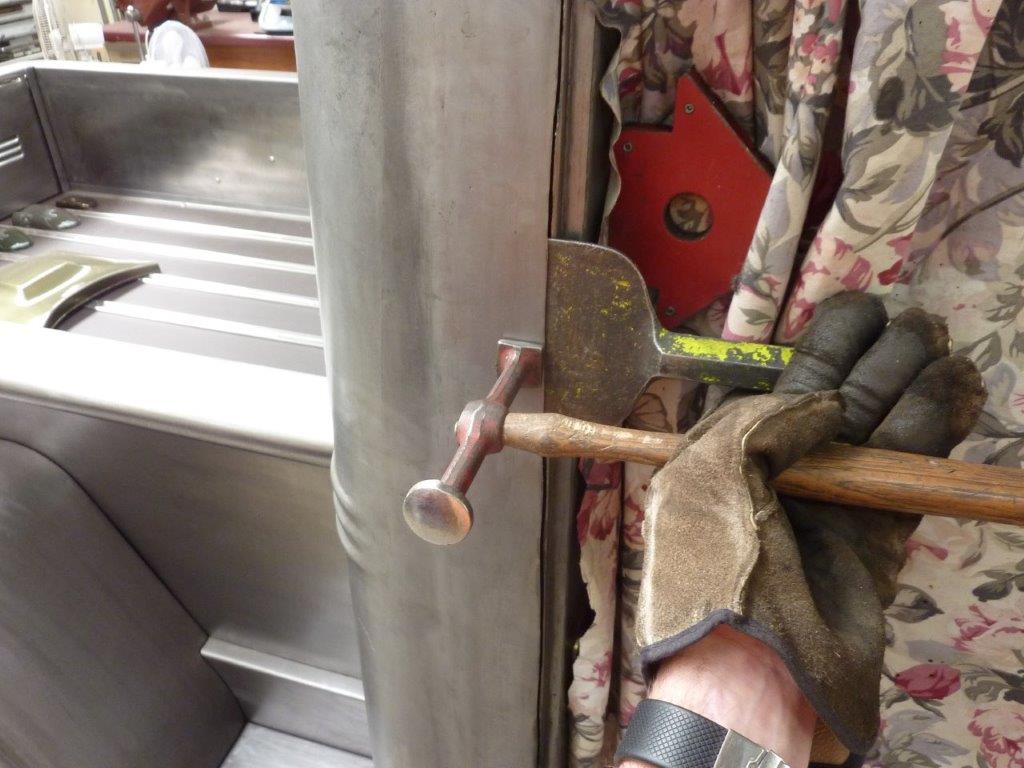
The stock check mounts have a bad habit of ripping out of the A pillar if someone lets go of a door on a side slope or a gust of wind grabs it suddenly. So I drilled and tapped some thick flat to take the mounting bolt. I drilled three holes. One for the bracket bolt and one above and below it for plug welding the piece in place once I had lowered it down on a magnet and secured it with the bolt.


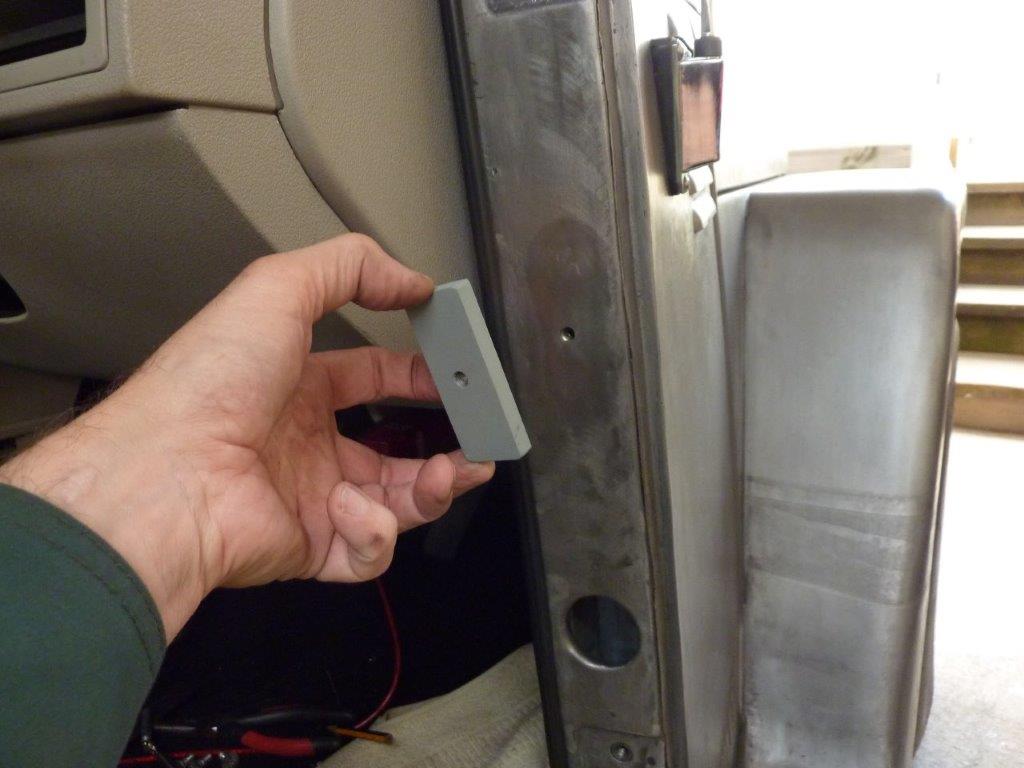
The check strap was way too long so just kept shortening it until the door opened the right amount. You can see also that it needed a curve in it to clear the glass as it was closing. I also made up a spacer from plastic to space it back further inside the door so the A pillar bracket could fit into the door when the door was closed.


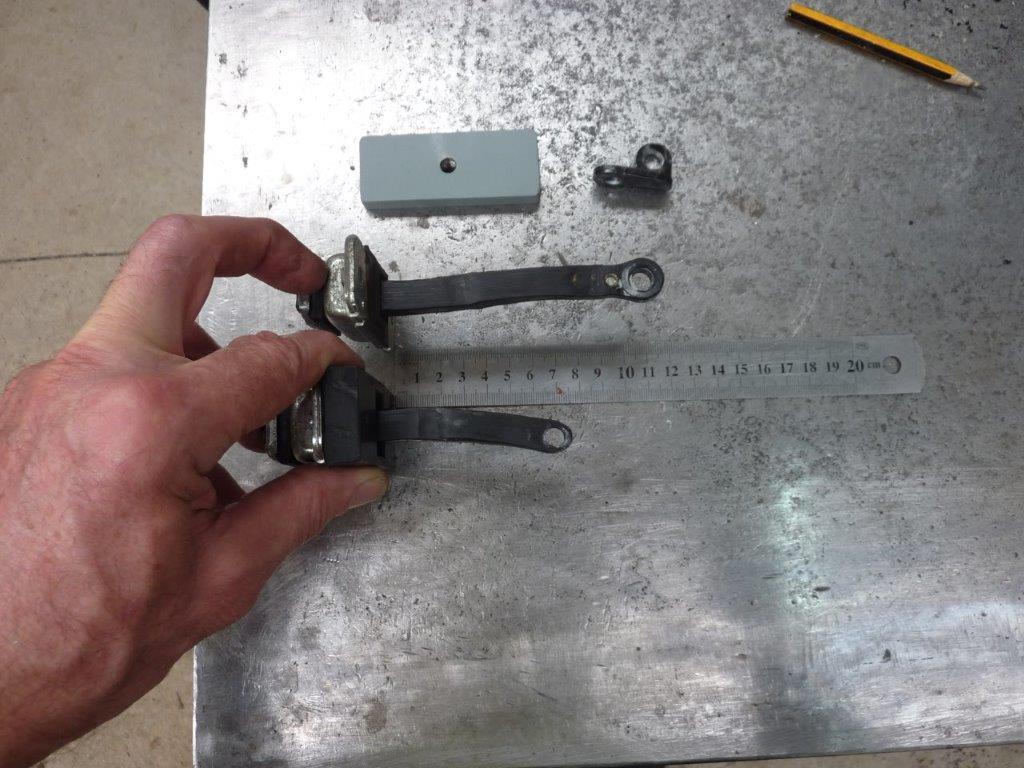
Because I had to shorten it, the end would be too weak to take the force of the door swinging too far as the hole was drilled in a much narrower section of the strap. So back to the wrecking yard and found that ones off a mid 90's Kia Reo had the right length and curve I needed. Also the same bolt spacing and width of housing.


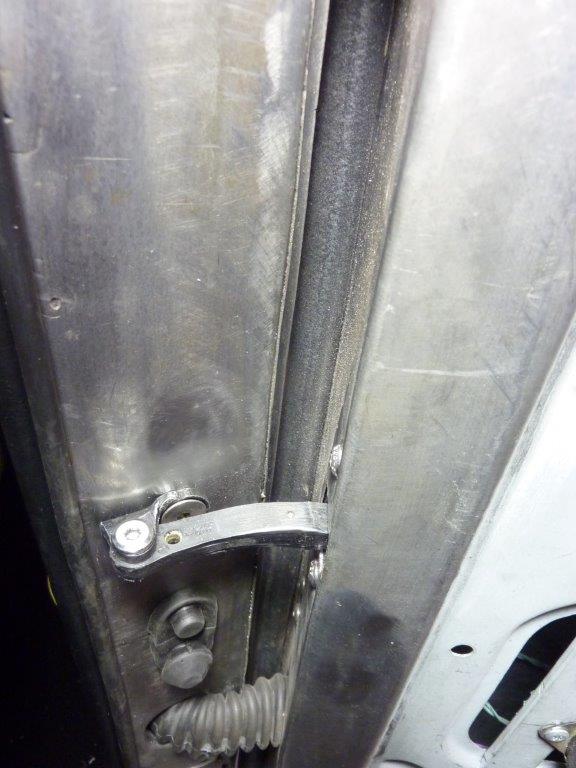
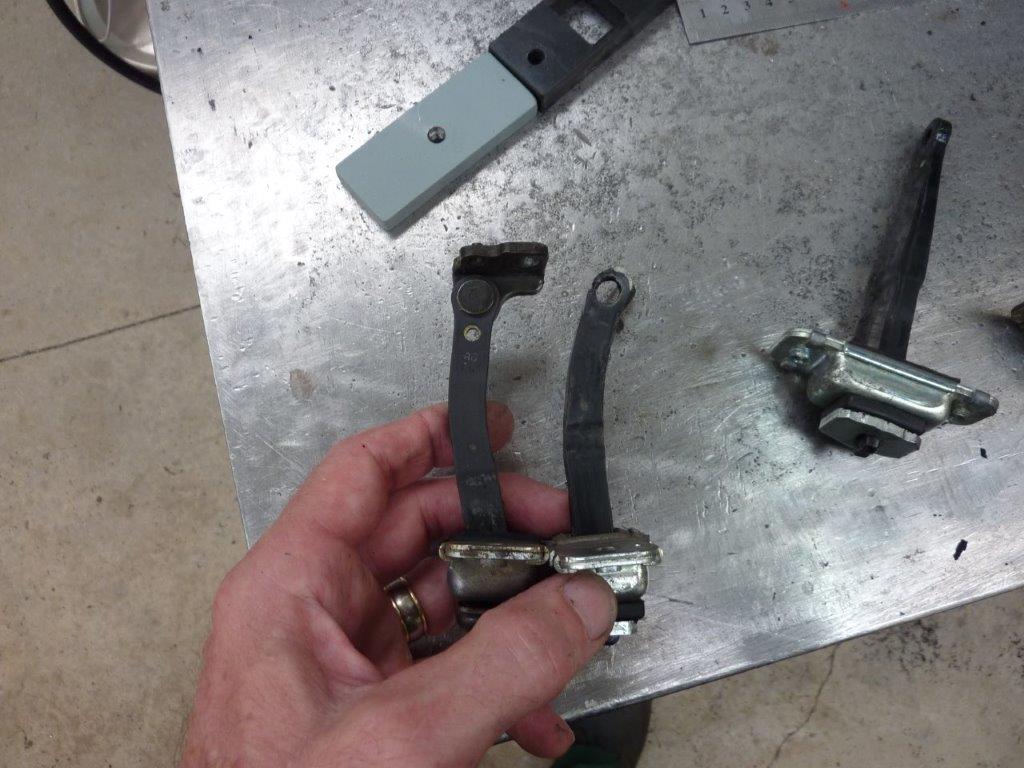
I changed the arm pin to a stainless barrel bolt so it makes removing the door easier. Also counter sunk the bracket to take a door hinge screw for clearance and used button head screws to hold the check strap in place. The biggest issue it solved also over using the leather strap is that now the door stays open!
__________________
Cheers, Marcus.

My web site:
http://willyshotrod.com Over 5'000 Club
Likes: (3)
  #1936  
Old 12-03-2022
Gojeep's Avatar
Gojeep  Gojeep is offline
LokRinger
 
Join Date: Jul 2002
Location: Victoria
Posts: 6,870
Likes: 789
Liked 1,754 Times in 556 Posts
Default


I don't often show this because people might think I'm mad. But I noticed that this door was sitting out more than the other side and moving the door latch pin inwards just made it hard to close.


Turns out that the return fold to the B pillar was 3mm-1/8" less on this side. Most would just smear filler over it but that is considered the limit for filler not to crack over decades of use.


So I got out the cutting wheel and cut the skin free from top to bottom and along the roof line and floor 50mm-2" as well.


Slipping a brick layers' bolster behind the skin and then hammer the edge. Not only remove the bend, but to stretch the edge the amount I think it will shrink when welding it all back together again filling the 3mm-1/8" gap. Years of knowing how much and hard to hit it to remove distortion after welding gives me a ball park feeling for it.


It came out much better than I started with little distortion. Was a risk as had no way of getting in behind the skin to do any stretching post welding.


Door sits as it should so it can stop annoying me now. It's no wonder this build takes forever as do this quite often going back over old work when I know I can do it better now.
__________________
Cheers, Marcus.

My web site:
http://willyshotrod.com Over 5'000 Club
Likes: (5)
  #1937  
Old 13-03-2022
bodgie's Avatar
bodgie  bodgie is offline
Rock Munki
 
Join Date: Aug 2009
Location: Castle Hill, NSW
Posts: 2,136
What Jeep do I drive?: WG
Likes: 11
Liked 300 Times in 245 Posts
Default

Quote:
I don't often show this because people might think I'm mad.
I don't think anyone here would think you're mad, just Marcus, a man who likes a job done properly.

This minor detail looks much better in my opinion.
Likes: (2)
  #1938  
Old 13-03-2022
SeaComms's Avatar
SeaComms  SeaComms is offline
MonsterMoose
 
Join Date: Jun 2010
Location: Noosa QLD.
Age: 58
Posts: 7,940
What Jeep do I drive?: WK2
Likes: 1,432
Liked 809 Times in 466 Posts
Check out my Ride(s)
Default

It's looks so easy when post up a couple a photos and a quick blurb about it. How long did that actually take?

Sent from my SM-N975F using Tapatalk
__________________
Cheers, Dave :)

2010 JK, then a 2015 KL Trailhawk, now a 2017 GC Trailhawk!

Over 5000 Club
Likes: (1)
  #1939  
Old 13-03-2022
Gojeep's Avatar
Gojeep  Gojeep is offline
LokRinger
 
Join Date: Jul 2002
Location: Victoria
Posts: 6,870
Likes: 789
Liked 1,754 Times in 556 Posts
Default

Many thanks for all the comments guys.

Quote:
Originally Posted by SeaComms View Post
It's looks so easy when post up a couple a photos and a quick blurb about it. How long did that actually take?

Sent from my SM-N975F using Tapatalk
Took a good 4-5 hours to complete from start to finish.
Some of that was because I was improving the gap at the same time so made the gap bigger to fill and go over to weld up any low spots on the edge.
__________________
Cheers, Marcus.

My web site:
http://willyshotrod.com Over 5'000 Club
Likes: (2)
Post New Thread  Reply


Posting Rules
You may not post new threads
You may not post replies
You may not post attachments
You may not edit your posts

BB code is On
Smilies are On
[IMG] code is On
HTML code is On


All times are GMT +10. The time now is 03:04 PM.


Advertisements


AJOR does not vouch for or warrant the accuracy, completeness or usefulness of any message, and are not responsible for the contents of any message. The messages express the views of the author of the message, not necessarily the views of AJOR or any entity associated with AJOR, nor should any advice be substituted as technical advice replacing that of a mechanic. You agree, through your use of this service, that you will not use AJOR to post any material which is knowingly false and/or defamatory, inaccurate, abusive, vulgar, hateful, harassing, obscene, profane, sexually oriented, threatening, invasive of a person's privacy, religious, political or otherwise violative of any law. You agree not to post any copyrighted material unless the copyright is owned by you or by AJOR. The owner, administrators and moderators of AJOR reserve the right to delete any message or members for any or no reason whatsoever. You remain solely responsible for the content of your messages, and you agree to indemnify and hold harmless AJOR, the administrators, moderators, and their agents with respect to any claim based upon transmission of your message(s). The use of profile signatures to intentionally mislead or misdirect any member on this forum is not acceptable and may result in your account being suspended. Any trip that is organised through the AJOR forum is participated at your own risk. If you or your vehicle is damaged it is your responsibility, not that of the person that posted the thread, message or topic initiating the trip, nor the organisers of AJOR or moderators of any specific forum. This forum and associated website is the property of AJOR. No user data is harvested and no information supplied in your registration will be sold for profit.


Powered by vBulletin® Version 3.8.7
Copyright ©2000 - 2024, vBulletin Solutions, Inc.

AJOR © 2002 - 2024 AUSJEEPOFFROAD.COM. All corporate trademarked names and logos are property of their respective owners. Ausjeepoffroad is in no way associated with DaimlerChrysler Corporation or Fiat Jeep.
www.ausjeep.com www.ausjeep.com.au www.midlifemate.com ausjeepforum.com www.r9kustoms.com
vB Ad Management by =RedTyger=