 How do I chop big holes in your Pride and Joy?
I chose the Airflow snorkel. When you go to purchase your new snorkel there are several types that you can get, and they are, Safari, an Airflow, and Airtek, with the Safari being sold through ARB and the Airtek being sold through TJM, and Airflow being distributed through Gaonnawhere.
The main differences are; the ARB travels inside the guard to in front of the airbox and the Airflow goes straight through the outer and inner guards entering into the side of the airbox and this is where the fun begins.
Weapons needed to affect the installation of either snorkels are:
Lots of nerve (after all you are about to cut several bloody big holes in your pride and joy)
A good quality 3 inch diameter hole cutter (approx $70.00) for cutting steel or alternatively a jig saw fitted with a metal blade (24tpi)
Sealant (sikaflex is the best)
Black electrical tape (several rolls)
50mm wide masking tape (low tack is easier to remove)
Drill and assorted drill bits
Pop Rivet gun and rivets to suit
Assorted Screwdrivers and spanners
A set of car ramps (found that they made life easier)
Nerve tonic
Comfy chair, and if you are of a nervous disposition give your Jeep to someone else to do. After all what you do not know will not hurt you.
First thing to do is make sure that inside passenger wheel arch is clean I went in there clean and came out brown (I went with Paul Kelly to Wombat Forest on the Saturday before Easter).
I sprayed all the wheel flare bolts with CLP Break free then went and had a coffee, so that when I came back all the nuts came off easily (10mm ring spanner) then I removed all the trim buttons that hold the inner skin to the metal on the wheel arch.
Next was to remove the monster washer bottle from the cavity couple of clips and two small bolts and it was ready to come out (Be smarter than me empty it first) unplug the electrical wires and plumbing from the bottle and put it to one side.
Next step is to get out that pattern and tape it to the side panel ensuring that it is correctly aligned (I covered the whole area in 50 mm masking tape first as it helps protect the paint work), tape pattern in place then go sit down and read the instructions again, get a coffee and contemplate what sacrilege you are about to commit on your pride and joy.
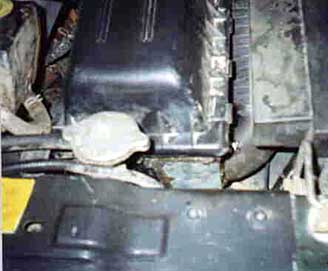
When you stop shaking as you pick up the drill and rest the bit against the mudguard that first time (Put drill down, step away and re read instructions). Reciting Sheppard's Prayer (you know how it goes! "Oh Lord Please don't let me Screw up Now") Working up the nerve I changed over to a mounting hole sized drill bit and taking deep breath I rested the bit against the mark and pressed the trigger, hell after that first hole all the rest of the holes were a piece of cake until it comes time to cut a 3 inch chunk out of that guard (scary stuff) but as they say "Damn the torpedoes, full steam ahead" so I changed over to that massive hole cutter and taking another deep breath (seemed to do a lot of deep breathing in that short space of time) and cut a huge chunk of metal ( and I mean a lump of metal that hole would have swallowed a cow) out of my guard. Then I had to do the same on my inner guard got the hole saw into the area and found out that it would not work in that area (too many lumps and bumps) what to do, this time I had a coke and rum though for all of thirty seconds got a small drill bit and cold chisel out and marked where I wanted hole, drilled lots of little holes in inner guard and joined them all up using cold chisel and large blacksmiths hammer (not neat but hey it works) Bolted up snorkel (looking good) and could not resist had to put hat on it to drool and pat myself on the back.
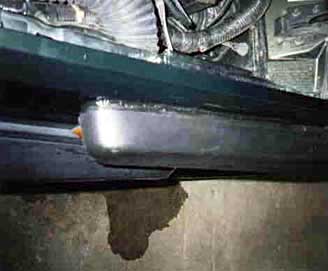
I then filed and painted all the cut surfaces with black Kill Rust and used the sealant to seal up along the top and round the front edge of snorkel leaving bottom open to allow any moisture to drain away,(do not forget to remove the temporary masking tape protecting your paint work). I then put the inner skin back on inside the guard and rolled Jeep of the ramps. Next I unwrapped the wiring loom to enable me to pull back the washer system wiring and hoses to a point behind where the inlet tube came through, and then re wrapped the loom.
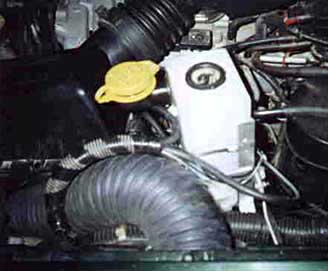
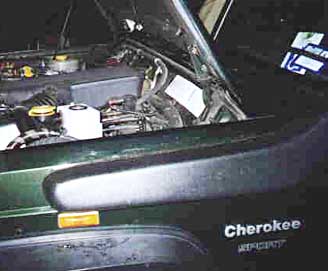
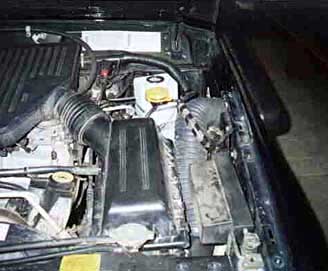
Then I set about removing the airbox from its location and figured out just where I cut the hole and fit the 90 degree elbow into it. Placing the elbow into the airbox I then temporarily refitted the airbox to ensure right alignment and removed airbox once again and then sealed inlet tube into place. Then went for a stiff drink while sealant went off. Having already cut off original intake snout, I then sealed the blanking plate over the intake and made sure it stayed by the addition of six pop rivets, after all the whole idea is to stop anything coming in through the original intake point.
While the sealant was curing I went looking round the Auto shops looking for a replacement washer bottle that would fit into the tiny space left to me on the passenger side, I settled for a vertical bottle. On returning I found that the goop had gone off so I fitted intake hose to airbox and re fitted it into jeep ensuring that existing wiring looms were tucked out of the way then connected the snorkel and the intake hose together, now almost finished, just a matter of drilling two more holes (in front pillar) to hold the top bracket to pillar, then two screws and one small bolt and all is done.
I wanted to have both the front and rear washer working, this is easy to do just ensure that you do not cut the holes too big. I pulled one pump out of the original bottle along with the low water sensor (ensure that the pump you take out of original bottle has the different wiring plug to the pump that comes with new bottle) I put the pumps on opposing sides and the low level float into one end. I had to fabricate a mounting frame for it and then when fitted and hooked up everything it all worked but found that the filler neck was rubbing on underside of bonnet so off with filler neck ( my original washer bottle had a plug in a hole in the top and it fitted into the cut down top) and out with Stanley knife to cut another hole in side of the bottle to take the original filler neck so that cap on it is only 10mm above top of the bottle, now no worries everything works.


 XJ Cherokee
 HG Premier

